 FREE 1 to 3-Day Delivery on Orders $119+ Details
Best Sellers


Mustang CDC Lightbar ('94-'04) - Installation Instructions
Installation Time
4 hours
Tools Required
- 7mm Socket
- 10mm Socket (94-02 Rear Seat Removal)
- 18mm Socket (03-04 Rear Seat Removal)
- Socket Wrenches to Fit Sockets Listed Above
- Socket Wrench Extension (3 inch)
- T-25 Torx Bit
- T-45 Torx Bit (CDCs instructions state T-50, but T-45 is whats needed for the 2000 GT seat belts)
- 1/4 Allen Wrench
- Drill
- 1/8 Drill Bit
- 19/64 inch, 13/32 inch Drill Bit (For 99-04 Seat Belt Modification)
- 3/4 Hole Saw
- 1 Hole Saw
- 1 3/4 Hole Saw
- Interior Trim Panel Tool (Fork Tool)
- Center Punch
- Hammer
- Wire Crimper
- Flathead Screwdriver
- Pop Rivet Tool
- Pliers
- Utility Knife
- Putty Knife (or something Similar)

Shop Parts in this Guide
Installation
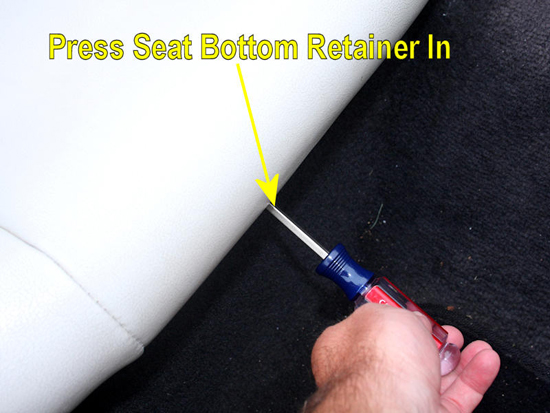
1. The first step is to get the rear seat out of the way. Start with the seat bottom. Find the retainers; they are about halfway between the middle of the seat and the side of the seat bottom. There’s one on each side of the seat bottom, and use a flathead screwdriver to release the seat.
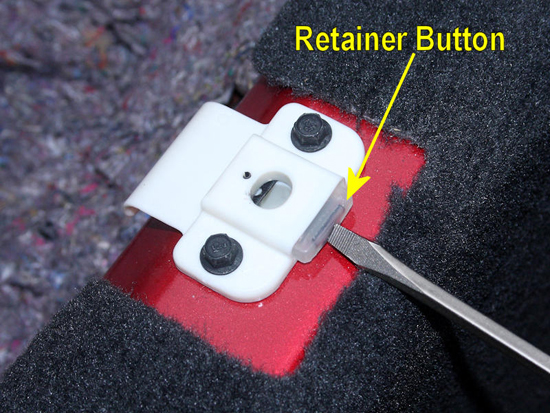
2. It’s easy to see how the retainer operates once the seat bottom is removed. You’ll push the plastic button in with the head of the screwdriver.
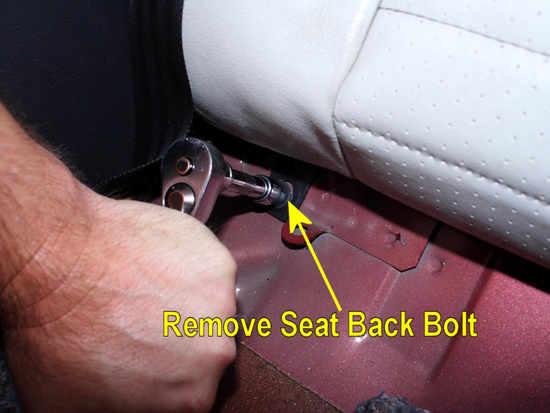
3. Use a 10mm socket (99-02), 18mm (03-04), to remove the seat back bolts. There are two bolts holding the seat back in place, one at each lower corner of the seat back.
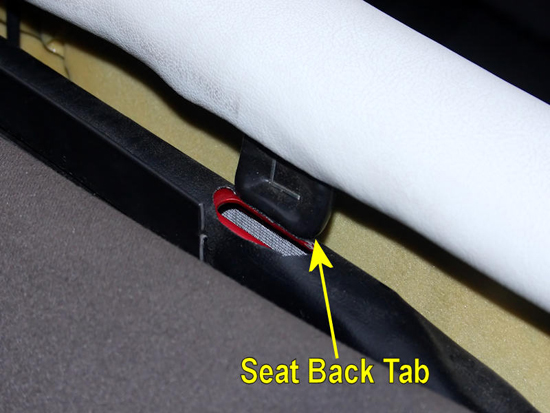
4. At both top corners of the seat back, there’s a tab that fits into the car. Pull up on each side of the seat back to free these tabs.
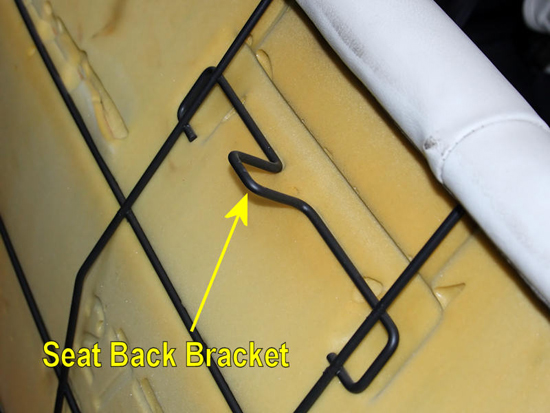
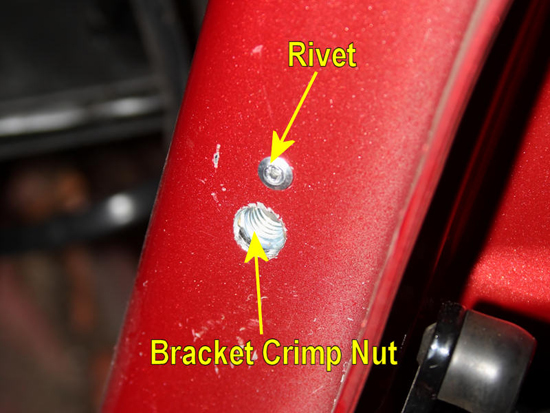
5. The middle of the seat back is held by a bracket that fits into the car. Once the tabs are free, push the seat back down to free it from the car.
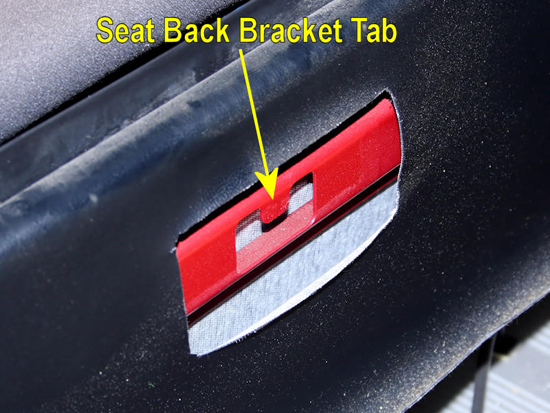
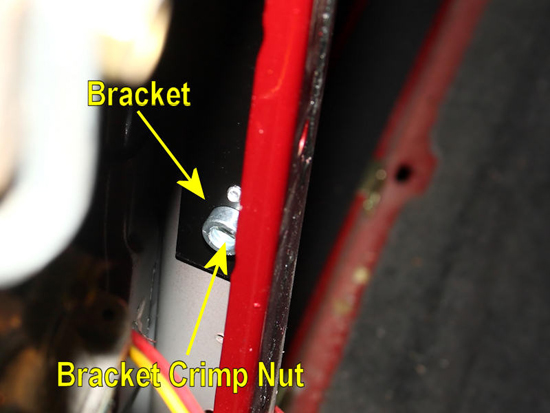
6. With the seat back removed, you can see the tab that secures the bracket on the seat.
7. Now that the rear seat is out of the way, all of the trim panel pins can be accessed and removed. The first two for each panel were hidden by the seat back. Using a trim panel pin removal tool, remove the plastic pins.
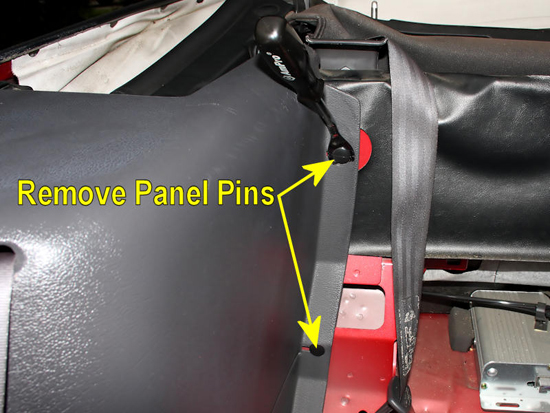
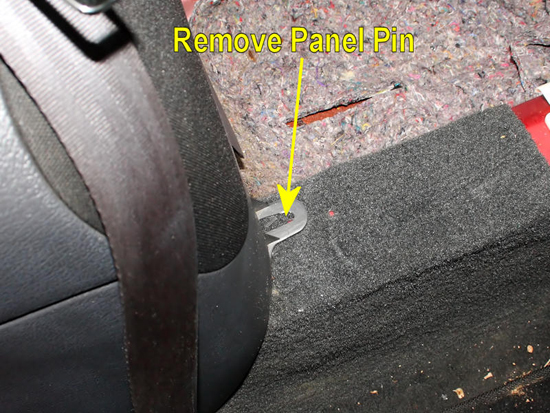
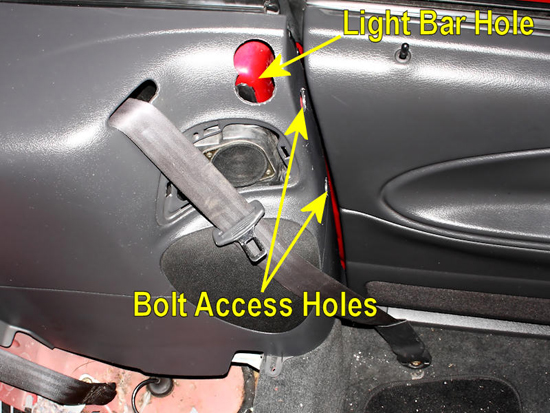
8. There is also a pin that secures the panel right under where the front of the seat bottom was located. In my case, since the car was used, these were missing.
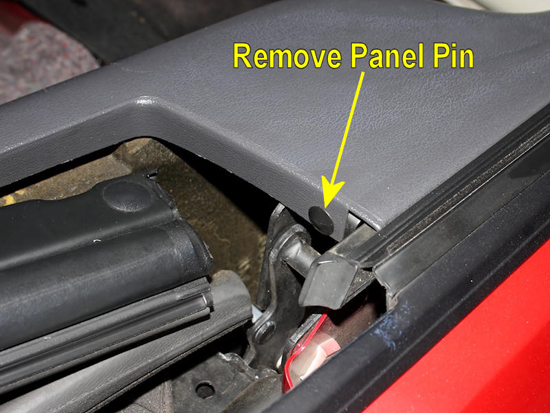
9. A panel pin removal tool will make quick work of removing the last large pin found where the top folds.
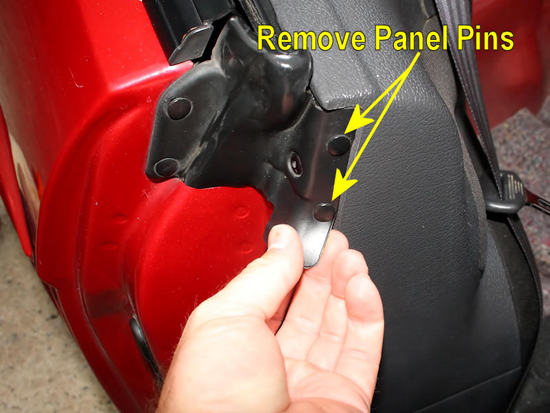
10. There are two smaller pins that hold the panel at the upper edge of the door frame. You can free these pins by gently pulling on the rubber trim until they are loose.
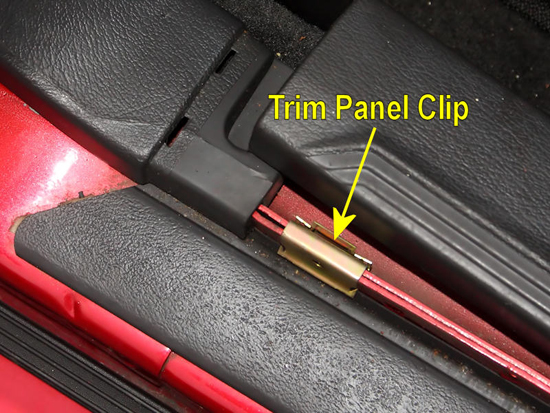
11. After the pins are removed, you’ll need to pull up the trim panel that runs along the bottom of the door. You can simply pull this panel up to free it. The metal clips may stay attached to the car, or they may stay on the trim panel. Where they remain is not a concern, as long as you remove the trim panel which frees up the rear side panel you are working to remove.
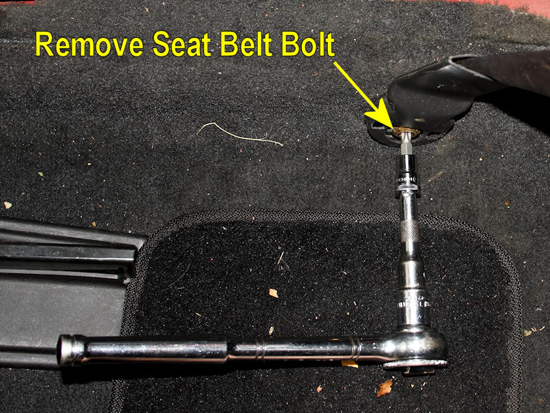
12. Use a T-45 Torx bit and socket wrench to free the end of the seat belt from the car.
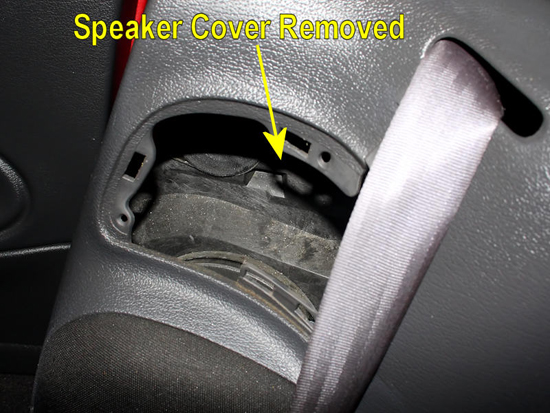
13. To pass the belt through the panel you’ll need to remove the upper speaker cover. Carefully push it out from behind the panel, don’t pry it from the front as you may break the clips that hold it in place.
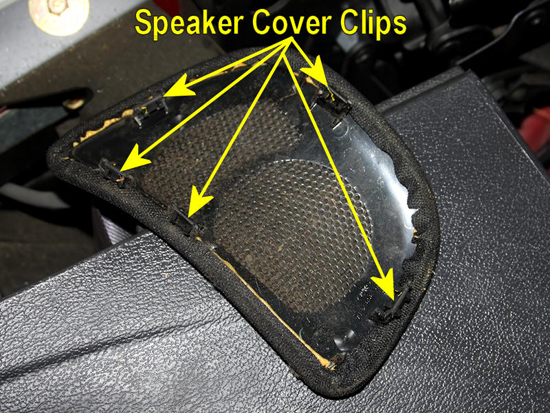
14. With the speaker cover removed, you can see all of the clips you need to press out of the interior panel
15. The last step is to slide the plastic cover that closes the slot between the seat belt gap and the speaker hole. Once removed, you can pass the end of the seat belt through the speaker hole.

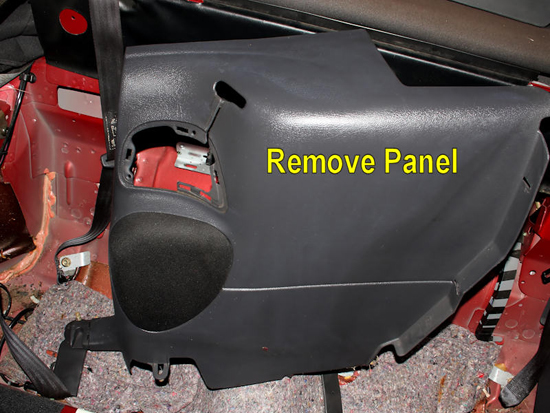
16. At this point, you can finally remove the side panel from the car. Use the exact same procedure on the opposite interior side panel.
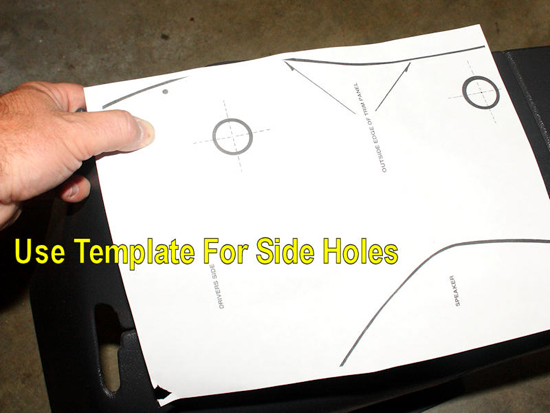
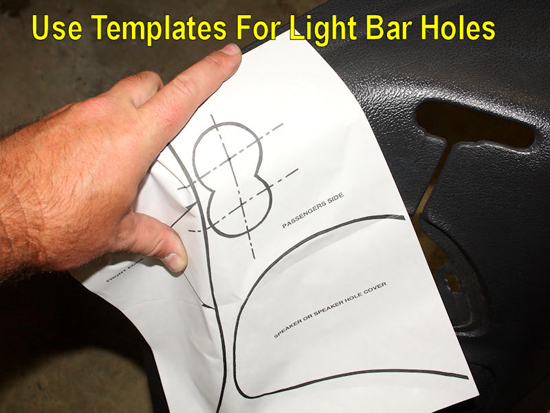
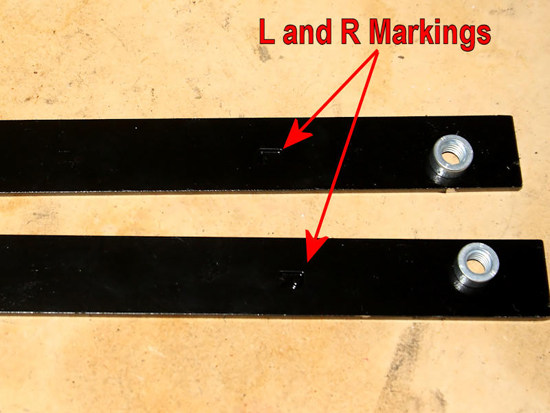
17. You’re now at the point that will make most people nervous. So take your time, and check your templates to ensure you’re using the correct one for each side. They are marked driver and passenger sides, and have markings on them that line them up with the panels to ensure you are placing the holes correctly. CDC has done an excellent job of helping you modify the panels. All that you need to do is to take your time, and double check your work as you progress. Start by lining up your template for the holes in the side panel.
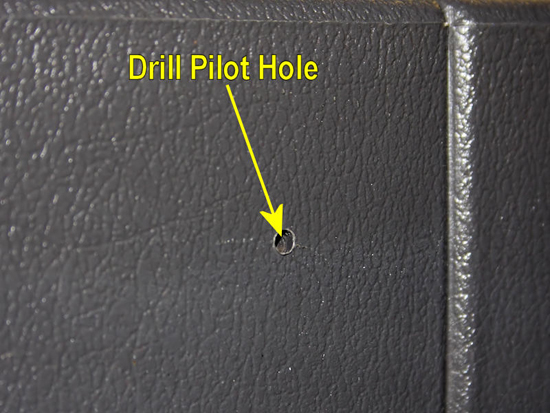
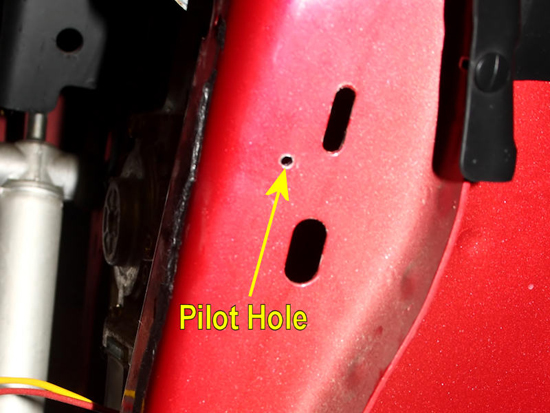
18. Use a punch, or something similar, to mark the hole through the paper. Then drill a small pilot hole with the 1/8 inch drill bit. The small hole will keep the inner bit of your hole saw steady when you use it.
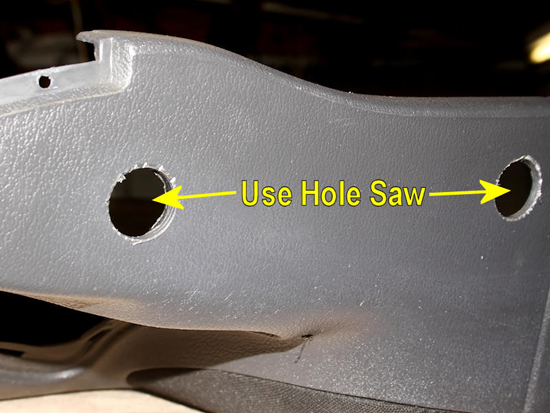
19. Once the pilot holes are made, follow up with the 1 inch hole saw. CDC’s directions state drill from the inside out, but I felt I could hold the drill steadier drilling from the outside of the panel to the inside. Clean up and remove any excess plastic left by the hole saw with a utility knife.
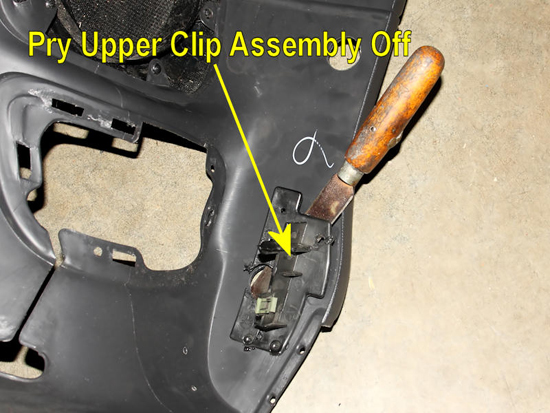
20. Use a putty knife, or similar tool, to pop loose the upper mounting clip assemblies from the inside of the interior panels. Alternatively, you can do this step before drilling the holes. I just find they pop off easier after the drilling process. The assembly will pop loose with minimal effort, as they are only attached in a few spots. These clips will no longer be used, as the holes in the car’s body that they slid into before will be covered by the bracket that secures the light bar.
21. Next, switch templates to mark the locations for the holes for the light bar to slide into. Use the same method as before, punch through the paper to make a mark on the panel and then use the 1/8 inch bit to make pilot holes.
22. After the pilot holes are made, follow up with a 1-3/4 inch hole saw to make the final holes. If desired, clean the holes up and make it a large oval.

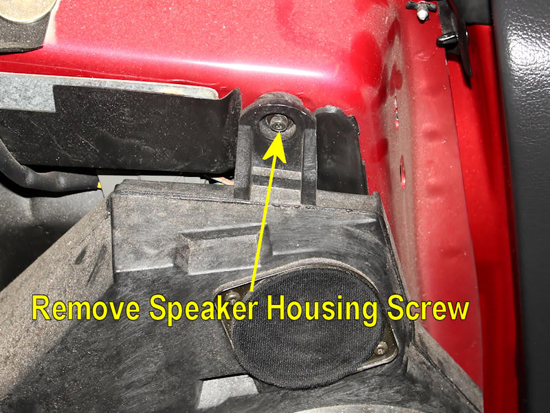
23. Now, set the panels aside. It’s time to focus back on the car again. To install the light bar brackets you’ll need to drill a few holes. However, first the rear speaker assemblies must be removed for access. There are three screws you’ll need to remove with a 7mm socket. The first to be removed is at the top of the assembly.
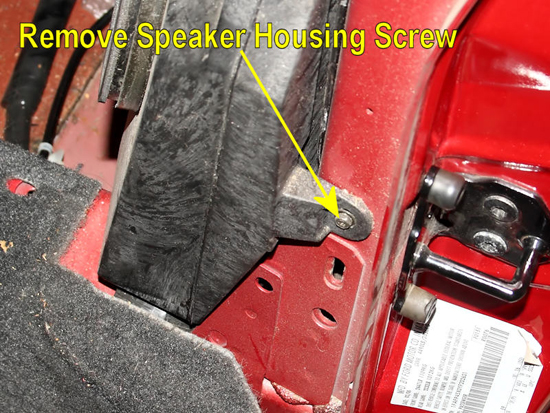
24. Next find the one on the side of the assembly, near the door latch, and remove it.
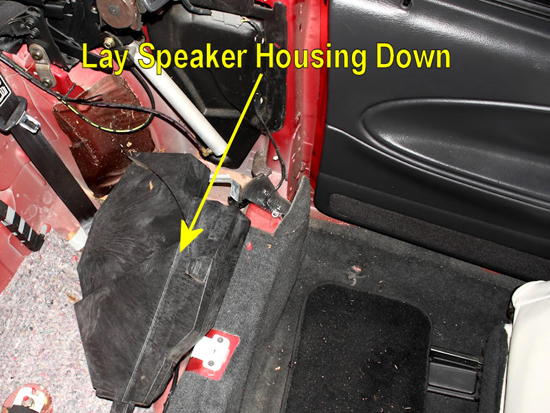
25. Once you remove the last screw, that attaches the metal bracket to the car, the speaker assembly should be free.

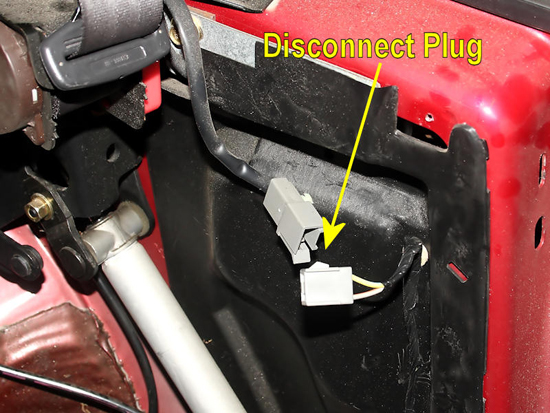
26. You can simply lay the speaker assembly down, out of the way.
27. If you prefer to remove it from the car entirely, while you’re working on it, simply disconnect the two plugs at the lower end of the assembly.

28. To gain access to the rear window area of the car, you’ll need to also remove the plastic cover that resided behind the speaker assembly. First unplug the connection to the power window motor.
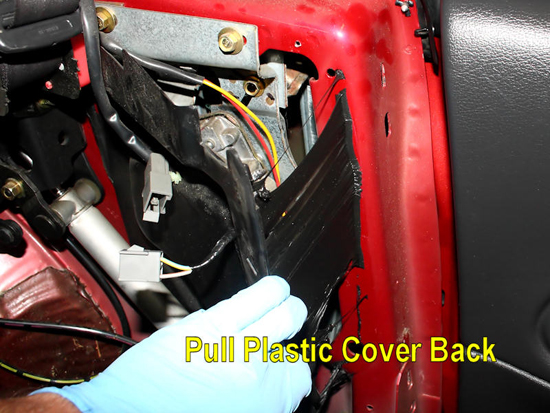
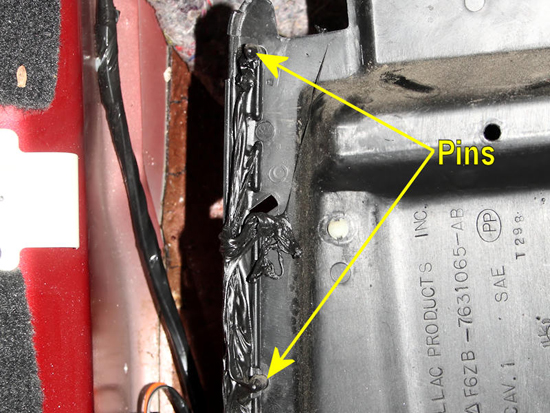
29. Then simply pull the plastic panel back. There are two small positioning pins on the plastic panel, but they don’t offer any real resistance to removal. The black sealant is really what holds the panel in place. It’s sticky so a pair of disposable gloves, while not required, comes in handy for this task. You don’t need to clean up the sealant after removing the panel, as it will be reinstalled back into place later.
30. With the plastic panel removed, you can see the positioning pins. They’ll help assist you when reinstalling the panel later.
31. The light bar brackets are marked, so you know which one is used on which side. Make sure to check these markings while working with the brackets, as using the correct one is very crucial throughout the next steps.
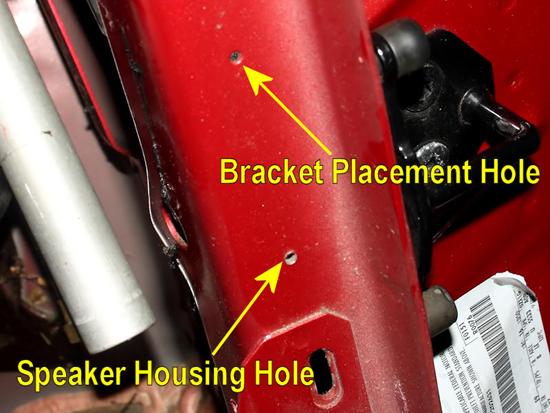
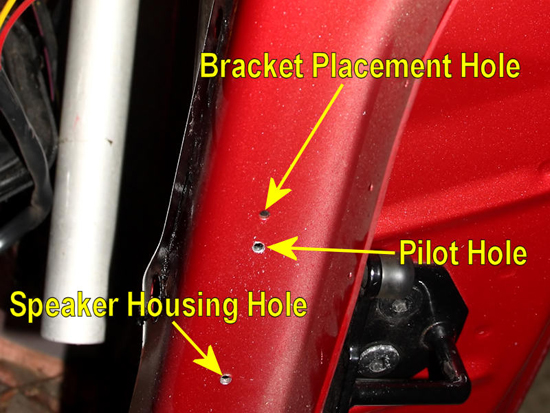
32. You’ll find an unused factory hole, near the door latch, just above the location where the speaker assembly mounted. This will serve as a placement hole to position the light bar bracket.
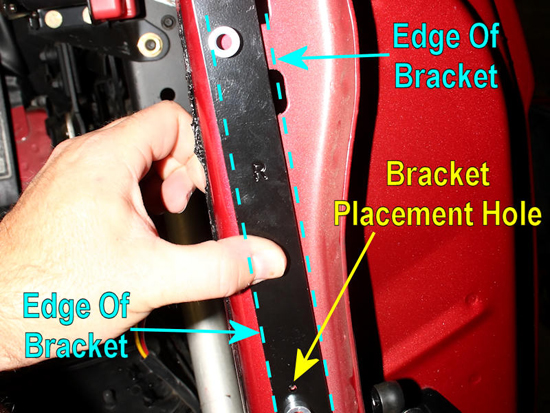
33. Using the bracket for the OPPOSITE side of the car, place the hole for the bracket over the placement hole. Since the bracket will be mounted on the backside of where we’re marking, the use of the opposite bracket will put the holes in the correct place. The silver crimp nuts are offset on the bracket, and should be closer to the inside of the car. When mounting the bracket, a rivet will pass through the holes in the bracket and the car to hold them together. Line the bracket up parallel with the inner edge of the car’s body, as demonstrated by the blue lines which indicate what the final position of the bracket should be. The bracket will cover up most of the elongated holes at the top of the bracket, which is the reason the upper clip mounting assemblies were removed from the inside of the body panels earlier.
34. Mark the holes through the crimp nuts, and then use a punch to make a small dent to help start a drill bit. Then follow up with a 1/8 inch drill bit to create a pilot hole.
35. Follow the same procedure for the top of the bracket as well. Then you’ll use a larger drill bit to enlarge both holes to their necessary size for the light bar hardware. CDC recommends the use of the ¾ inch hole saw here, but I chose to make the hole just big enough for the bolt that will pass through it. Make sure to mark and drill holes for both sides of the car before moving on to the next step.
36. Now, using theCORRECTbracket for each side, place it inside the window well of the quarter panel. The plastic panel removed earlier covered this area, but with it removed there is plenty of room to allow the bracket to be held into place. Use a rivet, from the outside of the panel, to secure the bracket in place once you get it positioned. Make sure the bracket is held tightly by the rivet once you install it. The holes you drilled earlier should allow you to thread the supplied bolts into the crimp nuts on the bracket. It’s a good idea to test the bolts before moving on, if you used a smaller hole like I did, as you want to ensure everything is lined up well before installed the actual light bar. Once test-fitted, remove the bolts and set them side.
37. From the inside of the window well, you can see the bracket. The crimp nuts should face the rear of the vehicle, and the bracket should fit flush against the cars body.
38. Now you can reinstall the plastic panel over the window well, the speaker housing, and the body panel. The sealant found around the plastic panel should still properly seal it up as it was before, holding it in place. Go ahead and replace the panel pins, seat belt, and plastic trim at the bottom of the door.
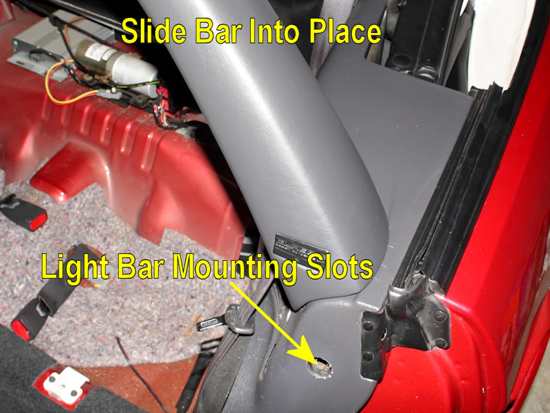
39. With both of the brackets installed, and the rear body panels in place, it’s time to install the light bar. This is accomplished easiest by two people, although a single person can do it if the need arises. The metal bar on the light bar assembly will slide in the gap between the body panel and the car body. Push the light bar completely into place against the body panels. You should see the slots in the bar line up with the holes drilled earlier for the crimp nuts on the light bar brackets.
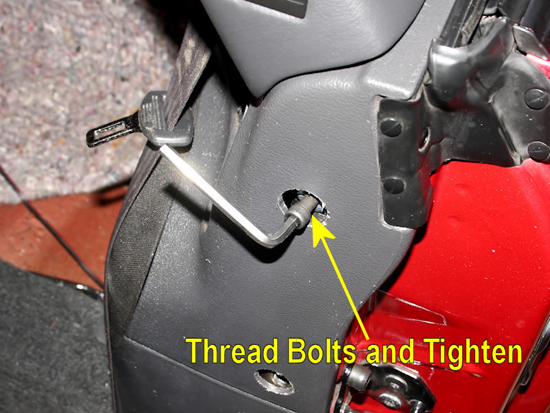
40. Using a ¼ inch Allen wrench, and thread the supplied bolts into place. I’d recommend against using threadlock, so you can remove the bar easier later should the need arise for maintenance of speaker or window components.
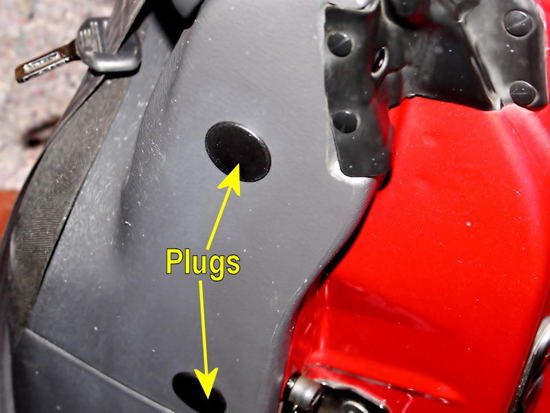
41. To hide the holes created for the mounting bolts, press the plugs supplied by CDC into place.
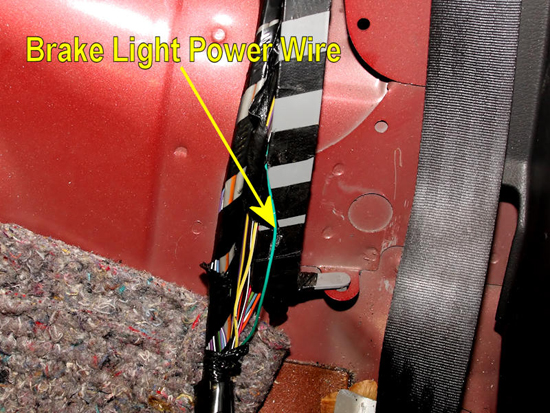
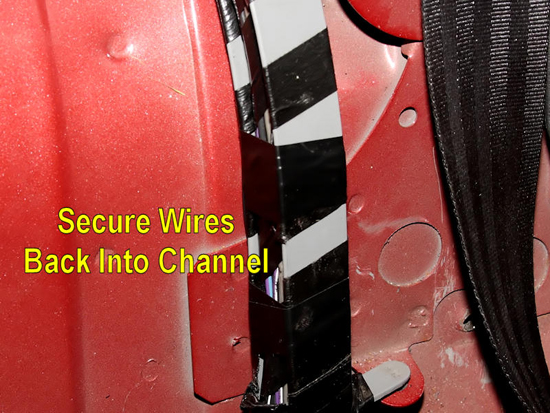
42. If you want to wire the light bar straight to the braking system, you can use the supplied electrical hardware. First remove the cluster of wires found in the channel under the rear seat, on the driver’s side of the car. You want to find the wire that supplies 12 volts to the third brake light, when the pedal is pressed. You can look at the third brake light in the trunk to help determine which two wires are routed to the light, and then use a volt meter to determine which wire carries the voltage. The color of the wires will vary between the various models. In a 2000 Mustang this should be the green wire. This is the wire you’ll connect the red-striped wire from the light bar to.
43. Press a darker blue clip over the wire, and press the metal clip into it. Use pliers if necessary. Then crimp the lighter blue plug onto the light bar’s wire with a wire crimping tool. You can then plug the two connectors together to establish the connection. Use the same procedure for the solid black wire from the light bar, connecting it to the black ground wire found in the cluster of wires.

44. Secure the wires back into the channel, and rewrap the channel with electrical tape to hold them into place. Keep in mind that wiring the light bar in this manner means that the brake light in the bar will work with the convertible top raised or lowered. If you prefer for the bar’s light to only function when the top is lowered, you will want to order the Splice-in Light Bar Switch, American Muscle Part #99022, and install it between the light bar and the car’s brake light.
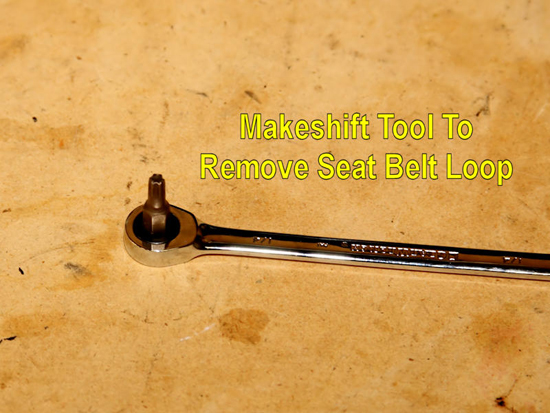
45. Now, the final task is to modify the seat belt loops, as they will damage the light bar’s finish if left stock. At this point, I deviated from the included instructions slightly. I did not have a suitable tool that worked to slide down into the seat to disengage the headrest. After raising the headrest as far as it would go, I was able to remove the outer screw with a T-25 Torx driver. For the inner screw, I used a T-25 Torx bit and a ¼ inch wrench to turn it. This procedure enabled me to remove the two screws that held the belt loop to the seat without the need to remove the headrest.
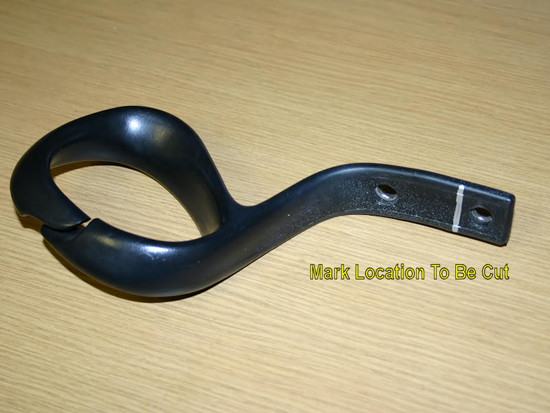
46. Once the belt loops are removed, mark them for cutting as indicated by the included template.
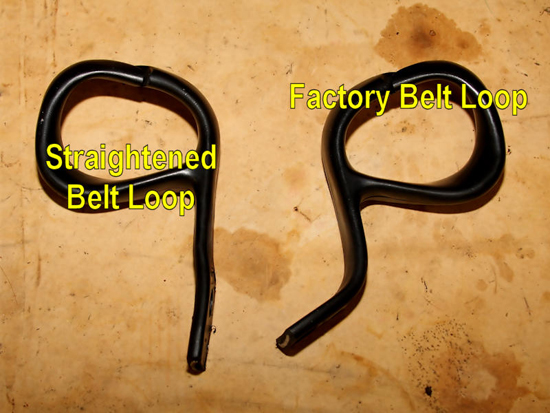
47. After the loops are cut, straighten the extension out as flat as possible.
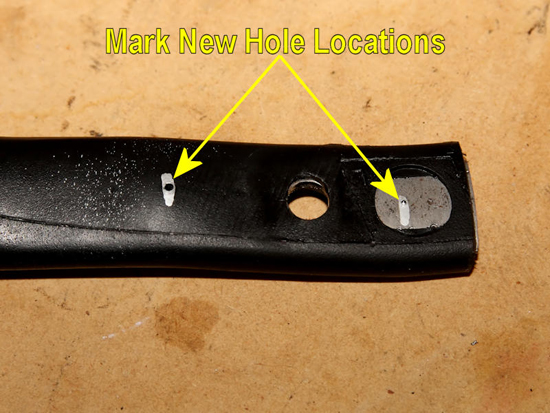
48. Using the supplied template again, mark the locations for the new holes, then punch indentions into the loop to help start your drill bit.
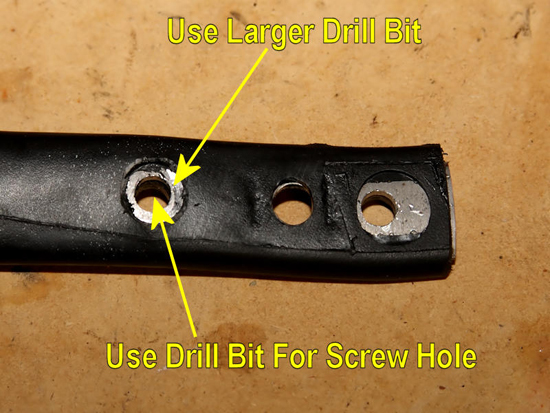
49. Use a 13/32 inch drill bit to clear out the plastic around the location for the hole furthest away from the end. Then use a smaller 1/8 inch bit to create a pilot hole, and follow it up with a 19/64 inch drill bit to make the actual hole for the mounting screw to pass through.
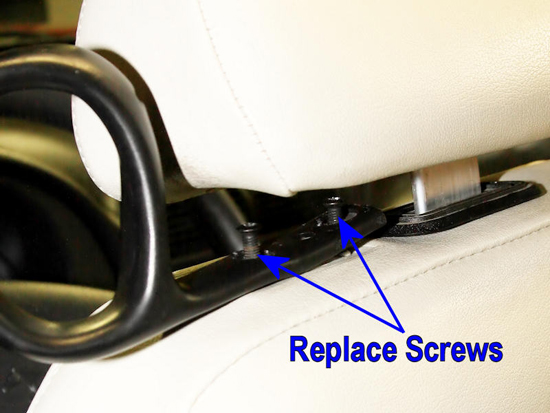
50. Remount the seat belt loop onto the seat, and replace the screws.
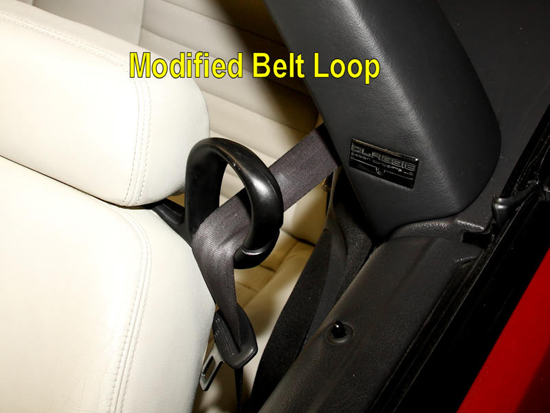
51. The seat belt loop should now clear the light bar when the seat is fully back and reclined. If it doesn’t, bend the loop slightly as necessary.
52. With the installation complete, reinstall the rear seat and then head out to enjoy your newly remodeled convertible Mustang!
Installation instructions provided by AmericanMuscle customer Eric Hege 7.6.09.
