 FREE 1 to 3-Day Delivery on Orders $119+ Details
Best Sellers


How to Install RedLine Tuning Hood QuickLIFT PLUS System (18-19 GT, EcoBoost) on your Ford Mustang
Installation Time
60 minutes
Tools Required
- Socket wrench with 13mm deep-well socket
- Electric drill
- Center punch
Installation Guide
Unpack QuickLIFT system and verify contents.
• (2) Struts
• (2) Fender Brackets
• (2) Hood Brackets
• (1) Plastic Drill Guide
• (1) 3/4" Stepped Drill Bit
Remove all items from the packing tube
Tools Required:
Please gather the following tools before you begin the installation:
* Socket wrench with 13mm deep-well socket
* Electric drill
* Center punch
Installation Instructions:
Step1 - Install hood brackets - Right Hand (RH) and Left Hand (LH):
A. Remove the hood's RH upper most hinge bolt using a socket wrench with a 13mm socket.
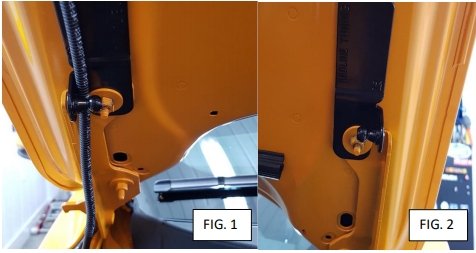
B. The RH bracket goes onto the right-hand side of the vehicle (from the driver's perspective). The bracket will go over the upper hinge stud, then rotate counter-clockwise until bracket is vertical and washer hose attachment can be popped through hole (Fig. 1). You may need to slightly loosen lower hinge bolt if factory misaligned hinge to hood.
C. Tighten nut(s) back down to secure bracket using 13mm socket.
D. Repeat for LH side of vehicle (driver's side in North America). LH side, bracket will rotate clockwise and stop on flange (Fig. 2).
Step 2 - Modify battery cover - Right Hand (RH).
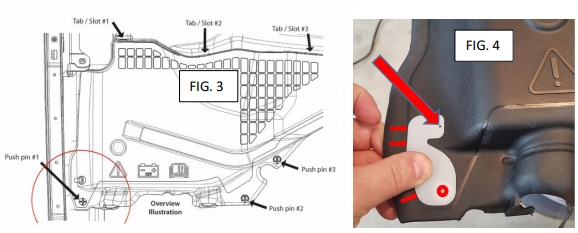
A. Insert the push-pin thru the larger hole in plastic drill guide and then back into the hole it came from. Now rotate guide until it aligns to the plastic edge of the battery cover - (The border of the rubber seal surrounding the battery cover) (Fig. 3)
(For right hand drive vehicles, the guide should be flipped over so it will align to your battery cover as it is a mirror image of the one shown).
B. Mark the center of the small hole at the top of the drill guide while keeping the guide aligned with the edge of the plastic as shown (Fig.4).
Step 3 - Remove battery cover to drill 3/4".
A. Remove the (3) push-pins (Fig. 3) holding down the front of the battery cover, then remove cover by lifting slightly and pulling forward to release the three 22mm tabs at the top edge that retain it.
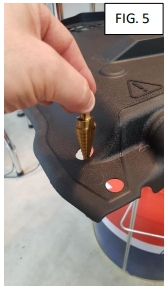
B. Carefully drill a small pilot hole in the plastic battery cover as marked in Step 4. Then drill the final 3/4" hole with the included step bit - entirely through the plastic. This hole is used for a pass-thru of the fender bracket installed in the next step (Fig. 5).
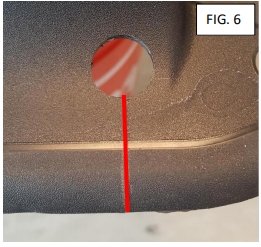
OPTIONAL STEP: For easy removal of the battery cover with the QuickLIFT system installed, cut a small slot from the center of the drilled hole straight out to the edge (FIG. 6).
Step 4 - Install fender bracket assembly on both sides of vehicle.
A. Be sure that the bolt in the bracket assembly is threaded most of the way thru the red attachment - leave 1-2 threads of the red attachment showing from bottom.
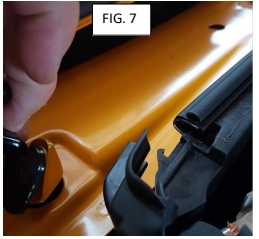
B. Tilt and insert the red attachment through the fender hole (Fig. 7) keeping the ball-stud aiming outward or away from the vehicle.
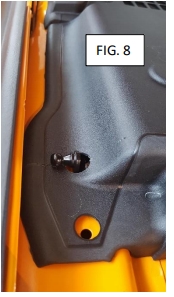
C. With the bracket pushed down into the recessed cavity, pull up on the bolt while turning bolt clock-wise to tighten. Slowly, the assembly will tighten, compressing the bracket and fender between the red attachment (lower) and bolt (on top). The red attachment is designed to fit perfectly in the fender slot and can be seen in the correct orientation (Fig. 8). Be sure it is aligned properly before final tightening of bolt.
D. Repeat installation on opposite side of vehicle. Ball studs aiming outward or away from vehicle on both sides.
Step 5 - Reinstall battery cover.
A. Push the ball stud/ bracket through the battery cover hole that was drilled.
B. Carefully align the 3 upper tabs on battery cover with the three slots on the cowl. Slide cover into slots and then reinstall the push pins into the front of the battery cover. Be sure that the cover gets tucked back around the battery cables and is fully seated (Fig. 8).
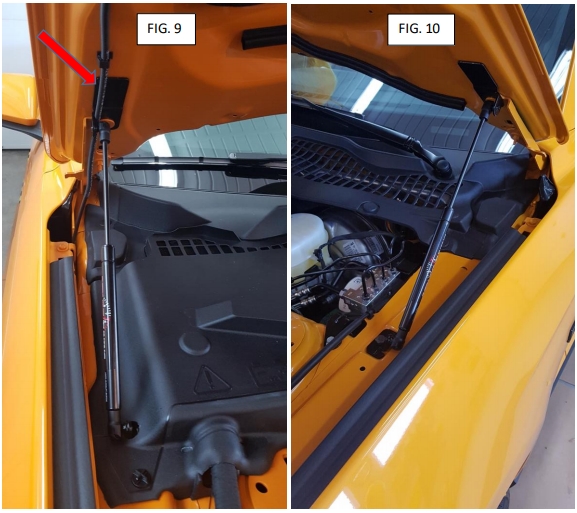
Step 6 - Install gas springs.
A. Route washer line over the bracket and under ball-stud. Plug in the hood attachment back through the new
bracket and into the same hole from which it was removed.
B. Firmly snap on the extending end of gas spring to the fender ball stud.
C. Snap on large end of gas spring to the hood's ball-stud. You may have to twist the socket to align to ballstud, as well as have someone raising up the hood to center the ball & socket before snapping it on (Fig.9)
D. Repeat installation on opposite side of vehicle (Fig. 10).
Step 7 – Final result

Installation Instructions Written by AmericanMuscle Customer Marc 4/29/2019
