 FREE 1 to 3-Day Delivery on Orders $119+ Details
Best Sellers


How to Install Roush Extreme Axle-Back Exhaust w/ Black Tips (05-10 GT, GT500) on your Ford Mustang
Installation Time
1.5 hours
Tools Required
- Jack and Jack Stands or Lift
- 3/8 Ratchet (Torque Specs will be listed but not totally required)
- 13mm Socket
- 15mm Deep Well Socket
- Safety Glasses
- Brake Clean / Penetrating Fluid / Degreaser (Not Required but Helpful)
- Pry Bar or something similar to break through rust (Not Required but Helpful)
- Gloves (Not Required but Helpful)
- Mallet and/or Hammer (Not Required but Helpful)
This is a project that will require patience and clothes that are “Ok” to get Dirty.
Also please note, for safety reasons DO NOT attempt with scissor jack from your vehicle. You will need a floor jack and jack stands, ramps, or a lift. Remember to use proper vehicle jacking safety measures.
Installation Instructions:
1. Prep Work Area: Remove the exhaust system from the box it was shipped in. Confirm all pieces are in there. You should have two pipes with two hangers per pipe, two exhaust Tips, Four exhaust Clamps. Things to note at this point will be hanger orientation and pipe orientation. The part that will be going over the mid-pipe (towards the engine) has two gaps in the metal. You want these ends of the pipe to face the middle of the car.
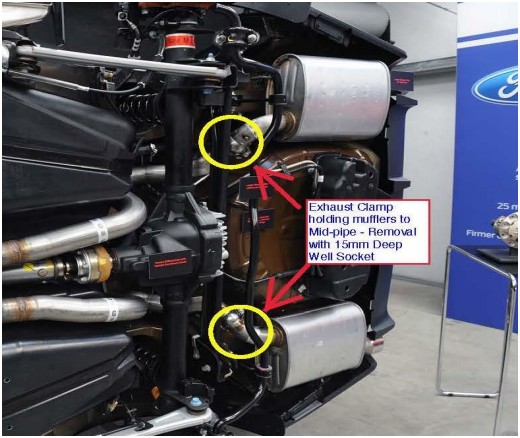
2. At this point, you may jack the rear end of the vehicle up, but I personally did not. If your Mustang has seen a lot of miles and road conditions, you will crawl under the back end to a great deal of rust. Either way, get under the rear end of the car with your safety glasses on and locate the exhaust clamps holding the stock muffler setup to the Mid-Pipe. These clamps will need to be loosened. You are going to remove the nut/bolt with the 15mm deep well socket. (Note: These WILL NOT be reused with this new setup) Prior to attempting to loosen, if you have penetrating fluid, use this on the entire clamp setup. (This clamp will most likely be rusted to the muffler pipe, rusted closed, and this pipe will be rusted to the midpipe) Now Undo the clamp.
3. If clamp comes loose, skip to step four- If the clamp is rusted shut, you will want to use a pry bar or something strong to break that rust free. You can hit the band wrapped around the pipe with a mallet or hammer to attempt and break that rust. You may need to use a screwdriver or similar to wiggle under the band to get to that rust. Do not be shy with the W-D 40.
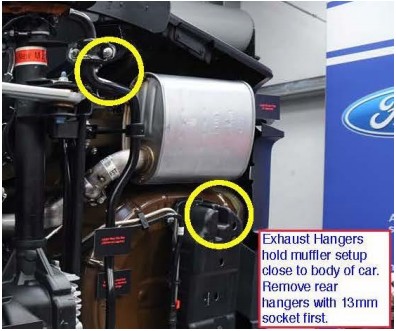
4. Move onto the hangers. In most cases, you will not be able to wiggle the muffler free. You will want to first hit the muffler towards the rear bumper to try and get it out of the mid-pipe. Use the Mallet to do that. If this is unsuccessful, you will need to get more room to work. Start by going to the hanger closest to the rear bumper. You will need a 13mm socket for these bolts. They are going to also be rusted, making for a difficult removal. Again, W-D 40 is your friend. Remove hanger completely. (Be sure to note where each hanger came from. If they get mixed up, not the end of the world but will make reinstallation easier). Remove hanger from muffler and prep for rust removal with W-D 40 / Brake Clean. Use a wire brush to remove excess rust. You will need to provide a good deal of force wiggling the muffler back and forth. The goal is to wiggle muffler in all directions (possibly violently) to break all rust free and get it free from the mid-pipe to completely remove. If one hanger does not suffice, you will have to remove the other hanger as well. This will take a great deal of patience. The bolts are in “impossible to reach” locations. The same process will be used, remove the two 13mm bolts from the hanger. At this point rip out the muffler using the above-mentioned wiggle tactic. THIS PROCESS IS IDENTICAL ON OPPOSITE SIDE. (The metal hanger coming off of the muffler, sticks through the hanger bolted to the vehicle. The hanger bolted to the vehicle is what is to be removed. The bolts and hangers are all needed for reinstall so do not loose these.)
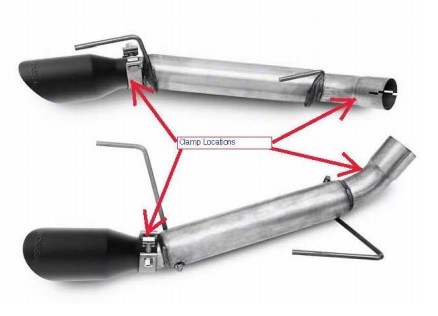
5. Congrats, the brutal part is over. You will want to prepare for install of the new axle back. If you have not jacked the rear of the car up yet, now you will want to. At this point, do not actually install tips on the pipe. We will do that in later step Start by putting one of the clamps supplied with the system on each pipe. (Right of Picture) These are to go on the end that will be connected to the midpipe. Put One clamp that was supplied on both exhaust tips
6. The next step is to reinstall the hanger closest to the engine (IF REMOVED) You will use the same 13mm socket. If it was not removed, proceed to the next step.
7. Start by getting under the car with the new pipe. Install the hanger closest to the end that will connect to the mid-pipe. (The metal hanger on the pipe will go through the same hole the stock muffler went through) After inserting that hanger, install new pipe over the mid-pipe. (Make sure that your exhaust clamp is still on your pipe. Do not concern yourself with tightening this yet. You will need the room to work.)
8. After the one hanger is installed and the pipe is over the mid-pipe, grab the hanger you took off the car that was closest to the rear bumper. You need to install the metal hanger from the new pipe into the hole of the existing hanger that will get bolted to the car. Prior to inserting the hanger, align hanger to the mounting location to ensure you have it aligned the correct way. Insert the hanger and bolt that hanger to the car using the 13mm socket.
9. Your exhaust pipe is now attached to the car, to finalize this side of the vehicle, ensure the exhaust is lined up properly. Take the exhaust tip and install on end of pipe ensuring the clamp is on the exhaust tip. Align the exhaust tip so it is straight.
10. Grab the ratchet with the 15mm Deep Well Socket. Align both clamps about ½ inch to 1 inch away from the edge of each piece. On the mid-pipe side, align clamp about an inch away from the edge of the new exhaust pipe. (The clamp is to be seated on the new exhaust pipe, and this will clamp the new pipe to your mid-pipe.) For the exhaust tip, It will be about ½ inch to 1 inch from edge of the exhaust tip. (The clamp will be seated on the exhaust tip to clamp that to the exhaust pipe) Begin to tighten the clamp so they become snug without tightening too tight. Once again, check the alignment of the exhaust system. Once satisfied with the alignment, tighten both clamps to 23 ft/lbs. Once fully installed, ensure there is no play in the exhaust system by pulling on the pipe.
11. Refer back to Step Five through Ten to install opposite side.
12. After fully installing the axle back, ensure your work area under the vehicle is clean of any tools or anything else that was brought down there. Prior to starting the vehicle, bring the vehicle down off of the jack and jack stands for safety. Finally, turn the key and listen to your “Stang” Roar!!
Installation Instructions Written by AmericanMuscle Customer Matthew J. 10/2/2019
