Talk to a Mustang Sales Tech
1-877-887-1105
M-F 8:30A-11P, Sat-Sun 8:30A-9P
$20K Sweeps! 10 Chances to Win! Enter Daily >

Bama 4-Bank Eliminator Chip with 2 Custom Tunes (99-04 Mustang GT, Bullitt)

Item 38000G99
Verify parts fit and get product recommendations.
Mustang Sales Techs: Connect Now M-F 8:30A-11P, Sat-Sun 8:30A-9P
$0.00
Our Price

$269.99

FREE Shipping Market Price $305.99 You Save 12% ($36.00) Up to 10% off for Military & First Responders! See Details

Will this fit your Vehicle?

Select a different vehicle Help?
Update or Change Vehicle
Ship to: Ashburn - 20149
Sorry, please enter a valid US or CA postal code
We're sorry, zip can't be updated at this time.
    Create a list
    Add to New List

    Saved - View your saved items

    We're sorry. We couldn't save this product at this time.

      Video Review & Installation

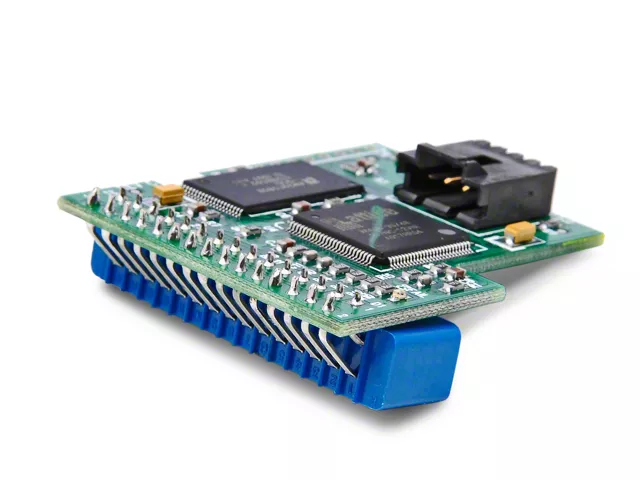
      Jake here for AmericanMuscle, and in this video, we're taking a look at the Bama 4-Bank Eliminator Chip with Two Custom Tunes, fitting 1999 to 2004 Mustang GT and Bullitt models. If you're looking for a quick and simple way to get some more speed and power out of your Mustang, this chip is a great way to make it happen without spending a ton of money. You get two custom tunes written just for your Mustang and enrollment in the Bama Tunes for Life Program with this kit as well, so it's a really stellar value and a package that is sure to make a difference in the way your car drives.Diving right in on numbers here, we tested our '99 GT that you see behind me on our in-house dyno. Now, our car is a manual transmission, and it runs 93 octane fuel. We did all of our runs in fourth gear, which is that ideal one-to-one ratio that you want. That said, in stock form, we saw 229 horsepower at 4,500 RPM with 295 pound-feet of torque at 3,700 RPM. After that, we installed the Eliminator Chip, and set it to the Bama Race tune just to see how much we could possibly make. After the tune, our Mustang laid down 242 horsepower at 4,500 RPM and 307 pound-feet of torque at 3,800 RPMs, giving us peak gains of 13 horsepower and 12 pound-feet of torque. Not bad at all for an otherwise stock 4.6. More impressive still is the fact that we saw power increases all the way through the rev range, as you can see from our graph.Now, the Bama Tune also ups your red line from our stock 5,700 to 6,200 RPMs. And we saw consistent smooth gains throughout the rev range. Now, the biggest curve gains came in at just about the 5,000 RPM mark, though, with 13 horsepower and 13 pound-feet of torque there as well. Like I said, it's very consistent. And having more power up top in this engine is great since that's where these naturally aspirated V8s tend to fall flat. Now, this 4-Bank Eliminator Chip is unique in the world of tuners, instead of needing a separate module that requires to stop and reprogram the ECU, as you do on many newer vehicles or with something like a hand-held tuner, this is a chip that makes some quick pre-program changes to your Mustang.Specifically, with this one you get two custom tunes written by the experts at Bama specifically for your car. So, if you already have some other mods on there like an intake or an exhaust those tunes may take those into account and get you more power and response. These are also taking into account a number of other factors including the air-fuel ratio, ignition timing, and other engine parameters to maximize your output. Bama also adjusts your transmission settings on automatic cars to change gear change firmness, the shift points, and even your throttle response to match your car setup and improve the overall driving experience.Now, you do get two tunes here, a performance tune and a race tune. Now, the race tune is best suited to the track or the dragstrip whereas the performance tune is designed for the street, and can best be described as an aggressive but daily driver-friendly setup. It can also be tailored for 87 to 93-octane fuel as well, depending on what's available in the area and what you wanna run in your car. Now, the race tune gets you the most power with further adjustments to timing, fueling, and throttle response.This one is the no-holds-barred tune, and it's designed for 91 to 93-octane, E85, or even race fuel. One note though is if you are using E85 or race fuel, you're going to need to run larger injectors which you would need to purchase separately. Now, this setup also allows you to switch up between those two tunes on the fly, so no need to stop down to reset your car, if you want more power, just turn the dial and you're off. If you wanna return to stock as well, you can do that right here on the dial too.Now, you can mount this very discreetly too, so nobody even has to know what you got up your sleeve. Best part though is that buying this particular setup also means that you're enrolled in the Bama Tunes for Life Program, so you can get free custom tunes for as long as you own your car. Now, that's great if you on keeping your car a while or if you plan on doing further modifications down the road, and for the price you're paying it's really an exceptional value.Now, this one is a bit of a tricky thing to talk about construction-wise, since you really don't see most of it. Basically, this is a chip that plugs in to the back side of your ECU. Now, no other modifications or wiring is needed though. Just plug the dial into one side of the cable, plug the other side of the cable into the chip, and you're ready to go. Now, the kit does of course include this pre-wired 6-foot cable and the switch, that we were talking about earlier, so you can mount this up wherever you want or keep it hidden away.Pricing comes in at about $325, which for all you get here, especially those custom tunes, is really a stellar price. Getting custom tunes written especially after your initial purchase can prove a headache and can easily get expensive. This is a one-time purchase and you get all the power you want plus the custom tuning and support. Truly, I can't overstate the value here. Just getting those tunes written for your car elsewhere would likely cost you just as much if not more, and you'd still need a way to get it loaded onto your car. This chip solves that and you get custom tunes for the life of your car, which is really a deal you can't beat.Installation is going to get a one out of three on our difficulty meter, and should take you about two hours to get everything plugged in and working. Now, you do need to access your car's ECU, which is in the passenger side footwell, and it makes things a little bit more complex. But otherwise though, it's really just plugging it in. So that said, let's jump over to the Mustang behind me, and I'll show you the process.Tools used in this install include a clip removal tool, panel removal tool, a 1/4-inch drive ratchet with an extension, 5.5-millimeter,7-millimeter, 8-millimeter, and 10-millimeter sockets, plastic razor, and a Brillo pad or other abrasive compound. All right, now, it is time to start installing the Bama Eliminator Chip on our '99 GT here. We're under the hood, the first thing we're gonna do is pull the negative terminal off the battery so we kill the power to the ECU. So, we'll start with that. So, we're gonna start by taking off the negative terminal on our battery. I've got my ratchet and an 8-millimeter socket. Just gonna loosen that up. Make sure I'm going the right way first. There we go. Pull that off the terminal.Now, I'm going to set this aside. I've also got a cloth here just to cover this up. Because of the proximity to everything, I don't want this to arc while I've got the computer off. So, we'll set that aside there, and, now, we can move into the interior. All right, now, we've hopped into the interior of the car because we're going to have to pull the kick panel down here on the passenger side. In order to get to that, though, we need to pull this sill panel off, too. So, I'm going to take my pry tool. I'm just going to go in here, and that'll unclip just like that. Now, we'll move on to this one inside.Next, we're going to pull out this kick panel. In order to do that, we've got to pull this pin out. So, I'm going to take a thinner pry tool, kind of work that around until I get it pried out. Just give it a nice little pop. It'll come right out. Once that pin is out, we'll set it aside. Then you can just pull the kick panel back and remove it. All right, now, that we have our PCM exposed, this is what we're trying to get to. But first, we're going to clear a little bit of room. So,, I'm going to start by undoing these two connectors and then pulling all three of these off of this bracket here. We'll undo the bracket, and then we'll get into the PCM itself. So, these are pretty easy, just a little clip in the middle, and we'll pop right out. We'll do the same thing here. Push the little tab. Pull up. Pop it out. Now, I'll take my pry tool. I'll just get underneath. All of these just have little plastic clips. We'll just pry them out of the way.And we'll do the same thing over here. That one, thankfully, we don't have to disconnect because we have enough room. All right, so, we'll get those out of the way as best we can, and we cleared some room. So, we're going to have to undo a couple of other bolts here. We're going to undo these two here for this bracket that these just pulled out of to make some room to get this connector out. And then we'll release the PCM using that connector right there. So, we'll start with these bolts. These are just 7 millimeters, so I'm just going to take my ratchet. Let that drop out. And then we've got one more right down here. Same thing, 7-millimeters. Let's pull that out. And then our bracket should be free, so we've got some room here. Great, we'll push that aside.Next, we're gonna undo this bolt right here that's holding in the bracket for the PCM. So, this is a 5.5-millimeter bolt. I'll just put that on my ratchet here and start loosening this up. And be careful when you take this one out, you don't want to drop it. It'll fall right down there we won't be able to get it. Next, we're going to undo this 10-millimeter bolt on the bottom of the connector. You need to undo this in order to unplug the PCM. So, I'm just going to take my ratchet with the 10-millimeter on it. It might be a little hard to see, might be able to see as this is coming out. This connector is actually coming loose, which is exactly what we want. We'll be able to pull that off so we can pull the ECM all the way out. I'll just pull it the rest of the way by hand. Get that out. Then a PCM should be free. There we go.All right, now, that we've gotten the engine computer out of the car, we're gonna go ahead and open the case up. Now, there are six of these bolts up top. These are 5-and-a-1/2-millimeter bolts. So, I'm just gonna take my ratchet and undo them. I'll set these bolts aside. Obviously, we're going to need them again. Now, I want to make a point to say, you can just pop this cover off to get to where we need to go. But for the sake of showing it on camera and also for the ease of actually our next step, I would highly recommend taking the case apart like this. All right, with our last bolt removed, now, we can pull the cover off of the case. Set that aside, and then we can pull this up to separate it. We'll leave the bottom of the case where it is and where we're going is right here. This is where our eliminator chip is going to plug in.Now, if you feel on it, as you actually might even be able to see, there is a coating over top of this. We're going to have to remove some of this coating in order to get the chip secured and have it make contact with the engine computer. So, that's going to be our next step. All right, now, we're going to go ahead and start removing some of this coating. Now, you can do this with a number of different tools. I recommend something that's not super abrasive. We don't want to take all of this off, but we do want to take some of it off. So, I've got a little plastic razor blade right here. Also, got a small little sandpaper wheel on my drill here, which I'm probably just going to take and use on its own, just because I don't want to mess too much of it up. So, I'm going to take the plastic razor blade and I'm just going to go gently along the edge, applying basically no pressure to this. We're just gonna work our way in a little bit, just slowly scratching the surface off. We're gonna do this on both sides of the chip.Now, as you do this too, you want to make sure that you don't damage anything else on here, and any of this stuff that you're scraping off. You kind of get out of the way too. I don't want this sitting in here and gumming anything up. Now, that I've got most of that off, I'm just going to take my little piece and sandpaper wheel here. Just scrunch this up a little bit. Now, again, you can use a drill on this if you really want to, but you don't want to go too deep on it. Again, we don't want to remove everything. You just want to get a nice bit of contact on there. All right, that's looking pretty good from what I can see. So, we're going to flip this over and do the same thing on the other side. And again, you don't want to take this all the way down. You should still feel a little bit of that stuff on there. It's a bit of a trial-and-error process. Check the other side. That's going pretty good.All right, now, it is time to install our chip. So, we're going to take the chip, you'll see the blue connector right here. This is going to slide in this way. So, the actual chip on the eliminator on the upside here, just like so. So, we should just be able to push this in very gently, and it should seat pretty snugly. All right, cool. I'm pretty happy with that. Make sure it didn't push anything on the inside here, which it should not have done. You've got quite a bit of clearance there, which is great. Now, that we've got that done, we're going to take our cord, and one end of that is going to plug in on the back of the chip right here with the clip facing up. As you can see, it's just going to go right in here inside of the casing, and you'll just hear and feel it clip in. Make sure that's nice and snug.All right, now, that we've got our eliminator chip and cord plugged in, we're going to go ahead and reassemble the case. This is going to go back together exactly the way that it came apart, with the notable exception that this little plastic cover is going to stay out. All right. So, put everything back nice and clean. We'll make sure we've got enough room here for our chip and our cord, and we'll just take our bolts, get them started. Now, especially with something that's kind of made of a soft metal, and especially with sensitive electronic components like this, I always like to start these bolts by hand to avoid cross-threading it, especially since we're going to have to put this cart back to stock when we're done with this. I'm just going to make sure I get all these started. If they fight me at all, like this one, it did a moment ago, you can always go backward until you hear a little click, just like that. And you know the threads are properly seated.Do the same on this one. There we go. This one's nice because it makes a really audible noise when those threads seat. And we'll take our ratchet, and we'll just go ahead and tighten these down. These don't have to be super-duper snug. In fact, you don't want them to be super tight. You might strip those bolts out. All right, now, that we've got that reassembled, we're going to go ahead and put this back in the car. We'll run our cord and get our switch hooked up. All right, back in the car, we're going to go ahead and get things set up to put our PCM back into place. The first thing I'm going to do, though, is I'm going to run our cable somewhere. Now, you can run this kind of wherever you want. For our purposes today, I'm going to run this with our switch into the glove box.So, the first thing I'm going to do is drop our glove box all the way down. And this is nice because you can just kind of push in on these plastic tabs here. The glove box will drop all the way down. So, back here, I'm just going to take the wire. Run it up through a gap. Get it up in here so we've got plenty inside of the glove box. I'm gonna make sure this does not pinch when I close it. We should be good there. Let me set our glove box back into position. Get this out of the way. Now, while we're in here, we're also going to take our switch. So, this is just a little knob that comes in the kit. And this is going to attach on the other end of this cable. Just going to click that in. And we'll leave that here in the glove box. Close our glove box back up. Okay, now, that we've got our cable run, we're going to go ahead and reset the PCM into its original position.Now, this part is just going to be a little bit finicky. You may have to do some adjustments, but you will not be able to see on the camera. I'm going to do my best to talk you through it here. So, this is going to go right back in where it started. So, watch that cable on the back. Remember, we didn't have that when we pulled this out originally. You want to make sure you don't pinch that or get it caught anywhere. All right. And there is a little bracket in here where this will slide into. So, ours actually just went in pretty darned easily. Before we do anything else, though, I'm going to go ahead and get our connector back into place while we still have some wiggle room. So, once that's kind of set in place, I'm going to go ahead and get the bolt started over here for our bracket for the PCM.So, again, this is just a little 5-and-a-1/2-millimeter bolt. We're just going to get that started so we have some tension on this while I tighten the connector back up. We won't tighten it all the way. We want a little bit of wiggle room here. Then we'll take our ratchet with the 10-millimeter socket on it. Make sure that we're tightening. And I'll go ahead and start to tighten this connector. Might take a little while to get this started. But it should go nice and easy. Don't force it. You don't want to bend any of those pins in there. That's nice and snug. We'll go another little quarter of a turn. That should be good for that. Now, we'll go back, we'll tighten the bracket on the side of the PCM here. Good. That's nice and snug. Now, we can reattach our bracket and these other connectors down here.Next, we'll go ahead and reattach this bracket we took off earlier. Again, these are the small gray 7-millimeter screws. I'm gonna start with this bottom one here because that one's a little bit more difficult to get aligned. Let's get that started. And we'll get the top one started, and we'll go back and tighten them down. Okay, once those are in, go ahead and take our ratchet here. I'll tighten these down. All right, do the same thing up here. Double-check that those are nice and tight. You also want to check here too, you've got clearance on the PCM plug, which we do, which is great. All right, now, once we're done with that, we can go ahead and start plugging our connectors back into place. So, I'll pull everything kind of back where it was. We'll start with this gray one. That plugs in right here. We'll connect these two together, and they're gonna plug in in the center here using that pin, and the gray one clicks back in. Now, this has an aligning pin on it. Yours may or may not have that still. That'll just clip right back in here.Now, once we're done with that, we'll make sure that everything is where it needs to be. It's looking good right there, so we'll go ahead and put our kick panel back on, and we can go ahead and run this on the dyno. All right, now, we're going to put our kick panel back on. If this looks weird, it's because I have it turned around, so you can see. There's an alignment pin and a metal clip here. Those are going to go, metal clip and alignment pin, respectively. So, this is going to slide back into place, and we'll put our plastic holder pin back in as well. It's going to go just like so. Put it on the outside of the pinch well here on that, and you should hear it click into place like that. Then we'll take our alignment pin, this one little hit should bring it right back into place. Now, we'll go ahead and put our sill plate back on. Last piece to put back on is our door sill cover.So we're just going to take this. You see, there's two large aligning pins. They're going to go here and here respectively. The metal clips are going to go around on this pinch weld. On this one in particular, we've got two tabs here that also align in the back. So, I usually find it's easiest to start with those and get it where it needs to go, and then just put some pressure on it and it clips right back into place. All right, before we actually run this car on the dyno, I want to take a moment to talk about this switch that we installed. Now, one of the cool features of the eliminator chip here is that we do have this switch, which means that you can toggle between different tunes on the fly.Now, we would recommend that you do this while the car is stopped, not while you're in motion, just because the computer may have a tendency to hiccup or so. So, make sure you're stopped. You can switch this up. So, this is a little eight-position switch. When you get your email from Bama with the tunes, you're going to get a couple of pieces of information. One of those things is going to be the positions of the switch. So, as you see on here, they give you a handy little chart that you can keep with you. Position number two and position number three for us are our tunes. So, position two is the 93 race one. Position three is the 93 performance one.Now, it came in the email. I filled this in earlier. As you can see in highlighted in red here, position four is the stock one. So, we can start with our car in stock mode as it is now. And if I switch it back to position three, that's the 93 performance one. Position two is the 93 race tune. Now, as you can also see down on here, positions five, six, and seven are anti-theft mode. So, if you want a really stealthy way to have an anti-theft system on your car, just give it one more way to keep thieves from potentially taking it, you can put this in either five, six, or seven, and that will keep the car from running. But again, we're going to put ours back into that 93 race tune. So, that's position number two on here.Now, we can run it on the dyno and see what kind of difference it made. And before we forget and start to run our car or try to run it, we got to put our battery back on. So, we're going to reconnect the negative terminal on the battery. I'm going to pull my cloth out of here. Just get that back on. Again, take our 8-millimeter socket and just tighten this back down. All right, that's going to wrap it up here for our review, install, and dyno test of the Bama 4-Bank Eliminator Chip with Two Custom Tunes, fitting 1999 to 2004 Mustang GT and Bullitts. Thanks so much for watching, and as always, for all things Mustang, be sure to keep it right here at americanmuscle.com.

      Product Information

      Features, Description, Reviews, Q&A, Specs & Installation

      Features

      • Improves Horsepower, Torque, Overall Performance, and More
      • Comes with two Bama V2 Custom Tunes - a $150 Value
      • Includes datalog reviews to ensure your vehicle is fully optimized
      • Free Tunes for Life
      • What Does BAMA Offer Tunes For? CLICK HERE
      • What More Information about the Free Tunes for Life Program? CLICK HERE
      • See the Real Value of Your Mods!
      • Switch Between Tunes on the Fly
      • Includes 6ft Cable & Dial Selector
      • Custom Tunes Take 2-3 Business Days to be Written
      • Fits 1999-2004 GT and Bullitt Mustangs

      Description

      Power and Performance. Now you can add dyno proven gains of 21 Horsepower and 34 ft-lb’s of Torque and improve the overall performance of your 1999-2004 GT or Bullitt Mustang with a SCT 4-Bank Eliminator Chip that includes 2 Bama Custom V2 Tunes. By optimizing the air/fuel ratio, adjusting ignition timing and tweaking variable cam timing, a Bama Performance Custom V2 Tune will squeeze out the extra power Ford left on the table. Automatic transmissions will see an even greater gain in acceleration and drivability, as the tune also adjusts shift points and firmness.

      Increase Your Mod's Potential. From the factory, Ford programs their vehicles to cater to the needs of the daily driver, not the performance enthusiast who adds aftermarket bolt-on modifications in search of more power. When making performance mods, you will need to recalibrate the vehicle's computer to realize their full potential. A Cold Air Intake kit alone on a 1999-2004 GT will net around a 5HP gain, but couple it with a Bama Custom V2 Tune and see dyno proven gains of 30HP and 40 ft-lb’s TQ or more.

      Switch Tunes On The Fly. One of the biggest benefits of a chip over a tuner is the ability to switch between tunes at a moments notice. There is no need to wait minutes for downloads to complete, just turn the dial and your ready to go.

      Easy to load; easy to restore. Not only is the SCT 4-Bank Chip easy to load on your vehicle with the supplied 6ft cable and dial selector, it is just as easy to restore to your factory settings with the turn of the dial.

      Free Tunes for Life! Every customer that purchases a Bama 4-Bank Eliminator Chip is enrolled in the "Free tunes for life" program. Any time that you make additional mods to your vehicle, our team of SCT certified Bama Custom Tuners will create new tunes for you.

      Bama V2 Custom Tunes. When you order a SCT Eliminator Chip, you aren't just getting a chip - you are getting the chip and 2 dyno-tested custom V2 Tunes that are written specifically for your Mustang and your particular modifications by Bama Performance. Bama even includes datalog reviews to ensure your vehicle is fully optimized.

      • Performance V2 (87-93 Octane) - The Performance Tune offers a seamless blend of power, performance and drive-ability. Improving the overall driving experience of your Mustang, the Bama Performance Tune improves vehicle acceleration, increases power throughout the entire RPM and improves throttle response with revised timing, fuel, and VCT maps. Automatic equipped vehicles offer an aggressive shifting map to provide more aggressive transmission settings. This tune is suggested for the aggressive daily driver that is looking for more "get up and go".

      • Race V2 (91-93 Octane, E85, Race Fuel) - The Race Tune is designed for maximum performance and ensures the largest increase in vehicle performance. Using the highest grade of fuel available in your area is mandatory as timing, VCT, fuel, and throttle response settings are very aggressive. Automatic transmission settings implement entirely new shift points, torque converter changes and firmness settings designed for Track use.

      Technical Note About Fuel. Use of E85 will require larger fuel injectors such as Injector Dynamics ID1300 or Ford Racing 47lb/hr Injectors. Unleaded race fuel can also be used, but Stoichiometric points must be supplied.

      Application. This SCT 4-Bank Eliminator Chip with two custom V2 tune files by Bama Performance is specially designed to fit the 1999-2004 GT and Bullitt Mustang's equipped with the SOHC Modular 4.6L 2 valve V8 engine. For more information about the SCT Eliminator Chip - View Eliminator Product Sheet.

      **NOTE: Programming custom tunes may take 2-3 business days plus applicable shipping time. We recommend ordering other products separately to avoid delay. Heavily modified cars are not tunable with a mail order tune. Click for restrictions. Membership in the Tunes for Life program is is valid for as long as you own the car that was originally tuned and is non-transferrable.

      Bama Performance

      Fitment:

      Details

      Bama 38000G99

      CA Residents: WARNING: Cancer and Reproductive Harm - www.P65Warnings.ca.gov

      Installation & What's in the Box

      Installation Info

      What's in the Box

      • 6ft cable
      • Dial Selector
      • Bank Eliminator Chip

      Tech Specs

      Chip/Handheld:ChipCustom/Strategy:Custom
      Memory Size:N/ACustom Tunes Held:3
      Year:1999-2004 GT, 2001 Bullitt, 2003-2004 Mach 1, 1999-2001 SVT Cobra Model:4-Bank Eliminator Chip
      Manufacturer:SCTSpecial Features:Free Tunes for life through AmericanMuscle
      4.5

      Customer Reviews (500+)

        Questions & Answers

        10 More Questions

        Will It Fit My Mustang

        • Bullitt - 01
        • GT - 99, 00, 01, 02, 03, 04

            Related Mustang Categories