FREE 1 to 3-Day Delivery on Orders $119+ Details
Best Sellers


How to Install Steeda Adjustable Sway Bar - Front on your Mustang
Stock Swaybar Removal
1.Raise the front of the car off the ground by the chassis, and place on jack stands (if not using a hoist), so that the front tires are at least a foot off of the ground at full suspension droop. Use caution operating a lift, or jack stands, to ensure the car is stable and safe to work around and underneath.
2.Remove the front tires.
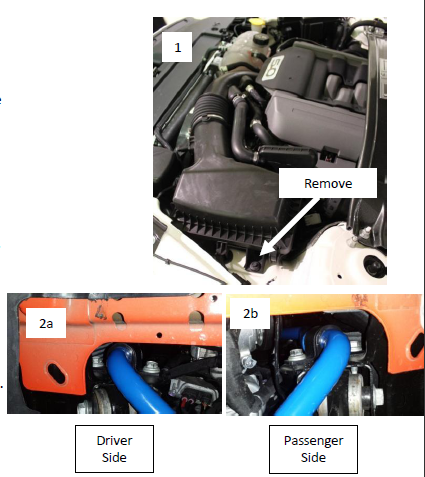
3.From the engine compartment, remove the air intake system. This will help give extra room for the bar to be maneuvered out of the car. Depending on the model car, a sensor will need to be unplugged from the air intake tube. Loosen the clamp securing the air intake tube to the air box, and remove the tube from the air box. There is one 10mm bolt securing the air box to the fender. After removing that bolt, pull up and towards the back gently to remove the air box assembly from the cold air feed. See figure 1.
4.Loosen and remove the 4 bolts securing the swaybar bushing brackets to the front sub frame. They can be accessed from the engine compartment, or the fender wells. See figure 2.
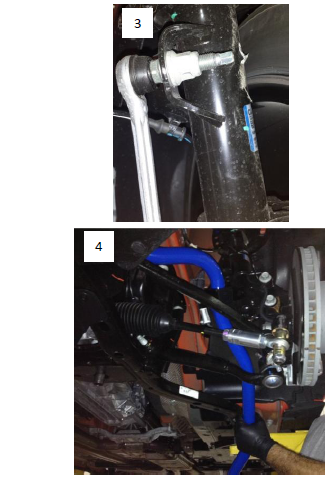
5.Remove the nuts from the end links, where they connect to the swaybar. The stud will need to be held with a 17mm wrench while the 18mm nuts are removed. See figure 3.
6.Maneuver the factory swaybar out through the driver side fender well, behind the strut. On some cars, it may be necessary to remove the strut from the spindle for extra room. See figure 4 for removal and installation orientation.
Steeda Swaybar Installation
7.Maneuver the Steeda front swaybar into the same location and orientation of the factory swaybar.
8.Liberally grease the inside of the provided polyurethane swaybar bushings with the provided grease pack. Install the supplied swaybar bushing brackets over the swaybar, outside of the bushing stops welded to the swaybar.
9.Slide the provided steel bushing brackets over the bushings.
10.By hand, start all four swaybar bushing bracket bolts into the sub frame before tightening.
11.Install the swaybar endlinks into the desired hole, and make sure the same holes are used on both sides. The hole on the swaybar that is closest to the front of the car, provides the stiffest setting.
12.Tighten the endlink studs to 65ft-lbs.
13.Tighten the swaybar bushing brackets to factory specs, around 35-40ft-lbs.