FREE 1 to 3-Day Delivery on Orders $119+ Details
Best Sellers


How to install a 3D Carbon Dual Exhaust Rear Valance on your 2005-2009 Mustang
Installation Time
1 hours
Tools Required
- Phillips Screw Tip
- 90 Degree Angle Screw Gun Attachment
- Clean Wiping Cloths
- Air or Electric Drill Motor
- 1/8" Drill Bit & ¼" Drill Bit
- Lacquer Thinner
Shop Parts in this Guide
Installation
NOTE: Installation of the 3dCarbon Dual Exhaust Rear Lower requires the vehicles rear lower to be cut and exhaust modified. Installation should only be performed by a qualified mechanic experienced in the installation of a Mustang Dual Exhaust System. 3dCarbon is not responsible for any incorrect exhaust modifications.
CAUTION!!!! IF A HEATED SPRAY BOOTH IS USED FOR BAKING THE PRIMER OR PAINT, DO NOT BAKE OR CURE GREATER THAN 120 F DEGREES FARENHEIT. THE PARTS CAN BE DISTORTED AND PERMANENTLY DAMAGED.
NOTE: These step by step installation instructions are for after the kit is painted. Please see the “Prepping and Painting” Instructions prior to prepping the parts for paint.
PREPPING THE KIT PRIOR TO PAINT
The first step is to inspect the parts to make sure you have the correct parts. Refer to the part numbers on the back of the parts to confirm the Year – Make – Model. Parts that are prepped and painted cannot be returned or exchanged.
Using lacquer thinner and a clean cloth – clean the tape flange surface on the back of each part where the double sided tape will be applied. Using 1” masking tape, apply the tape 1/8” below the top edge of the part. This will protect the tape flange from getting contaminated during the prepping and painting process. Refer to Prepping and Painting Instructions for “Step by Step” procedures.
APPLYING THE 3M TAPE TO THE KIT
After the kit has been prepped and painted, the double face tape should be applied to the parts. The tape is not pre-installed on parts prior to shipping because the tape can be contaminated during the sanding/ priming and painting process.
The first step is to clean the tape flange on the back of the parts where the tape will be applied. Make sure the complete tape flange is clean and free of all primer and paint. Using lacquer thinner on a clean rag, thoroughly clean the tape flanges on all parts of the kit.
Using the adhesion promoter bottle with felt tip supplied, apply it to the tape flanges – be careful not press too hard causing too much to be applied. The adhesion promoter will leave a thin clear polymer primer film that will increase the bonding strength of the double face tape.
The tape should be applied 1/8” down from the top edge of the part so that it cannot be seen after the kit is installed. The tape is to be applied from the wheel well to the center. Press the tape firmly to the surface to insure good adhesion. (See Image #1)
Repeat the cleaning and adhesion promoter steps on all parts of the kit.

INSTALLING THE V6 DUAL EXHAUST REAR LOWER
Part 1. Modification of Exhaust
Step 1) V6 Mustang exhaust system must be modified for a dual exhaust. 3dCarbon does not provide steps for this installation. Installation of the exhaust system should only be performed by a qualified mechanic experienced in the installation of the V6 Mustang dual exhaust system. 3dCarbon is not responsible for any incorrect exhaust modifications.
Part 2. Cut Out Area on Vehicle’s Rear Lower Using Template
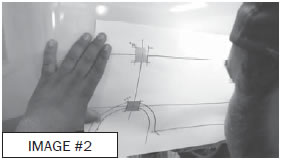
Step 1) Place the enclosed template on the vehicle. Follow the directions on the template for proper alignment to correctly cut the vehicle’s rear lower. (See Image #2)
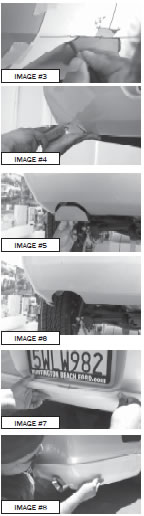
Step 2) Once the template has been properly aligned and the striped areas have been cut out from the template, use a grease pencil to trace the area where cutting will occur. NOTE: Do not include the reference alignment box when marking your cut-out area. (See Image #3)
Step 3) Using an air saw, cut the area out from the rear lower using the grease pencil marks made in Step #2 as a reference. (See Images #4-6)
Part 3. Installation of 3dCarbon Rear Lower
Step 1) Place the rear lower on the front factory bumper and check the fit. Use the license plate opening as a reference for positioning the rear lower correctly from right to left. Using a grease pencil, draw a line around the top edge of the part so that you have a reference to line the part up during the final installation. (See Images #7-8)
Step 2) Remove the part from the car and using Lacquer thinner on a clean lint-free cloth, wipe the paint surface where the tape will attach. Be careful not to remove the grease pencil marks. Using the adhesion promoter supplied, apply the adhesion promoter to the paint surface where the tape will attach.
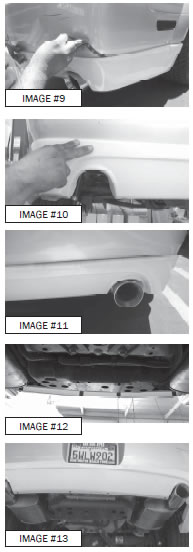
Step 3) Peel back a small piece of the red plastic backing from the tape, making a tail that can be pulled when the rear lower is installed. (See Images #9-11). Place the rear lower back on the car positioning it suing the grease pencil marks as a reference. Starting with the center, pull the red backing tail and press the rear lower – tape to the paint surface at the same time.
Step 4) Using the supplied #8 x ¾” self tapping screws, secure the rear lower in the wheel wells through the (2) pre-drilled holes in each wheel well
Step 5) Secure the rear lower on the factory rear bumper. Using the (4) supplied brackets, secure the rear lower to the factory rear bumper. (See Images #12-13)