FREE 1 to 3-Day Delivery on Orders $119+ Details
Best Sellers


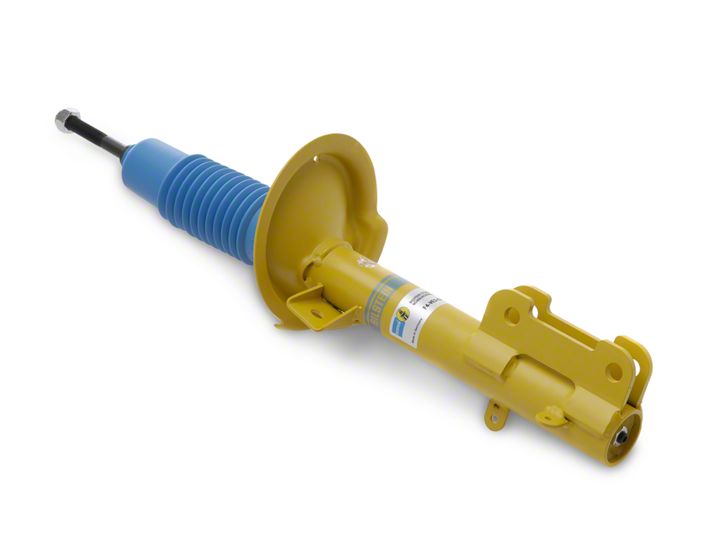
How to install a Bilstein HD Series Front Strut on your 2005-2010 GT Mustang
Shop Parts in this Guide
Installation
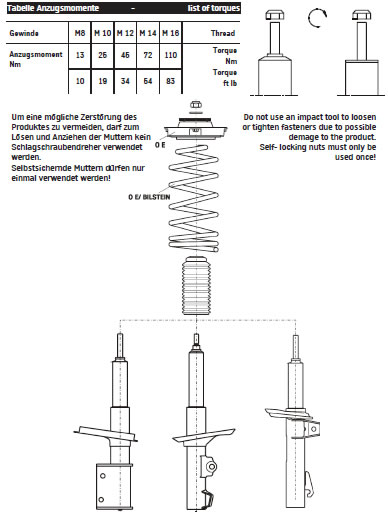
Before installation please observe the following points:
Read all information in this manual carefully. All suspention components are fitted and removed acc. to the manufacturer’s specifications for fitting and removing, if not otherwise required in these instructions.
Check that dimensions and fastening points are comparable between the original and Bilstein shock absorbers.
Directional references (left, right, front, rear) are always with reference to the driving direction.
The test vehicles are left- hand drive cars.
After installation please observe the following points:
After installing the suspension system, caster and camber must be checked and adjusted according to manufacturer´s specifications. Check and reset load- dependent brake compensator and ABS system according to manufacturer´s specifications
Check and adjust headlight aim.
Because the vehicle has been lowered, freedom of movement for all wheel-/ tire- combinations must be checked.
All rubber- mounted strut/ damper attachments must not be fully tightened until AFTER the suspension system is loaded (wheels on the ground). Other mounting fasteners (for example brackets) must be securely tigh-tened BEFORE load is placed on the suspension system.
Removal
Place vehicle on a chassis hoist, lift it and remove wheels.
Disconnect the negative battery pole. The lower control arm must be supported by suitable means! Remove bottom mount.
If necessary release brake hose/ brake hose holder/ stabilizer/ ABS- hose and/ or swing- support at strut.
At support suspension arm, screw on top, inside must be released a little.
Remove top fixing nutsfrom support bearing. Do not remove center nut at this time! Remove complete strut and clamp it in an appropriate strut vise.

Using a suitable spring compressor, compress suspension spring until tension on support bearing is released. Fit original/ BILSTEIN mounting parts on strut in reverse sequence to removal, except for bump stop, since BILSTEIN- strut has built in bump stop. Please refer to diagram to identify which parts will be replaced with BILSTEIN- supplied components also. If there is no dust cover delivered by BILSTEIN, the original one is to be reused.
ATTENTION: Some models are equipped with plastic- dustcover cap also. This cap do not reuse!
Install
Assemble BILSTEIN and/ or original mounting parts, as well as the new BILSTEIN spring, if been used, on the BILSTEIN strut in reverse sequence of removal.
Before releasing the spring, care is to be taken to ensure that the spring rest in the cutouts of top and bottom spring plate!
The correct mounting position of the suspension springs can be determined by the printing on the springs; install them with the print upright.
Fit assembled BILSTEIN strut to the vehicle in reverse sequence of removal. Connect the negative battery pole again.
Installation
Before installation please observe the following points:
Read all information in this manual carefully. All suspention components are fitted and removed acc. to the manufacturer’s specifications for fitting and removing, if not otherwise required in these instructions.
Check that dimensions and fastening points are comparable between the original and Bilstein shock absorbers.
Directional references (left, right, front, rear) are always with reference to the driving direction.
The test vehicles are left- hand drive cars.
After installation please observe the following points:
After installing the suspension system, caster and camber must be checked and adjusted according to manufacturer´s specifications. Check and reset load- dependent brake compensator and ABS system according to manufacturer´s specifications
Check and adjust headlight aim.
Because the vehicle has been lowered, freedom of movement for all wheel-/ tire- combinations must be checked.
All rubber- mounted strut/ damper attachments must not be fully tightened until AFTER the suspension system is loaded (wheels on the ground). Other mounting fasteners (for example brackets) must be securely tigh-tened BEFORE load is placed on the suspension system.
Removal
Place vehicle on a chassis hoist, lift it and remove wheels.
Disconnect the negative battery pole. The lower control arm must be supported by suitable means! Remove bottom mount.
If necessary release brake hose/ brake hose holder/ stabilizer/ ABS- hose and/ or swing- support at strut.
At support suspension arm, screw on top, inside must be released a little.
Remove top fixing nutsfrom support bearing. Do not remove center nut at this time! Remove complete strut and clamp it in an appropriate strut vise.
Using a suitable spring compressor, compress suspension spring until tension on support bearing is released. Fit original/ BILSTEIN mounting parts on strut in reverse sequence to removal, except for bump stop, since BILSTEIN- strut has built in bump stop. Please refer to diagram to identify which parts will be replaced with BILSTEIN- supplied components also. If there is no dust cover delivered by BILSTEIN, the original one is to be reused.
ATTENTION: Some models are equipped with plastic- dustcover cap also. This cap do not reuse!
Install
Assemble BILSTEIN and/ or original mounting parts, as well as the new BILSTEIN spring, if been used, on the BILSTEIN strut in reverse sequence of removal.
Before releasing the spring, care is to be taken to ensure that the spring rest in the cutouts of top and bottom spring plate!
The correct mounting position of the suspension springs can be determined by the printing on the springs; install them with the print upright.
Fit assembled BILSTEIN strut to the vehicle in reverse sequence of removal. Connect the negative battery pole again.