 FREE 1 to 3-Day Delivery on Orders $119+ Details
Best Sellers


Mustang Coupe Rear Seat Delete Kit ('79-'93) - Installation Instructions
Shop Parts in this Guide
Installation
Factory Seat Removal:
1. Remove your rear seat, seat back, and back seat belts. You will see four metal strips on the back side of the seat back that you have removed. These strips fit into slots in the metal braces that are now exposed between the back seat and trunk area. Take note of the outer most slots on the driver and passenger side. You will be using the slots in the braces to mount your new seat delete back (section #3).
2. Take time to vacuum the loose insulation, screws, and dirt that have accumulated since leaving the showroom. Use a damp cloth and wipe down exposed metal pieces clearing it of dust and grime.
3. After removal of the seat back, two pieces of stock insulation should be exposed in the curved corners. Take one piece of included carpet and place it over the insulation and tuck it in behind the plastic. Smooth it down with your hand and then attach it with a screw and washer to the brace near the corner. Do the same on the opposite side. Note, attaching the screw to the brace may require a small pilot hole being drilled.
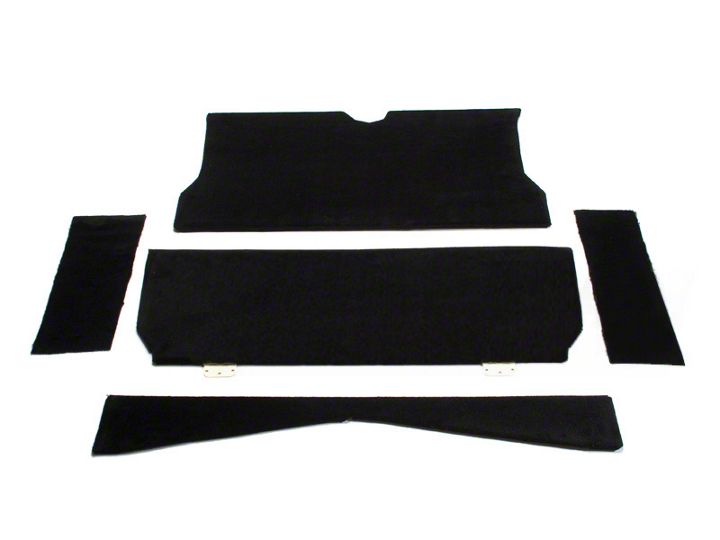
4. Take section #1 (the lower trim piece) and lay it on the floor with the carpet side facing down. You will see that one side is arched and the other is straight. It is now time to install the "L" brackets to the straight side. Two large "L" brackets will be equally spaced on each side and the small "L" bracket will be placed in the center. Make sure that the larger "L" brackets do not extend beyond the opposite side into the arch. If they do, they may be visible after installation.
5. Now lay section #2 (the seat section) on the floor, carpet side facing down. You will notice two straight parallel sides. The shorter side will go to the back and has two hinges attached to the under side. Section #1 with the "L" brackets will be attached to the longer side of section #2. Now take section #1 and place it on the long side of section #2. Align section #3 so that it is even with section #2 at both ends and on the outside carpeted areas. Screw down the "L" brackets making sure the outside edge remains flush as you go.
6. So you have an idea of how these sections fit in your Mustang, place them in the back seat area. Section #1 will be going to the rear floorboard at a 90 degree angle. Section #2 will be sitting on top of the small pockets of the driver and passenger side of the rear seat area. Remove these sections and move on to instruction #7.
7. It is now time to take a look at section #3 - this takes the place of the seat back. On the unfinished side you will see the two metal mounting tabs already attached to the top. These tabs are going to be placed in the outermost slots of the mounting braces. (It is recommended that you trial fit section #3 to ensure that pre-mounted tabs are in the correct place for your Mustang. If they don't slide into the slots on the mounting brace, you might need to move one to the left or right so that they both go into the brace slots.) At the bottom you will see a half circle that has been cut out. Lay section #3 on the floor with the carpet facing up and if possible find a friend to help with an extra set of hands. Now take section #2 and #1 that are securely fastened and hold them over the half circle. The two hinges that are fastened to section #2 should be laying flat, one on each side of the half circle. The edge of section #2 should be placed about aV2inch above the half circle and about 3Vainches above the bottom of section #3. Using the screws provided, screw the hinges into section #3 making certain you do not over-tighten causing the wood to strip out. Please keep in mind that the range of motion for the hinges is limited and will not allow you to lay the kit flat.
8. It is now time to place it in your car.Once again, it is very important that you are patient and don't force the kit in place.It will go but, you must work carefully. Lift the kit up by holding section #1 and section #3. You will notice a slight hinging motion, but don't over do it. Too much hinging motion will cause the screws to pop out. With your friend's help, keeping sections #2 and #1 slightly hinged move the kit into place. Reaching behind section #3,carefully feel for the two mounting tabs at the top. Then with a downward motion slide the entire thing into place. When properly in place, section #3 should be about even with rear dash. Your Mustang COUPE rear seat delete kit is now in place.
Installation instructions provided by MMR
Best Sellers
Related Guides
-
Installation
-
Installation
-
Installation
