 FREE 1 to 3-Day Delivery on Orders $119+ Details
Best Sellers


Mustang RAM Clutch Kit ('86-'04) - Installation Instructions
Installation Time
4 hours
Tools Required
- A good basic mechanics tool set with metric sockets deep well and shallow, ratchets (1/2 in, 3/8in, and 1/4in) wrenches some long extensions (we ended up using several 12in extensions at one point) torque wrench, pilot bearing remover tool, hammer, block of wood, jacks, transmission jack (if you can get one) jack stands, and a clean work bench.. (some friends would probably be helpful as well)
Shop Parts in this Guide
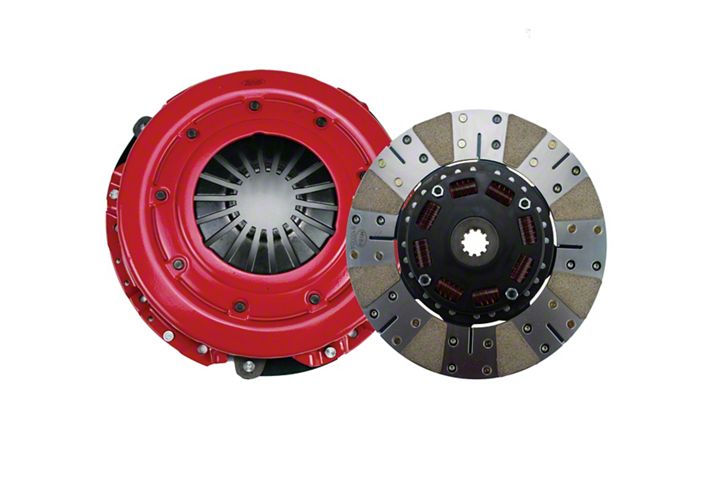
- RAM Clutches Powergrip Iron/Organic Clutch Kit; 10-Spline (86-Mid 01 Mustang GT; 93-98 Mustang Cobra)
- RAM Clutches Powergrip Iron/Organic Clutch Kit; 10-Spline (94-04 Mustang V6)
- RAM Clutches Powergrip Iron/Organic Clutch Kit; 10-Spline (Late 01-04 Mustang GT; 99-04 Mustang Cobra, Mach 1)
- RAM Clutches Powergrip HD Iron/Organic Clutch Kit; Upgraded 26-Spline (Late 01-04 Mustang GT; 99-04 Mustang Cobra, Mach 1)
- RAM Clutches Powergrip HD Sintered Iron Clutch Kit; 10-Spline (Late 01-04 Mustang GT; 99-04 Mustang Cobra, Mach 1)
- RAM Clutches Powergrip HD Iron/Organic Clutch Kit; 10-Spline (86-Mid 01 Mustang GT; 93-98 Mustang Cobra)
- RAM Clutches Powergrip HD Iron/Organic Clutch Kit; Upgraded 26-Spline (86-Mid 01 Mustang GT; 93-98 Mustang Cobra)
Installation
1. The first step is to remove the negative battery terminal of the battery, you will be removing the starter later, and working around live wires.
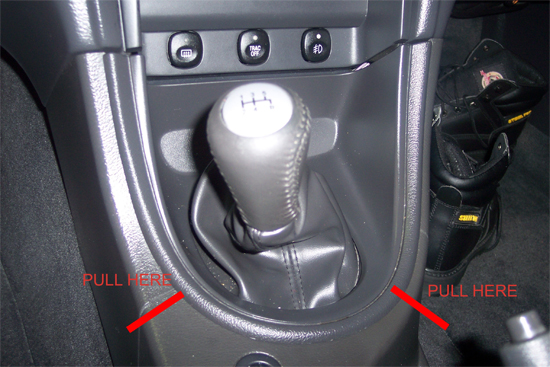
2. Make sure the transmission is in neutral and remove shifter bezel to expose the 4 (8mm) bolts securing the cover and remove
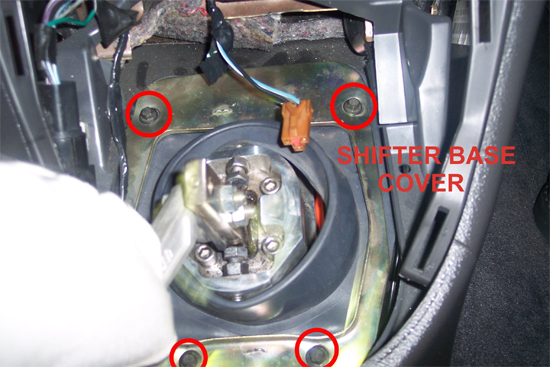
3. Next remove the 4 (13mm) bolts and remove the shifter arm base, remove and set aside.
4. Securely raise the vehicle on jack stands or a lift of some sort. The more room you have the easier it will be to work.
5. I recommend draining the transmission fluid, that way you don’t end up making a mess in your work area and end up slipping and sliding all over the place. The drain plug is near the bottom of the transmission. Mine was labeled drain, just use a3/8 ratchet to remove the plug. After the fluid is all drained replace the drain plug.
6. Next, remove your stock midpipe, will make easier access to everything.
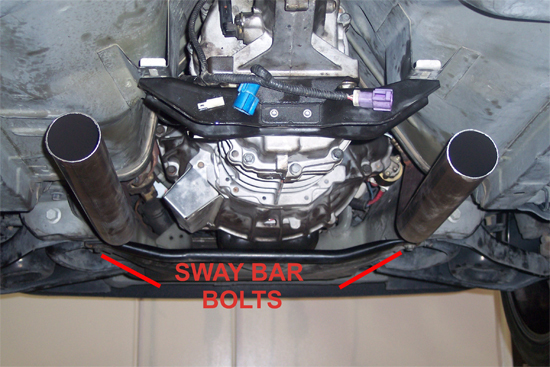
7. Remove the 2 (15mm) bolts securing sway bar to vehicle, remove and set aside
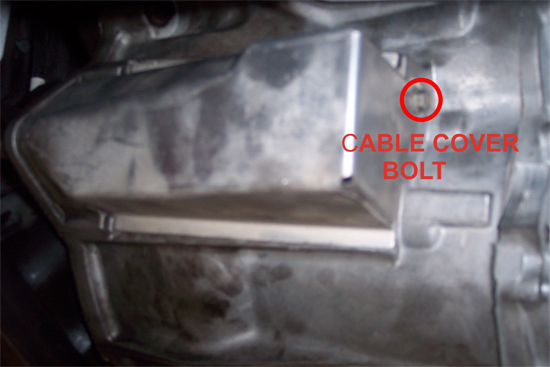
8. Remove shifter cable cover, remove cable from shift fork and place out of the way
9. Next you will want to remove the starter. I found it easier to disconnect the electrical connections on the starter itself, using an extension I accessed the connections from the front. The you will need to remove the 3 (13mm) bolts holding the starter on. 2 bolts are clearly visible, the second is concealed. I had to feel around until I located the bolt, it is at the very top of the starter.

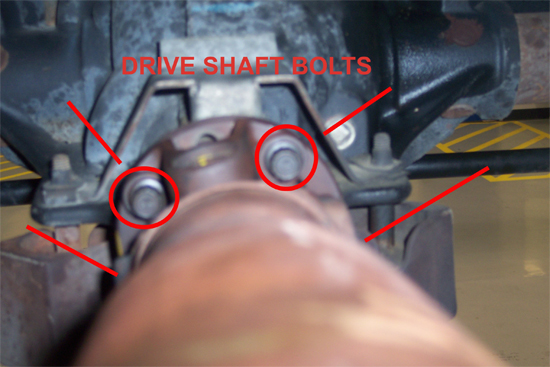
10. Next, mark the driveshaft and yokes so it can be put back in the same location it is mounted, doing this will prevent having a balance issue with the drive shaft after completion. Then remove the 4 (12 mm 12 point) bolts securing it to the differential case and remove the drive shaft. Set aside in safe location out of the way.
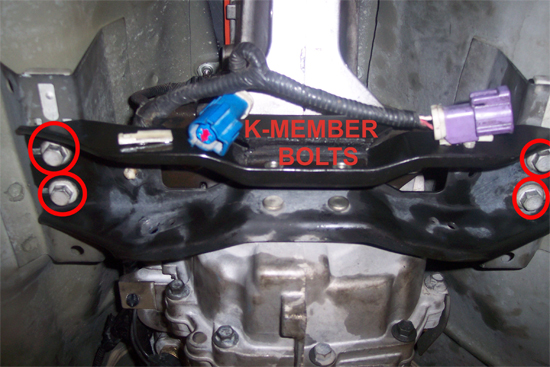
11. Remove all electrical connections connected to the transmission, make sure there aren’t any wires that will snag when lowering the transmission, use a jack or transmission jack to secure the transmission in place and remove the 4 (17mm) bolts securing the k-member to the bottom of the transmission. The k-member will remain attached to the transmission so no need to remove it.
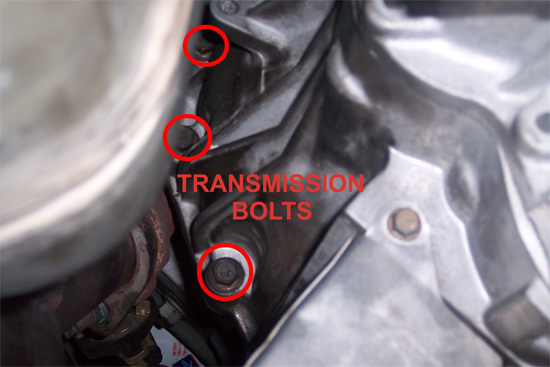
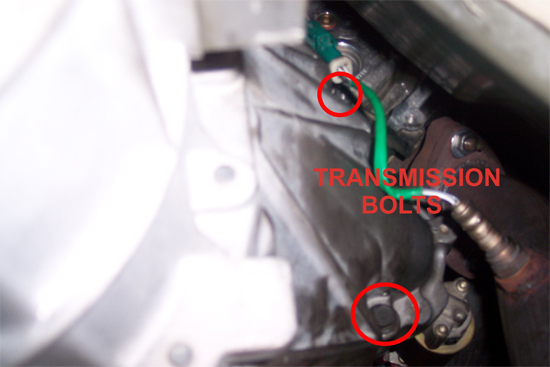
12. Next, slowly lower the transmission enough to get to the top two bolts, to remove them we used two 12in extensions, and two 6in extensions with a shallow 13mm socket on a wobble joint. After removing the top two bolts you can level the transmission back and remove the rest of the bolts 3 on one side, 2 on the other. 7 (13mm) Bolts total securing the transmission to the engine.
13. Next, pull the transmission out of the clutch assembly, may need to use a pry bar with a small amount of force to free the transmission from the engine. After the transmission has cleared the pressure plate it can be lowered, take it off of the jack and set it aside in a safe location.
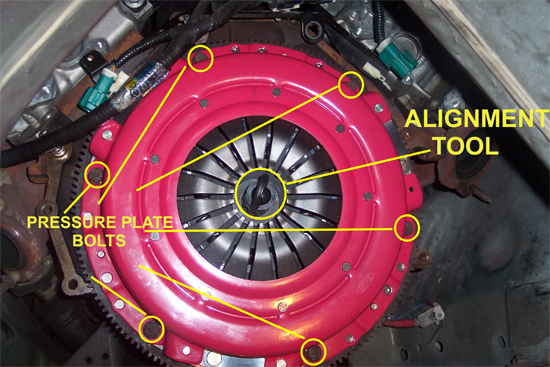
14. Now remove the pressure plate by removing the 6 (13mm) bolts securing it to the flywheel, once all the bolts are out the pressure plate and clutch disk can be removed from the flywheel. May also need to use a pry bar to free the pressure plate from the flywheel (don’t use a lot of force)
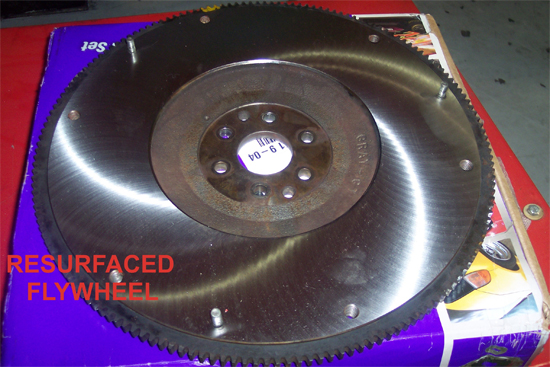
15. Now remove the 6 (15mm) bolts securing the flywheel to the crank remove. At this point inspect the flywheel for cracks, breaks, chips, or missing gear teeth. If badly damaged it should be replaced. If the flywheel is in good condition it is still strongly recommended to get the flywheel resurfaced, this procedure only cost me 40$, and is very much worth it.
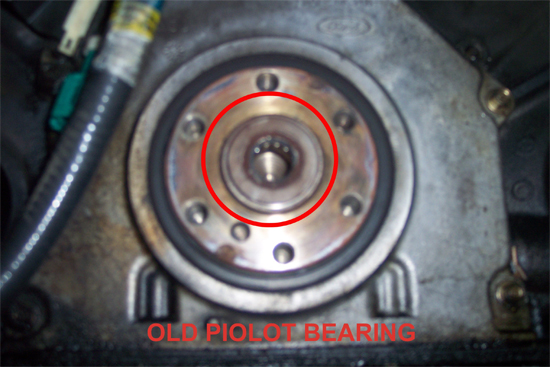
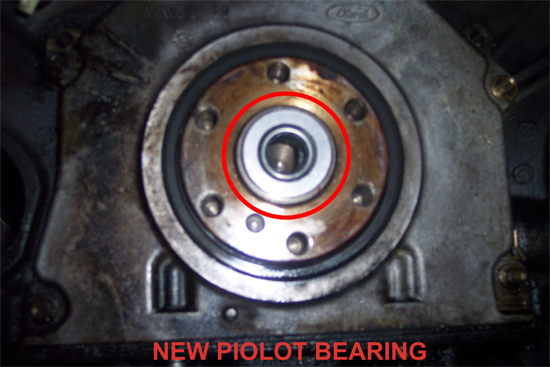
16. It is also recommended to replace the pilot bearing when removing the transmission, can pick one up from AM for 12.99. Will need a bearing remover tool to remove the pilot bearing, if you look at the new bearing, you will notice the two notches on the back side, these notches are what the teeth of the puller will slide into when removing it. When putting the new one in, make sure it is straight, and does not go in sideways. Use a socket big enough to fit around the outer portion with a ratchet extension and hammer to start it, then use a block of wood with a hammer to finish seating the bearing.
17. Now install your freshly resurfaced flywheel, line up the bolts and finger tighten them in a star pattern. They will need to be torqued to specs, when torquing the bolts torque them in a star pattern as well to prevent the flywheel from warping.
18. Now install the new RAM HDX clutch and pressure plate. USE THE ALIGNMENT TOOL PROVIDED IN PACKAGE. The clutch disk flat side will face the flywheel, insert the alignment tool with the clutch disk into the pilot bearing through the flywheel, and then put the pressure plate in place, making sure to line up the dowels of the pressure plate to the flywheel. These bolts will also need to be torqued using the same type of tightening pattern as the flywheel.
19. Next replace the throw out bearing. To replace it, remove the clutch fork from the transmission. Looking into the transmission on the back side of the clutch fork, there is a clip holding the fork to the pivot ball. Spread the clip and push the fork away. The fork will slide down through the opening where the clutch cable is. Remove the throw out bearing, replace with the new one. When re-inserting the fork, give the bottom a few taps with a rubber mallet to make sure it is seated.

20. Now the transmission can be re-installed, a couple extra hands will be very helpful at this point. When I installed mine I loosened my motor mounts a little bit, placed a pole jack on the front of the engine and pivoted the front of the engine up to give some more room when installing the transmission. When installing the transmission, line up the dowels, and push the transmission into place, NEVER DRAW THE TRANSMISSION UP TO ENGINE BY TIGHTENING THE BOLTS. ALWAYS MAKE SURE THE TRANSMISSION IS FLUSHWITH THE ENGINE BEFORE TIGHTENING THE BOLTS. Put all the bolts back in place, and torque them down. Then put the bolts back in place on the k-member and torque the, as well.
21. After the transmission is secured, replace all electrical connections that were connected to the transmission.
22. The starter, sway bar, and exhaust can now be reinstalled.
23. Re-install the drive shaft, making sure to align the marks you made prior to removing, tighten and torque the 4 bolts securing the drive shaft.
24. Now, reinstall the clutch cable onto the fork. Making sure you have adjusted it correctly. Ideally, it is recommended to have about an inch, to inch and a half of free play at the pedal. Re-install the cable cover after adjustments are made.
25. Now fill the transmission back up with the recommended type transmission fluid and the proper amount per manufactures specs. I found it easier to fill the transmission through the top where the gear shift is.
26. Reinstall the gearshift arm, base, cover, bezel and knob. Re-connected the battery terminal, and take your car out for a new test drive, and enjoy the awesome new clutch you just installed.
Installation instructions provided by AmericanMuscle customer Brad Obenshain 4.26.10
