Installation Time
(approx) 2 Hours
Difficulty Level:
Light to Moderate mechanical skill required.
Guaranteed Free Delivery by 12/24! available on most items - Details
$530.10 (kit)
FREE Shipping Market Price $609.99 You Save 13% ($79.89)Add Local Shop Installation
Saved - View your saved items
We're sorry. We couldn't save this product at this time.
or use
Justin: Hey, everyone. I'm Justin with americanmuscle.com, and today we're taking a closer look at and installing the PowerStop Z23 Evolution Pad and Rotor Kit, available for all dual-piston front caliper-equipped 2006 and newer Chargers. Now, you should be checking out this kit for your ride if you're looking to replace and upgrade both the pad and rotors, front and rear of your Charger, for an improved braking experience, less brake fade, and a cooler appearance.All right, guys. So the foundation of this kit from PowerStop will be the company's cross-drilled and slotted G3000 cast iron rotors, which, as you can see, have been finished off in that silver zinc coating to resist any corrosion on your non-friction areas. Now, the slotted and drilled design, well, that's done to help keep the brake surface clean, but also to help with cooling, and PowerStop claims that surface temps on the rotor have dropped nearly 180 degrees here with that drilled treatment, and that's gonna help greatly reduce brake fade, especially when the whole system is working hard to slow the car down from speed.Now, as an added bonus, I'd say that slotted and drilled design admittedly adds a much cooler look behind your favorite set of stock or aftermarket wheels. Now, the second part that is included here will be PowerStop's Z23 pads for both the front and rear. Guys, this pad does feature a carbon fiber ceramic compound that will offer better performance, better heat resistance, and greater bite when compared to a traditional ceramic pad.Now, also worth mentioning, guys, is the fact that these pads will produce roughly 30% less dust compared to your OE pads, which means you're gonna have cleaner wheels over time. Now, the backside of the pads will feature a rubberized shim to help keep noise to an absolute minimum. And finally, guys, the PowerStop kit is backed by a 3-year or 36,000-mile warranty just in case you ever run into any issues.Now, I do also wanna point out that fitment for this kit is admittedly a little bit all over the place, but at the end of the day, it really just boils down to the dual piston front calipers, which came on many different trim-level Chargers dating all the way back to 2006. So do yourself a favor, do your homework, double-trek your trim and your fitment before pulling the trigger just to make sure you get the right kit for your ride.The price point for the kit will live in the mid to high $500 price point, which is certainly gonna be a little bit higher than your generic parts store replacements, but at the same time, it's not nearly as high as some of your big brake kits from companies like Wilwood or Brembo. So it's gonna live right there in the middle. You're definitely getting some upgrades in the form of the pads, but also the cross-drilled and slotted rotors. So if you're looking for a subtle upgrade over just some stock replacements, certainly a kit worth checking out.Now, as far as your installation is concerned, well, brake jobs, certainly gonna be one of the basics of automotive wrenching, but since there is a little bit of elbow grease involved for this one, the site is gonna kick things up to a two out of three wrenches on the difficulty meter, call it a couple of hours or so to complete from start to finish. But what do you say we head out to the shop, check out our detailed walkthrough and tool breakdown.Man: The tools you'll need for this project are a 1/2-inch impact gun, a 13-millimeter socket, a 21-millimeter socket, a 1/2-inch drive ratchet, a 15-millimeter socket, an 18-millimeter socket, an 18-millimeter wrench, a dual-piston caliper compression tool, and a single piston caliper compression tool, a caliper hanger, a clean cloth, and some brake cleaner.Once you've got your vehicle supported safely either on a lift or on a set of sturdy jack stands and you remove the wheel, then we can go ahead and turn the wheels and remove the caliper first and then we'll remove the mounting bracket for the caliper. So we'll be using our 13-millimeter socket at the top and bottom of the caliper here. And then behind it, we've got two 21-millimeter bolts to remove the mounting bracket.So as I said, we're gonna use our 13-millimeter socket to remove this bolt here and this one here at the bottom of the caliper so that we can lift that up out of the way. All right, now we can just go ahead and slide our caliper out. Now, keep in mind, when you remove your caliper, you wanna have some sort of a hanging tool so that you can support it so take less stress off of that brake hose. So we're just gonna use this little rod here and hang it off of the control arm. Now we can go ahead and slide our pads out, get them out of the way.Now we can remove the caliper mounting bracket. Now we'll go ahead and remove the two bolts that hold our caliper mounting bracket on using our 21-millimeter socket. All right, now, you'll notice that our vehicle does not have factory stock rotors because they are slotted and drilled. We're going to go ahead and upgrade ours anyway. These are wore out, so we'll just go ahead and do that. So we just pull the rotor off and repeat that whole process for the other side.Now, before we actually start putting everything back together, it's always a good idea to inspect everything for any damage or anything else that might need to be replaced. One such area are these boots that go along these guide pins here for the actual calipers. Now, you need to pull these out no matter what and re-lubricate them with the supplied grease that comes in the kit. It doesn't take a whole lot, just make sure that it's completely covered so that everything slides smoothly.Next thing you want to do is inspect these boots. Make sure that there are no tears or cracks in them and there's no grease leaking out of them. If there are, the kit does come with replacements for you. So in order to replace them, what you'll need to do is take your small flat head screwdriver, put it underneath the lip of the boots here and just work your way all the way around until it finally pops loose.Once it's out, then you can go ahead and insert your new one and then use something like a 19-millimeter socket and a hammer and gently tap it down until it's back in smooth. So we're not going to replace ours, ours are in pretty good condition, I don't see any leaks with it. So we're just going to leave ours alone and not replace them. We will, however, go ahead and put some new grease on the new guide pins. Like I said, it doesn't take a whole lot, just make sure that it's completely covered so that when it goes back in with the new pads, everything slides the way it's supposed to.Now, once you've got both of your pins lubed up, go ahead and slide them back into the boot and press them down to make sure that it seals around the top edge of the pin. Next thing we're going to do is we're going to pull out these anti-rattle clips here and replace them with the new ones supplied in the kit, and they just simply snap into place like so. Do that for both sides. Now we're ready to put this back on the car.Now, before we install our new rotor, we want to make sure that we've got the correct one. They are labeled for each specific side, and if you look along the top of the edge here, you will see that it has the part number along with the letter L or the letter R. L is for the driver's side, R is for the passenger's side. So once you know you've got the right rotor, it's highly recommended that you use a brake cleaner to go ahead and spray down the rotor and wipe it off with a clean cloth to make sure that you remove any manufacturing oils or residue from when they shipped it. So just go ahead and spray it down and wipe it off. And, of course, you want to make sure that you get both sides. Now we can go ahead and install our rotor and our caliper mounting bracket.Now we can go ahead and install our new rotor back on the hub like so and then we'll reinstall our caliper mounting bracket using the original hardware. Go ahead and insert one of our mounting bolts and then do the same thing for the one on the bottom. And we'll tighten them down with our 21-millimeter socket.Now, with our caliper mounting bracket back on the car, we can go ahead and install our new brake pads. Before you do that, again, we're going to reuse some of this grease that's supplied in the kit. We're going to lubricate the backside of this and also the very ends. Now, be very careful when you put this on there not to get it on the pad surface itself.So like I said, it doesn't take a whole lot, just a little bit. Smear it on. Put some on the ends so they slide good. And then we'll go ahead and slide it into the caliper bracket. Do the same for the other pad. Then we'll go ahead and slide this one in from the backside. Now we're ready to put our caliper back on over our pads. But before we can do that, we've got to compress the two pistons inside the caliper to make sure that they're all the way in because of the extra width of our new rotor and our new pads. So to do that, we're going to use this handy dandy little compressor that you can pick up and rent at most auto parts stores.So to do this, we're just going to put it in here like so. To operate this compressor, basically, you're going to put this hook on the outside edge of the caliper. Make sure that this bar crosses both pistons. And then you're just gently going to squeeze the handle very slowly until the pistons are completely compressed inside the caliper. Once it won't move anymore, we can release the pressure.Now we can go ahead and slide our caliper back over our new pads and secure it using the original hardware. Insert one of the original bolts on top and the same on the bottom. And now we'll tighten them down using our 13-millimeter socket. And you can repeat that process now for the other side as well. Now, the process for the rear is very similar to the front. We've got two bolts to remove the caliper and then we've got two bolts to remove the caliper mounting bracket and then we can slide the rotor off.So to remove the caliper first, we're going to be using a 15-millimeter socket to remove those two bolts. So let's go ahead and get that done. Once you loosen the caliper mounting bolts, you may find that the whole pin starts to spin. If it does, just grab an 18-millimeter wrench, put it on the inside, and hold it while you finish removing the bolt. And just do the same thing for the top bolt. And then go ahead and slide your caliper out and make sure that it's supported so that there's not any undue stress on the brake hose. Then we go ahead and remove our pads simply by sliding them outward away from the rotor.Now we go ahead and remove the two mounting brackets bolts using our 18-millimeter socket. And with the mounting bracket removed, we can go ahead and slide our rotor off. Now, with our old rotor pads out of the way, now's a good time to go ahead and inspect your emergency brake pads, make sure they're still in good condition and they've got plenty of wear left on them. And also use some brake clean to go ahead and clean that area up. And also use maybe like a Scotch-Brite pad to go around the hub area to make the new rotor slide on a little bit easier. Now, once that dries, we can go ahead and start assembling everything back on the car.Now we go ahead and spray some brake clean on our rear rotor to remove any manufacturing residuals, and again, make sure that you get the backside. And now we can go ahead and slide our new rotor back over our axle. All right, and just like the fronts, we're going to go ahead and inspect our rubber boots here and make sure that there's no leaks or no cracks. If they're fine, I recommend just leaving them alone. And then we're going to definitely replace our anti-rattle clips. Just take the old ones out and slide the new ones in, like so.Now we can go ahead and install this using the original hardware and tighten it down with our 18-millimeter socket. And we'll go ahead and insert the bottom one. And we'll tighten it down using our 18-millimeter socket. And again, just like the fronts, we're going to put a little bit of lube on the back of the pad and on the contact points at the top and bottom. And then we can go ahead and slip it in. All right, and then lube up the back one and slide it in place as well.And that wraps up our review and install of the PowerStop Z23 Evolution Sport Brake Rotor and Pad Kit for the Front and Rear for the '06 to '14 Charger with dual-piston front calipers and the '15 to '17 Charger Daytona, RT, all-wheel drive SE, all-wheel drive SXT, and the '18 to current Charger with dual-piston front calipers. Thanks for watching. And remember, for all things Charger, keep it right here at americanmuscle.com.
Subscribe to our YouTube Channel
Features, Description, Reviews, Q&A, Specs & Installation
Brand | PowerStop |
Rotor Location | Front and Rear |
Rotor Type | Drilled and Slotted |
Brake Pad Material | Carbon Ceramic |
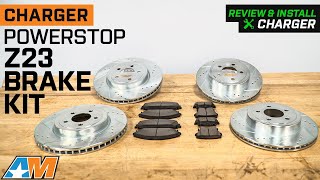
Smooth Brake System. Improve your regular day driving experience by installing the PowerStop Z23 Evolution Sport Brake Rotor & Pad Kit to your Charger. Never fear a slope again with this brake rotor's powerful stopping capabilities and track-tested deceleration quality.
Race-Ready Equipment. This PowerStop Z23 Evolution Sport Brake Rotor and Pad Kit is made out of durable G3000 cast iron plates that have been machine-drilled through a robotically automated system, assuring a direct OEM fitment every time. Each piece has also been zinc-plated to ensure everlasting strength on the road.
Quick-Cooling and Ventilation. This PowerStop Z23 Evolution Sport Brake Rotor and Pad Kit's drill-bored body and specialized slots help keep the brakes cool from constant brake usage and give protection to the brake pads and rotor from damage-inducing debris.
Low Brake Dust. The Brake Pads of the PowerStop Z23 Evolution Sport Brake Rotor & Pad Kit are made out of exceptional carbon fiber components that resist damage caused by high temperatures and reduce brake soot and dust, leaving you with powerful and efficient brake pads that are made to last.
3-Year Warranty. The PowerStop Z23 Evolution Sport Brake Rotor and Pad Kit is backed by a 36,000-mile or 3-year warranty which also includes workmanship or construction problems.
Installation. This product does not require professional installation and would take no more than an hour to replace and attach.
Application. This PowerStop Z23 Evolution Sport Brake Rotor and Pad Kit; Front and Rear is designed to fit 2006-2023 Charger AWD SE, AWD SXT, Daytona, GT and R/T with Dual Piston Front Calipers.
Information on PowerStop's proper Break-In Procedure can be found here: https://www.powerstop.com/brake-pad-break-in-procedure/
Fitment:
PowerStop K2853
CA Residents: WARNING: Cancer and Reproductive Harm - www.P65Warnings.ca.gov
Installation Info
Installation Time
(approx) 2 Hours
Difficulty Level:
Light to Moderate mechanical skill required.
What's in the Box
10 More Questions