 2011-2023
 2006-2010

Installation Time
(approx) 2 Hours
Difficulty Level:
Light to Moderate mechanical skill required.
 FREE 1 to 3-Day Delivery on Orders $149+ Details

$462.00 each
CONFIRM THIS FITS YOUR VEHICLE!
Saved - View your saved items
We're sorry. We couldn't save this product at this time.
or use

American Brothers Design Black Oil Catch Can with SRT Logo (09-23 5.7L HEMI, 6.4L HEMI Charger)
 120
120
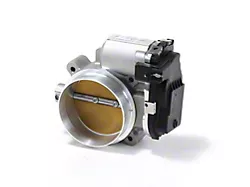
BBK 90mm Throttle Body (13-23 5.7L HEMI, 6.4L HEMI Charger)
 147
147

Carven Exhaust Angled Cut Rolled End Round Exhaust Tip; 5-Inch; Black (15-23 V8 HEMI Charger)
 72
72
Features, Description, Reviews, Q&A, Specs & Installation
| Brand | AFE |
| Cold Air Intake Type | Cold Air Intake |
| Air Intake Tuning Requirements | No Tune Required |
| Cold Air Intake Filter Type | Dry |
| Cold Air Intake Tube Material | Plastic |
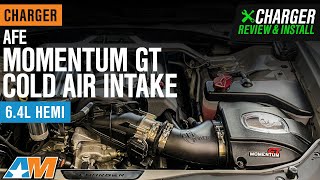
Awesome Airflow Augment. The AFE Momentum Black GT Pro DRY S Cold Air Intake will boost your Dodge Charger's performance on the streets and on the circuit. This cold air intake outperforms your standard air intake by 18%, resulting in higher power and torque gains and faster throttle transmission. With this increased efficiency, your Dodge is now a genuine "Challenger" on the track.
Easy and Eco-Friendly. The AFE Momentum Black GT Cold Air Intake uses the Pro DRY S filter's non-oil air filtration system which employs three layers of successively finer synthesized filtration mesh to remove 99.2% of engine pollutants while maintaining maximum air circulation. This filter is very simple to clean through brushing, dusting, or liquid soap and water.
Visionary Computerized Manufacturing. The AFE Momentum Black GT Cold Air Intake's single-piece housing and roto-molded intake pipes are CAM-assembled and made from durable thermal plastic for robustness and an accurate fit. The air filter is totally insulated from engine heat build-up, and the casing has a direct viewing porthole for simple filter monitoring. Finally, the couplers and clamps are made of heat-resistant elastomers and fortified stainless steel providing a fine and secure fitting.
Installation. This product is made for easy bolted installation but professional help is also recommended. Alone, this product can be installed in no more than 1 hour.
Warranty. This product is sold with a 2-Year limited guarantee for any manufacturing or craftsmanship flaws.
Application. The AFE Momentum Black GT Pro DRY S Cold Air Intake fits all 2011-2023 Dodge Charger 6.4L HEMI models Without a shaker hood.
AFE 51-72203
CA Residents:  WARNING: Cancer and Reproductive Harm - www.P65Warnings.ca.gov
Installation Info
Installation Time
(approx) 2 Hours
Difficulty Level:
Light to Moderate mechanical skill required.
What's in the Box
Tech Guides:
Some Applications are 50-State Legal (CARB Compliant). CLICK HERE for CARB EO D-550-22 Details