Talk to a Charger Sales Tech
1-877-887-1105
M-F 8:30A-11P, Sat-Sun 8:30A-9P
$20K Sweeps! 10 Chances to Win! Enter Daily >

K&N Blackhawk Cold Air Intake (06-23 5.7L HEMI Charger w/o Shaker Hood)

Item CR2464-57
Verify parts fit and get product recommendations.
Charger Sales Techs: Connect Now M-F 8:30A-11P, Sat-Sun 8:30A-9P
$0.00
On Sale

$349.99 (kit)

FREE Shipping Market Price $459.99 You Save 24% ($110.00) Up to 10% off for Military & First Responders! See Details

Will this fit your Vehicle?

Select a different vehicle Help?
Update or Change Vehicle
Ship to: Ashburn - 20149
Sorry, please enter a valid US or CA postal code
We're sorry, zip can't be updated at this time.
Recommended Install Shops
How It Works
Install Shops are available near Ashburn - 20149

Add Local Shop Installation

Total cost of service $175.00
    Create a list
    Add to New List

    Saved - View your saved items

    We're sorry. We couldn't save this product at this time.

    or use

      Product Videos

      Justin: The K&N Blackhawk Intake that we have here will be a great choice for the 2006 and newer Charger owners who might be looking for a no-tune required intake that will deliver a very stealthy all-black appearance under the hood, and wanna go with one of the most trusted names in the industry.Now, the Blackhawk will come with everything needed for the installation, including your dry synthetic filter, your included heat shield, and, of course, all of your necessary components all for right around that high $400 price point. Installation is not gonna require any permanent modification here, gang, very easy day in the garage.So, therefore, figure pretty soft one out of three wrenches on the difficulty meter and about an hour or so to complete from start to finish. But if you hang with me for a bit, we'll walk you through that job later in the video. Now, as the name implies, the Blackhawk from K&N is all about one thing, and that is murdering out or blacking out 99% of the system, including things like your synthetic filter, heat shield, but even smaller things such as your hose clamps, as you can see, all been done in black.Now, your only exception here with this kit is gonna be the badging on the K&N logo or plaque that has been milled onto the mandrel-bent aluminum intake tube. But breaking things down even further, I think you'll find the Blackhawk like K&N's other offerings for the 5.7 Hemi will feature that open-element filter design, which is gonna have its pros, it's gonna have its cons.Now the pros will be a dramatic increase in sound coming from under the hood under hard acceleration, just this kind of angry growl, if you will, along with a much cooler look whenever you pop the hood. Now, the drawback to this open-element design is that you're not fully isolating that filter from any hot engine bay air from entering the filter or the intake. And ultimately, that's where your sealed enclosure will get the nod.Now, if you are interested in a sealed enclosure instead, we can certainly check out the rest of our selection back at AM. But getting back to the Blackhawk here, what does this all mean for power? Well, the reality is guys with a no-tune required intake such as this, my experience, you're typically looking at high single-digit, low double-digit gains at best to the tire without the use of that tune.Now that's not to say there aren't benefits here, including the small bump in power along with that sound, and even things like a little bit more throttle response in addition to that very cool look under the hood. But aside from the stealthy appearance and the added power and sound benefits, the Blackhawk is all also gonna deliver some really nice components, guys, including things like your black aluminum intake tube here that we did briefly mention earlier.And you're also getting one of K&N's signature filters. Now, this filter is a bit unique because unlike some of K&N's other options that utilize a traditional oiled cotton gauze filter, the Blackhawk here is gonna utilize a dry, synthetic material instead. So yes, it is gonna be washable. It is reusable, but you won't need to go ahead with that extra step re-oiling the filter, which some owners actually might prefer instead. Now, in regards to cleaning, K&N does state this filter can go up to 100,000 miles before needing a deep cleaning.I will also say one of the drawbacks with going with a black filter is that you never really know when it's fully dirty. So, if were you guys, I'd probably shorten up that cleaning interval a little bit, maybe every 10,000, 20,000 miles. Pull it off, blow it off with some compressed air, maybe hose it down, whatever the case, just make sure you drive it fully before you reinstall it back into your ride.Last but not least, K&N does kick in everything needed for the install here, guys, including all of your hardware, couplers, all that good stuff. It's a very complete kit from start to finish. I love the black band clamps here or clamps. They do really help nail that blacked-out look. Obviously, [inaudible 00:03:40] your elbow with the K&N logo, and you got your heat shield here.Aluminum heat shield is gonna do its best to isolate that synthetic filter from all of that hot engine bay air. Gonna do so using the included weather-stripping, which will go on top of the heat shield, help seal that filter to the underside of your factory or aftermarket hood, and then utilize the factory cold air ducting to feed the filter itself.But now let's shift gears and get into the install as promised earlier, guys. And again, solid one out of three wrenches, about an hour or so from start to finish. This is basic wrenching 101, intakes always a great place to start if you've never wrenched before on your car. But to give you a better idea of how things will go down on your Hemi at home, check out our detailed walkthrough and tool breakdown now.Man: Tools used for this installation, 3/8 electric impact gun, cutting pliers, 14-millimeter wrench, 10-millimeter wrench, 10-millimeter ratcheting wrench, 1/4-inch drive extension, 3/8 to 1/4-inch drive adapter 13, 10, and 8-millimeter sockets, and a 1/4-inch drive ratchet. First thing we're gonna do is remove our engine cover. You're just gonna lift up on it, give it a little bit of a tug, and off it comes. Next, we're gonna remove our air intake sensor connector, plus our two 8 millimeters here on our clamps to remove our air intake tube.Just gonna push down on that clip, squeeze it, remove that. I'm gonna take my 8-millimeter here on my gun. Loosen my clamps up. That'll allow me to pull it off of the airbox and the throttle body and remove the air intake tube. Now that we have our air intake tube off, we're gonna remove our PCV hose. Just gonna give it a tug and a twist, pull off of there. And we're gonna remove it from the airbox. Twist it off. So next, we're gonna remove our 8-millimeter that will allow us to remove our airbox. Gonna wanna hold on to this bolt because we're gonna need it when we reinstall the new cold air intake.Now that 8-millimeter bolt's out, we're gonna be able to lift up on our airbox. Give a little bit of snug, and she comes right out. Now that we have our old airbox uninstalled, we're gonna look at what we have here in this kit. And we're gonna have to remove some parts from our old air intake tube. The first thing we're gonna remove is our air intake sensor. We're just gonna give it a twist and pull it out. Just like that. We're gonna lay that right here. We're gonna move the air intake tube out of the way now because we're pretty much done with that. And we're gonna look at what we got in this kit from K&N.Now on this kit here, we're gonna use the grommet that's supplied, which is gonna go in here and then they give you two fittings for the PCV hose. One is for a 6.1-liter, one's for a 5.7. Our vehicle's a 5.7. So we're gonna install the 5.7 into this and our grommet into here and our air intake sensor into here. So first thing I'm gonna do is put our grommet in. I'm gonna push it in and get it started, get it all the way around. And once I have that in, I'm gonna take our air sensor and I'm gonna get that started and spin it and push it down in.You might have to push it in and you'll see there's a little clip on it that holds it from going any further. So now that we have that installed, we're gonna take our 5.7 fitting, screw that into our air intake tube here. And you gotta remember this is plastic, so you're not gonna wanna go crazy tight with it or you're gonna strip it or break the plastic.Take my 14-millimeter wrench. I'm gonna get it pretty good and tight. That'll be enough. Now that we have this done, now we're gonna work on our airbox and start putting our rubber seal on it. So now I'm gonna install our rubber seals onto our airbox right here. We have a shorter one and a longer one, the longer one's gonna go around the bottom. Shorter one's gonna be on the top. So I'm gonna start by pressing it down, sliding into place. And I'm gonna work it around the whole upper lip of our airbox. And Pretty much like that, it's gonna seal and go down and you'll just go all the way around. And I'm just gonna go around and make sure I pushed it down all the way. And that's the top one.Now we're gonna install our bottom gasket. This is just gonna help seal the airbox to the chassis. I'm gonna start it here in the corner. See how it lays out. You're gonna have to push it down on to get it to go down, but it fits pretty nice. Now, if you have extra left over, you can just take a pair of cutters, cut this, make it fit. I'm actually gonna cut it back. So about this section here because we have a bracket that's gonna bolt here. So I'll end up cutting it here and that'll be our seal for when it sits down inside the chassis.Next, we're going to install this bracket that they supply in the kit. And we're gonna use our 10-millimeter bolt with our flat washer. They're the bigger washers in the kit. They give two of them, plus they give a locking nut. So what we're going to do is take this bracket, we're going to install it like this, slide our bolt through, hold it in there like that, put our flat washer underneath. With our nut, get that started.And what I'm gonna do is take my 10-millimeter ratcheting wrench, get on there. Use your 10-millimeter to hold it underneath. And I'm gonna tighten it up until it's pretty snug, but still movable. That way we can move it where we want when we drop our airbox back down in. That's pretty good there. It's pretty tight. So now we'll install our bracket onto our head.Now we're gonna take our bracket with our spacer and our 13-millimeter that's supplied in the kit. We're gonna install this into our head. This is gonna hold our air intake tube on. So we're gonna just take that, get that started. And again, I'm gonna take my 13-millimeter this time and my 1/4-inch drive ratchet, and I'm gonna snug this up and make it pretty tight, but I wanna be able to it when we go to hook our air intake tube up.So that's probably good there. Now we'll install our airbox. Now I'm gonna drop in our new airbox. I'm gonna seat that in place and get it where we want it. And once we get that in, now we'll install our bolts that hold it onto our brackets. So now I'm gonna install our 10-millimeter that comes in the kit with our 2 washers and nuts. I'm gonna put it through that bracket we installed into the chassis there. And I will install flat washer, the locking nut on this one that's gonna hold it in place. I'll take my 10-millimeter and snug this up.Now I have that one snugged up. Next, we'll install our bracket over here with our 8-millimeter that we removed in our disassembly. So now we're going to install this bracket with this 10-millimeter. We're gonna put this on. This is gonna end up sitting down on here. We'll use our 8-millimeter that we took out on our uninstall. So I'll install this bracket down inside here, put our flat washer and our nut.Once I have that, I'm gonna take my 10-millimeter ratcheting wrench, snug this one up. Wanna move our 8-millimeter like that. Now we'll install our 8-millimeter that we did on our uninstall, and that'll secure our airbox to the chassis. Now we'll put our 8-millimeter in, run that in with my gun. Now we'll go back. And once you leave it loose, you can move it around where you want it just so you get it to fit properly. Now that we have our new airbox installed and bolted in place, we're going to install this into our air filter and I'm gonna do this on the table here.You're gonna push it down. There's a lip on this. You'll see it'll go so far, then it'll stop. We're gonna take our hose clamp, snug it up with our 8-millimeter. I'll get it started a little bit and put it on, get it in place. Once I get it in place, now I'll finish it with my 8-millimeter. I wanna make sure it's even all the way around. That looks pretty good. So now we have that tight and that's all installed. Now we'll start installing our rubber tubes onto our air intake. So now we're gonna install our rubber tubes onto our air intake pipe. You're gonna see that our air intake center's this will way. You're gonna see this rubber tube here.This rubber tube has a K&N logo on it. That's gonna go towards the throttle body. So what I'm gonna do is take our hose clamps and start them around onto our tubes. Then install that onto our intake tube. I'm gonna take another clamp, install that to this side. And then we'll install this one. This is gonna go on to the air filter. We're gonna install that with a hose clamp on the back part.Now, when I get them started, what I'm gonna do is I'm going to take my 8-millimeter and just snug them up a little bit. You wanna make sure you give yourself plenty of room in here so that it slides onto the filter. I'm gonna hold this in place, and just snug it up a little bit like that. And I'm gonna do the same to this one. And I'm not gonna make them too tight because I'm gonna wanna be able to move them when we get it on the vehicle. So now that we have those installed, we're gonna take this over, install it on our car now.So before we install our air intake tube, we're gonna install our air temp adapter right here. I'm gonna plug this in to our harness. I'm gonna run it underneath here, fish it down through. That way, when we get our air intake tube on, we can just hook that up. It gives extra length for our wires so we can connect it over to here.Now I'm gonna install our air intake tube. I'm gonna put it on to our [inaudible 00:17:32], and I'm gonna tighten these two clamps up with our 8-millimeter to hold it into place where I want it. Now I'll tighten this one, and just snug them a little bit. That way, it holds it in place where it's gonna be. Next, we're going to install our bracket on the back of our air intake tube that came off our cylinder head. So now I'm gonna install our 10-millimeter bolt on the back where our bracket goes into our air intake tube. I'm gonna get that started. I used a flat washer and a lock washer.Now that I got that tight, we're gonna take our air temp sensor wire, connect that in. Next, we'll install our air filter. Next, we're gonna install our hose clamp onto our rubber tube and drop our air filter in place. Might take a little bit just to finagle it down in here. And once we get it where we want it, we'll slide that rubber tube out some so I can get it in.And once we have that in place, spin the hose clamps up. Line them up. Take my 8-millimeter, snug the one up. And get the second one in place where it goes. Gonna line that one up. Tighten those both up. Air filter is in place, now we'll install our engine cover. Now we'll install PCV hose. We're just gonna push it over top and get it on and get it in place.You wanna make sure you push it as far in as you can get it. And we'll bend this. This will go onto our air intake tube. Put it down underneath the AC line like that. Now we'll install our engine cover. Just gonna wanna give it tap down in place. That wraps up this review and install of our K&N Blackhawk Series Cold Air Intake. Thanks for watching. And for all things Charger, keep it right here at americanmuscle.com.

      Product Information

      Features, Description, Reviews, Q&A, Specs & Installation

      Features & Specs

      • High-Powered Cool Air Charge for More Power
      • Improves Throttle Response
      • Outflows the Factory Intake System
      • Black, DryFlow® Synthetic Air Filter
      • High-Flow, Black Powder-Coated, Aluminum Intake Tube
      • Includes a Durable, 1-Piece Heat Shield
      • No Computer Re-Tune Required
      • Simple, No-Drill Installation
      • Backed by the Manufacturer’s Million Mile or 10-Year Limited Warranty
      • CARB-Certified with EO Number D-269-76 (Only Up to 2019 Model Year)
      • Designed for All 2006 to 2023 5.7L HEMI Dodge Charger Models Without Shaker Hood

      Description

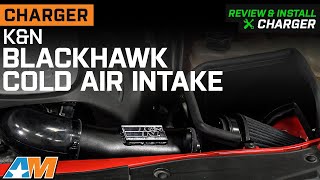
      High-Powered Performance. Bring in more confidence in your Dodge Charger’s dynamic performance by using the K&N Blackhawk Cold Air Intake. This intake system offers a high-powered, cool-air charge that outflows the factory intake. The larger volume of oxygen-rich air will release your engine’s potential and provide you with improved fuel economy, acceleration, torque, and horsepower.

      ECU Calibration Not Required. Using this Blackhawk Cold Air Intake does not require re-tuning of your vehicle’s ECU. The factory tune will do the job and let this intake upgrade operate for your engine’s optimum performance.

      Premium Synthetic Dry Filter. The conical DryFlow® air filter features a multi-layer progressively finer, washable synthetic mesh that can endure repeated cleaning cycles. The durable and innovative construction enables optimum airflow and high filtration capacity. These qualities significantly increase the available air volume for maximum airflow that generates additional power.

      Highly Durable Materials. K&N ensures the high quality of this Blackhawk Cold Air Intake by using a high-grade aluminum intake tube. This tubing is covered in a black powder-coated finish for extra durability and reinforced corrosion resistance. This intake system also features a durable heat shield that protects the system from the surrounding hotter, under-the-hood air.

      Drill-Free Installation. Featuring a hassle-free installation, this Blackhawk Cold Air Intake fits into your vehicle’s factory mounting locations with no drilling required. The installation completes using standard hand tools and light to moderate mechanical skills.

      Warranty. The K&N Air Filter and Intake System come with a limited warranty that covers defects in materials and workmanship. This warranty lasts for 10-Years or a Million Miles, whichever comes first, from the date the product was purchased. Some exclusions and limitations may apply; please check the terms and conditions for full details.

      Street-Legal Use. K&N equips your Charger with an emission-compliant intake system for all-terrain performance. This Blackhawk Cold Air Intake is 50-state SMOG legal, certified under E.O. Number, D-269-76.

      Application. This K&N Blackhawk Cold Air Intake is intended for use on all 2006 to 2023 5.7L HEMI Dodge Charger models without Shaker Hoods.

      Fitment:

      Details

      K&N 71-1542

      CA Residents: WARNING: Cancer and Reproductive Harm - www.P65Warnings.ca.gov

      Installation & What's in the Box

      Installation Info

      What's in the Box

      • (1) Air Filter
      • (1) Intake Tube
      • (1) Heat Shield
      • (1) Adapter
      • (5) Hose Clamps
      • (3) Hose
      • (2) Edge Trims
      • (2) Extension Harnesses
      • Installation Hardware
      4.7

      Customer Reviews (218)

        Questions & Answers

        10 More Questions

        Will It Fit My Charger

        • Daytona - 17, 18
        • Daytona R/T - 06
        • Pursuit - 12, 13, 14, 15, 16, 17, 18, 19, 20, 22, 23
        • R/T - 06, 07, 08, 09, 10, 11, 12, 13, 14, 15, 16, 17, 18, 19, 20, 21, 22, 23
        • R/T Road & Track - 15, 16
        • SE - 08, 09, 10, 11, 12, 13, 14