Talk to a Charger Sales Tech
1-877-887-1105
M-F 8:30A-11P, Sat-Sun 8:30A-9P
$20K Sweeps! 10 Chances to Win! Enter Daily >

PowerStop OE Replacement Brake Rotor and Pad Kit; Front and Rear (06-23 Charger AWD SE, AWD SXT, Daytona, GT & R/T w/ Dual Piston Front Calipers)

Item CR2973
Verify parts fit and get product recommendations.
Charger Sales Techs: Connect Now M-F 8:30A-11P, Sat-Sun 8:30A-9P
$0.00
Our Price

$496.02 (each)

FREE Shipping Market Price $570.42 You Save 13% ($74.40) Up to 10% off for Military & First Responders! See Details

Will this fit your Vehicle?

Select a different vehicle Help?
Update or Change Vehicle
Ship to: Ashburn - 20149
Sorry, please enter a valid US or CA postal code
We're sorry, zip can't be updated at this time.
Recommended Install Shops
How It Works
Install Shops are available near Ashburn - 20149

Add Local Shop Installation

Total cost of service $349.00
    Create a list
    Add to New List

    Saved - View your saved items

    We're sorry. We couldn't save this product at this time.

    or use

      Product Videos

      Jake: Jake here for American Muscle, and today I'm taking a look at the PowerStop OE Replacement Front and Rear Rotor and Pad Kit, fitting various different models in terms of Chargers. Now, before we dive in here, wanna take a moment to acknowledge that this kit does have a bit of a complicated fitment, so make sure you double-check on our website that this is gonna fit on your Charger before you buy it. If you're looking for an affordable, effective upgrade to your street-driven Charger's brakes, well, then PowerStop has got you covered here. These are a mild upgrade versus your stock brakes, that are gonna give you that factory-fresh feel, with some additional stopping power, all for a very budget-friendly price point.Now, we all love talking about go-fast parts, but if you're gonna go fast, you need to be able to stop fast too. Now, upgrading your brakes is an easy, effective way to make your car not only better to drive, but also safer. PowerStop is a company that is solely focused on brakes and braking components. So, when they put their stuff out, you know it's gonna be good. This is a full replacement kit for the front and rear of your Charger, and that's gonna include all the components that you need to replace and upgrade your brakes. So you get new rotors for the front and rear, as well as new pads, plus all-new stainless steel hardware. The rotors are a solid setup, and they are built to be a direct bolt-on replacement. Now, these are also manufactured to very strict tolerances, to ensure proper performance, and the weight and the vane count here in the center is gonna match your original rotors as well. Same is true for the pads too. Front and rear are basically the same, and they contain the same proprietary compound, and they're designed to deliver consistent maximum stopping power, all while keeping dust and noise at bay. Now, it is worth noting that these are intended for street use and not for heavy-duty track use. However, their construction does give them a leg up over your stock brakes, so they are decidedly an upgrade.As for that construction, the pads, again, feature PowerStop's proprietary ceramic compound, and this is designed to be resistant to rust and corrosion, as well as be low-noise and low-dust, all while giving you a little bit of extra bite when you hit the pedal. They also use positive mold technology during the manufacturing process, making them strong and durable. Now, that pad surface is also thermal scorched for optimal performance, and also allowing for a fast break-in. Now, the rotors, again, are made from OEM-grade cast iron. They're totally mill-balanced, for a smooth, balanced operation, and they're, again, made to very strict tolerances, so they're gonna fit well, and they're gonna perform just as good if not better than your original equipment. Now, the faces of the rotors, as you can probably see, have this crosshatch finish on them, to help with pad break-in. And as I mentioned previously, they're built to have that same weight and vane count as your original rotors, too. So they're gonna provide you with a little bit more stopping power, but similar overall operation and feel to your factory setup. It might just get a little bit more initial bite when you first hit that pedal.Now, pricing for the set comes in at just about $400, and that does make them a pretty solid bargain for what you're getting here. Now, again, these aren't super-grabby track pads, or drilled and slotted rotors, but they are a budget-friendly setup that's great for a street-driven car. They're still gonna give you a little bit of a boost in stopping power, and if you've priced out brakes recently, you know that these are a pretty good value for your money.Installation here is gonna get a two out of three wrenches on our difficulty meter, and should take you about four hours to complete. Now, again, everything you need to replace your factory pads and rotors is included here, even that new hardware. This is, again, a 100% bolt-on setup, so there's no modification needed to get these fitted. Just swap out your stock ones, put these ones on. Now, brakes are a pretty straightforward procedure. They just require some time and patience, so this is certainly an upgrade that you can tackle at home. And to show you exactly what's involved, let's head over to the install bay.Man: The tools you'll need for this project are a half-inch impact gun, a 13-millimeter socket, a 21-millimeter socket, a half-inch drive ratchet, a 15-millimeter socket, an 18-millimeter socket, an 18-millimeter wrench, a dual-piston caliper compression tool, and a single-piston caliper compression tool, a caliper hanger, a clean cloth, and some brake cleaner.Once you've got your vehicle supported safely, either on a lift or on a set of sturdy jack stands, and you remove the wheel, then we can go ahead and turn the wheels, and remove the caliper first, and then we'll remove the mounting bracket for the caliper. So, we'll be using our 13-millimeter socket at the top and bottom of the caliper here. And then behind it, we've got two 21-millimeter bolts to remove the mounting bracket. So, as I said, we're gonna use our 13-millimeter socket to remove this bolt here, and this one here at the bottom of the caliper, so that we can lift that up out of the way. All right. Now we can just go ahead and slide our caliper out. Now, keep in mind, when you remove your caliper, you wanna have some sort of a hanging tool, so that you can support it, so take less stress off of that brake hose. So, we're just gonna use this little rod here, and hang it off of the control arm. Now we can go ahead and slide our pads out, get them out of the way.Now we can remove the caliper mounting bracket. Now we'll go ahead and remove the two bolts that hold our caliper mounting bracket on, using our 21-millimeter socket. All right. Now, you'll notice that our vehicle does not have factory stock rotors, because they are slotted and drilled. We're going to go ahead and upgrade ours anyway. These are wore out, so we'll just go ahead and do that. So, we just pull the rotor off, and repeat that whole process for the other side. Now, before we actually start putting everything back together, it's always a good idea to inspect everything for any damage, or anything else that might need to be replaced. One such area are these boots that go along these guide pins here for the actual calipers. Now, you need to pull these out no matter what, and relubricate them with the supplied grease that comes in the kit. It doesn't take a whole lot. Just make sure that it's completely covered, so that everything slides smoothly.Next thing you'll wanna do is inspect these boots. Make sure that there's no tears or cracks in them, and there's no grease leaking out of them. If there are, the kit does come with replacements for you. So, in order to replace them, what you'll need to do is take your small flathead screwdriver, put it underneath the lip of the boots here, and just work your way all the way around until it finally pops loose. Once it's out, then you can go ahead and insert your new one, and then use something like a 19-millimeter socket and a hammer, and gently tap it down until it's back in smooth. So, we're not gonna replace ours. Ours are in pretty good condition. I don't see any leaks with it. So we're just gonna leave ours alone and not replace 'em.We will, however, go ahead and put some new grease on the new guide pins. Like I said, it doesn't take a whole lot. Just make sure that it's completely covered, so that when it goes back in with the new pads, everything slides the way it's supposed to. Now, once you've got both of your pins lubed up, you can go ahead and slide 'em back into the boot, and press 'em down to make sure that it seals around the top edge of the pin. Next thing we're gonna do is we're gonna pull out these anti-rattle clips here, and replace 'em with the new ones supplied in the kit. And they just simply snap into place, like so. Do that for both sides. And now we're ready to put this back on the car.Now, before we install our new rotors, we wanna make sure that we get some brake cleaner and spray down the outside of it, make sure that there's no residual oils or manufacturing chemicals left on the rotors before we install 'em, so they don't contaminate the brake pads. So, we'll just spray it on, and wipe it down. Make sure it's all nice and clean, and then flip it over and make sure we get the other side.Now we can go ahead and put it on the car. And we'll just slip it onto the hub. So, before we reinstall the caliper mounting bracket, we're gonna wanna replace these two spring clips here, that are the anti-rattle clips. To replace those, basically, you just have to pull up on 'em and remove 'em. They pop out pretty easy. And we'll just slide the new ones in. And now we can go ahead and mount it back up using the original hardware. And now we'll tighten it down with our 21-millimeter socket. Now, we're gonna apply just a little bit of the supplied brake pad lube, just to the back of it, just a little bit, and on the ends, where it slides through the caliper. Just smear it in. It'll just help with the noise further down the road. Now we just go ahead and slide our pad in to our anti-rattle clips. And do the same thing for the other pad. And we'll just slide the other pad in the back.Now, since our new pads and rotors are gonna be thicker than the ones we took off, we're gonna need to compress the pistons in the caliper before we can slide it over the pads. In order to do that, you're gonna wanna rent a dual-piston caliper compressor, so that you can do both pistons at the same time. You can get this in your local parts store relatively cheap. So, you just hook it in here like this, you squeeze the handle, and slowly compress the pistons back into the caliper, and then release the pressure. Now you can go ahead and slide it over the pads. Now, we'll secure it, using the original hardware. Then we'll tighten those down with our 13-millimeter socket. And now you can repeat that whole process for the other side.Now, the process for the rear is very similar to the front. We've got two bolts to remove the caliper, and then we've got two bolts to remove the caliper mounting bracket, and then we can slide the rotor off. So, to remove the caliper first, we're gonna be using a 15-millimeter socket to remove those two bolts. So, let's go ahead and get that done. Once you loosen the caliper mounting bolts, you may find that the whole pin starts to spin. If it does, just grab an 18-millimeter wrench, put it on the inside, and hold it while you finish removing the bolt. And just do the same thing for the top bolt. And then go ahead and slide your caliper out, and make sure that it's supported, so that there's not any undue stress on the brake hose. Now we can go ahead and remove our pads, simply by sliding them outward, away from the rotor. Now we can go ahead and remove the two mounting brackets' bolts, using our 18-millimeter socket. And with the mounting bracket removed, we can go ahead and slide our rotor off.Now, with our old rotor pads out of the way, now's a good time to go ahead and inspect your emergency brake pads, make sure they're still in good condition and they've got plenty of wear left on them. And also, use some brake clean to go ahead and clean that area up. And also, use maybe, like, a Scotch-Brite pad to go around the hub area, to make the new rotor slide on a little bit easier. Now, once that dries, we can go ahead and start assembling everything back on the car.All right. So, just like the fronts, before we put our new rotors on, we're gonna wanna spray 'em down with some brake clean and get 'em wiped off, make sure that they're all clean and ready to go. Now we can go ahead and slide our rotor on, making sure that it's seated. Now we can go ahead and replace the anti-rattle clips with the new set, just like we did for the fronts. Now we can go ahead and reinstall our caliper mounting bracket, using the original hardware. And we'll tighten them down, using our 18-millimeter socket.All right. Now we can go ahead and put a little lube on the back of the pads, and on the end points. Just spread it around a little bit, then go ahead and slide it into place. And do the same thing for the one on the backside. Now we can go ahead and slide our brake pad in on the backside. Now, we will need to compress the piston in the rear caliper as well. And to do that, you'll need a different compressor tool, that, again, you can rent from your local auto parts store. Works the same way. You slip it in, squeeze the handle, compress the piston all the way in. Once it stops, then you can go ahead and release the handle. And now we can go ahead and slide our caliper over our new pads. And we'll secure that with our original hardware. Insert our upper bolt, then move to the lower. And now we can tighten it down using our 15-millimeter socket and our 18-millimeter wrench. And now you can repeat that whole process for the other side.And that wraps up our review and install of the PowerStop OE Replacement Brake Rotor and Pad Kit for the Front and Rear, for the '06 to '14 Charger with dual-piston front calipers, the '15 to '17 Charger Daytona R/T, all-wheel drive SE, and all-wheel drive SXT, as well as the '18 to current Charger with dual-piston front calipers. Thanks for watching, and remember, for all things Charger, keep it right here at americanmuscle.com.

      Product Information

      Features, Description, Reviews, Q&A, Specs & Installation

      Features & Specs

      • Replacement Brake Rotors
      • Vented Structure with Plain Surface
      • Single Piece Cast Iron Design
      • Front Nominal Thickness of 28.19 mm
      • Rear Nominal Thickness of 22.10 mm
      • Front Outer Diameter of 345 mm
      • Rear Outer Diameter of 320 mm
      • Manufacturer Warranty Against Defects
      • Comes with Ceramic Brake Pads
      • Easy Installation
      • Fits 2006-2023 Charger AWD SE, AWD SXT, Daytona, GT and R/T with Dual Piston Front Calipers

      Description

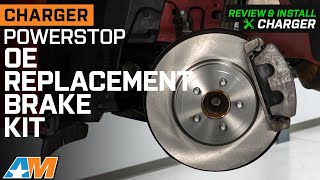
      Easy Brake Solution. Get better stopping power for your Charger and replace your rusty stock rotors with this PowerStop OE Replacement Brake Rotor and Pad Kit; Front and Rear. Designed to restore the braking power of your car that you once enjoyed, it features a vented design and a plain surface for excellent street-grade stopping reliability.

      Tough Structure. Made for street cruising vehicles, it is made of cast iron for good heat dispersion, fracture toughness, and a longer lifespan as well as dependable stopping power that won't rust easily.

      Warranty. There is a manufacturer warranty on this product against factory defects.

      Installation. This product is easy to install and should take about 4 hours.

      Application. This PowerStop OE Replacement Brake Rotor and Pad Kit; Front and Rear is designed to fit 2006-2023 Charger AWD SE, AWD SXT, Daytona, GT and R/T with Dual Piston Front Calipers.

      Information on PowerStop's proper Break-In Procedure can be found here: https://www.powerstop.com/brake-pad-break-in-procedure/

      Fitment:

      Details

      PowerStop KOE2853

      CA Residents: WARNING: Cancer and Reproductive Harm - www.P65Warnings.ca.gov

      Installation & What's in the Box

      Installation Info

      What's in the Box

      • (4) Brake Rotors
      • (8) Brake Pads
      • Mounting Hardware
      4.5

      Customer Reviews (200)

        Questions & Answers

        10 More Questions

        Will It Fit My Charger

        • Daytona - 17, 18
        • GT - 18, 19, 20, 21, 22, 23
        • R/T - 06, 07, 08, 09, 10, 11, 12, 13, 14, 15, 16, 17, 18, 19, 20, 21, 22, 23
        • SE - 07, 08, 09, 10, 13, 14, 15, 16, 17
        • SXT - 07, 08, 09, 10, 12, 13, 14, 15, 16, 17, 19, 20, 21, 22, 23