FREE 2 or 3-Day Delivery on 10,000+ Items. Details

Talk to a Charger Enthusiast
1-877-887-1105
M-F 8:30A-11P, Sat-Sun 8:30A-9P
$20K Sweeps! 10 Chances to Win! Enter Daily >
The AmericanMuscle Show is Back! Register Now>

Diode Dynamics LED Front and Rear Side Marker Lights; Smoked (15-23 Charger)

Item CR1462
Call a Charger Enthusiast at 1-877-887-1105
M-F 8:30A-11P, Sat-Sun 8:30A-9P
$0.00
Market Price $227.99 You Save 12% ($28.04)
Our Price

$199.95 (set of 4)

FREE Shipping

Will this fit your Vehicle?

Select a different vehicle Help?
Update or Change Vehicle
Ship to: Ashburn - 20149
Sorry, please enter a valid US or CA postal code
We're sorry, zip can't be updated at this time.
    Create a list
    Add to New List

    Saved - View your saved items

    We're sorry. We couldn't save this product at this time.

    or use

      Video Review & Installation

      Justin: The Diode Dynamics Front and Rear LED Side Markers that we have here today should appeal to all 2015 and newer Charger owners who wanna completely black out their markers themselves, while also adding some unique and very bright, quality LED lighting at the same time. Now, this American-made set will include two amber markers for the front, along with two red markers for the rear, all for right around the low $200 price point. Install is gonna be a very straightforward plug-and-play job, guys. Figure a soft one outta three wrenches on the difficulty meter. Maybe 20 minutes or so of your time to complete from start to finish, as we'll show you later in the video. So, right off the bat, guys, I do wanna say that if you're looking to just simply smoke the marker lights, the factory marker lights on your ride, well, you can certainly save a few bucks and go with the more traditional vinyl tint kit instead.Now, we do have a couple of different options for your Charger back on the site, including some vinyl, so feel free to check out the rest of our selection first before pulling the trigger. Now, on the other hand, if you dig that smoked, or blacked-out look, and you'd like to add some brightness through a very high-quality LED, along with the unique lighting pattern, well then you have to check out these options from Diode. Now, I say quality in this case, guys, because this isn't your run-of-the-mill, overseas-style, DIP LED chip. This is an American-made SMD, or surface-mounted diode, that is not only brighter than those other cheaper options, but also a lot more durable as well. And as a result, Diode Dynamics does back their kits with a limited lifetime warranty, in case you run into any issues.Let's get back to that unique lighting pattern, guys, because unlike your factory markers that utilize a single dull incandescent bulb in the middle, the Diode options here are gonna feature that high-intensity SMD LED strip, running the entire length of the marker itself. Gonna deliver a very cool look once these guys are fired up. Now, compare that to your factory housings, especially one that maybe you did cover with that smoke tint, and you're gonna get that lone bright spot here in the middle, and then the rest of the marker is essentially gonna be dead, for lack of a better word, and it just doesn't really look all that good.Now, let's briefly talk about construction here, guys, and those SMD LEDs are gonna be housed in this durable ABS plastic base, topped off with a very dark smoked polycarbonate lens. And the housings themselves are essentially a carbon copy of the factory lights from a design or a footprint aspect, meaning they're gonna be a direct replacement, without the need for any modification. On top of that, again, you're looking at a 100% plug-and-play job. And again, the kit is made here in the USA, and everything, as we mentioned earlier, backed by that lifetime warranty.But now we wanna go back to that install, show you a little bit more how it's done. And again, because this is a direct swap plug-and-play job, guys, site is gonna stick with that one out of three wrench rating on the difficulty meter. Maybe 20 minutes or so to complete from start to finish. But now, grab your toolbox, check out our detailed walkthrough and tool breakdown.Man: The tools you'll need for this project are a trim removal tool, a ratchet, a short stubby ratchet, a 10-millimeter socket, a T25 Torx bit, and possibly a floor jack instead of jack stands.Hi, everyone. Today we're gonna be replacing the side marker lights on our Charger, so let's get started with the uninstall first.First thing we need to do is remove three push pins from the fender well, so that we can access the backside of our marker light. So, let's go ahead and use our trim removal tool, and get those out of the way. So, our three push pins, we've got one at the bottom here, then we've got one at the bottom of our marker light, and one at the top of our marker light. Now we can use our trim removal tool to pry away the fender well from the bumper, so that we can access a 10-millimeter bolt that's right up here on the bump. Now, with the fender well pulled away from the bumper, we can access a 10-millimeter bolt that's right behind the bumper up here at the top that holds it to the fender. It's a little difficult to get the camera in there, so we're just gonna go ahead and take it out. But you get the idea where it's at. Now, we can pull the edge of the bumper away from the fender, so that we can access the two T25 screws that hold the light to the bumper. Now we can pull the light out, disconnect the connector, and our light is now disconnected.So, on the front, we have four push pins that we need to remove, so, again, we're gonna be using our trim removal tool to get those out of the way. So, our push pins are located, we've got two at the bottom, one here, one here, another one at the bottom of the light, and another one at the top of the bumper here. Now, starting at the bottom, we can pull this fender well away, and over this lip at the very bottom.Now, you should be able to do this with the car on the ground as it is, but to make it a little bit easier for you to see what we're doing, we're gonna go ahead and take our front tire off, and make it a little bit more accessible for us. So, depending on the size of your tires and wheels, you may want to consider removing your front tires as well.All right. Now that we've got our tire off, we've got a little bit better access in here, so we can go ahead and finish taking out this second screw. And we can unplug our electrical connection, and repeat the process for the other side.Now, to install our new lights, we're simply gonna plug it back into the electrical connection on the vehicle. And then before we button everything back up, I like to test them out first, just to make sure everything works. Now we can go ahead and finish installing it. And we'll be reusing the original hardware that we took out from the other lights.Now we can go ahead and push our fender liner back into place, and secure it using our original push pins. Now, to install the rears, we're just going to reverse the process that we used to uninstall the original lights. So, we just plug it in. Again, test our lights to make sure that they work, and reuse the original hardware, using our T25 Torx bit to tighten it down.Now we can go ahead and snap our bumper cover back into place, and secure it with the original hardware, and tighten it down with our 10-millimeter socket. Now we can snap our fender liner back into place, and secure it with the original push clips. Now you can repeat that process for the other side.And that wraps up our review and install of the Diode Dynamics LED Front and Rear Side Marker Lights, Smoked, for '15 and newer Charger. Thanks for watching. And remember, for all things Charger, keep it right here at americanmuscle.com.

      Product Information

      Features, Description, Reviews, Q&A, Specs & Installation
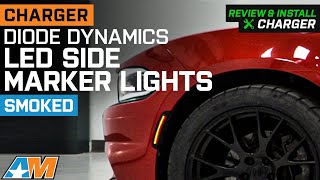
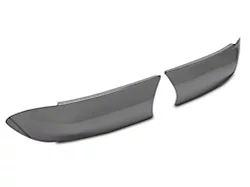
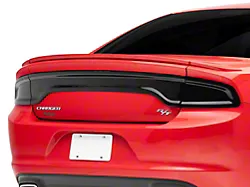
      Features

      • LED Front and Rear Side Marker Lights
      • Better than DIP LED Lights
      • Smoked Black Tinting
      • Mountable Installation
      • 4-Piece Set
      • Limited Warranty
      • Fits All 2015-2023 Dodge Charger Models

      Description

      Brighter and Bolder. If your Side Marker Lights are starting to dim out, replace them with these long-lasting Diode Dynamics LED Front and Rear Side Marker Lights. Encased in ABS factory-grade tinted plastic and assembled with mini SMD LED lights for a clearer and brighter shine during long and dark highway trips.

      Better Than DIP LED. DIP LED chips break easily and only go up to 4 lumens on the brightness scale, but the Surface Mounted Diodes of the Diode Dynamics LED Front and Rear Side Marker Lights can be as bright as 8 lumens, making them clearer and more distinct compared to their factory counterparts.

      Warranty. This product includes a limited lifetime warranty that covers manufacturing defects or damages.

      Installation. This product does not require professional installation and can be installed within 20 minutes.

      Application. The Diode Dynamics LED Front and Rear Side Marker Lights fit all 2015-2023 Dodge Charger models.

      Fitment:

      Details

      Diode Dynamics DD5112

      CA Residents: WARNING: Cancer and Reproductive Harm - www.P65Warnings.ca.gov

      Installation & What's in the Box

      Installation Info

      What's in the Box

      • (2) Front LED Side Marker Lights
      • (2) Rear LED Side Marker Lights
      • Mounting Hardware
      4.8

      Customer Reviews (33)

        Questions & Answers

        10 More Questions

        Will It Fit My Charger

        • GT - 23
        • Pursuit - 23
        • R/T - 23
        • Scat Pack - 23
        • SRT Hellcat Redeye Widebody - 23
        • SRT Hellcat Widebody - 23
        • SXT - 23