 FREE 1 to 3-Day Delivery on Orders $149+ Details
How to Install Ford Performance Mustang Boss 302 Alternator Kit (11-14 GT) on your Ford Mustang
Tools Required
- Flat Head Screw Driver
- 1/2" Drive Ratchet
- 6mm Socket
- 8mm Socket
- 13mm Socket
- 15mm Socket
- Extension (Optional)
- Allen Wrenches
- Breaker Bar
- Torque Wrench

Shop Parts in this Guide
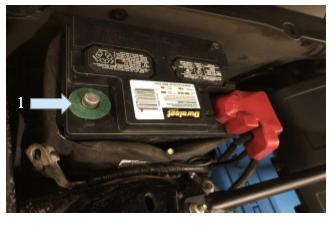
1. Begin by disconnecting the negative terminal of the battery using an 8mm socket and move the cables to the side.
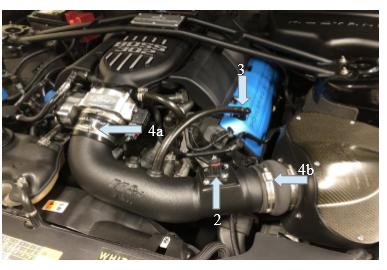
2. Disconnect the MAF sensor by pulling up the red tab and unplugging the sensor.
3. Unplug the PVC valve hose.
4. Use a flat head screwdriver to loosen the metal clamps and remove the intake tube. (a & b)
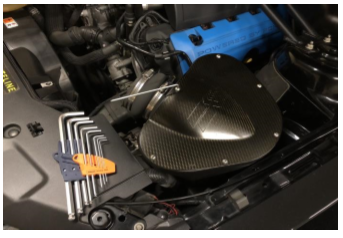
5. Remove the remaining intake components (may very per application).
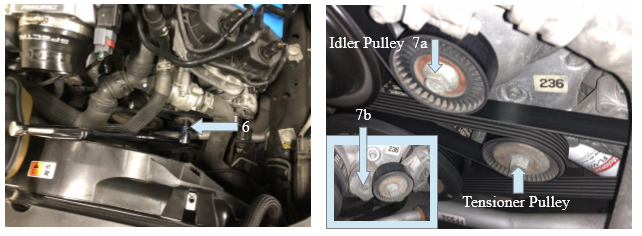
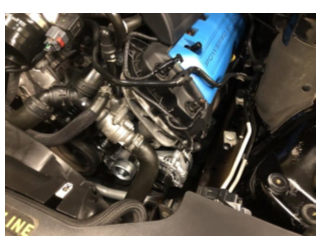
6. **Note the position of the accessory belt**. Rotate the belt tensioner pulley counterclockwise using a 15mm socket and a breaker bar. Move the accessory belt aside and release tension on the breaker bar.
7. Remove the idler pulley
- (a) using a 15mm socket and the tensioner pulley
- (b) using a 13mm socket.
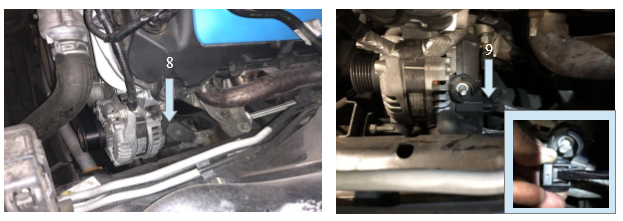
8. Remove the alternator electrical connection terminal by pulling off the rubber boot and using a 13mm deep socket to loosen the nut.
9. Disconnect the plug-in terminal by pushing on the grey tab using a flathead screwdriver and pulling off the connector
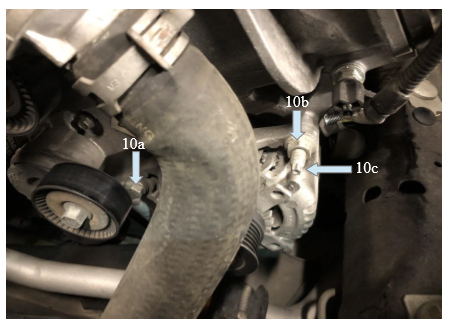
10. Using a 15mm socket remove:
- The alternator bolt on the left side (a)
- The alternator stud nut on the right (b).
- The alternator stud using a 6mm socket (c).
11. Remove the alternator by carefully pulling it free from the mounts and out of the engine bay.
12. Install the new components in reverse order. Ensure to torque all bolts to spec.:
- Alternator bolt = 35 lbft (48Nm)
- Alternator stud = 71 lb-in (8Nm)
- Alternator stud nut = 35 lbft (48Nm) ▪ Alternator electrical connection nut = 150 lb-in (17Nm)
- Tensioner Pulley = 18 lbft (25Nm)
13. Visually inspect all newly installed components. Double check to ensure that everything has been properly tightened.
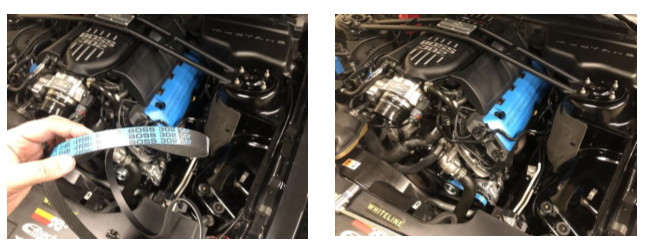
14. Position the new accessory belt loosely around the pulleys. Rotate the belt tensioner counterclockwise using a 15mm socket and a breaker bar. Slide the belt around the final pulley and slowly release the breaker bar to create tension on the belt.
15. Reinstall all intake components (may very per application). Tighten all intake box bolts and metal clamps around the intake tube. Reconnect the MAF sensor and the PVC valve hose. Reconnect the negative terminal on the battery.

Installation Instructions Written by AmericanMuscle Customer Emir H. on 4/17/18
