 FREE 1 to 3-Day Delivery on Orders $149+ Details
How to Install McLeod High Performance Hydraulic Clutch Line Upgrade (05-14 V8) on your Ford Mustang
Installation Time
2 hours
Tools Required
- Floor Jack and Jack Stands (or a Lift)
- Flashlight
- Angled Pick Tool
- 13mm Box Wrench
- 14mm Box Wrench
- Diagonal Cutters
- Channel Lock Pliers
- 1/4" Drive Ratchet
- 1/4" Drive 10mm Socket
- Vacuum Pump and Rubber Plug Adapter that Fits Securely in Brake Fluid Reservoir (Optional)
- Magnet (not completely necessary but can come in handy)
- Shop Rags or Old Shirt or Towel
- Catch Pan
- Brake Fluid (DOT3 or DOT4, if you already have DOT4 in the vehicle, only use DOT4, if it's the original fluid which is DOT3 from Ford, you can use either)
- Brake Cleaner or Carb Cleaner (1 Can)
- Long Zip Tie (1 or 2)

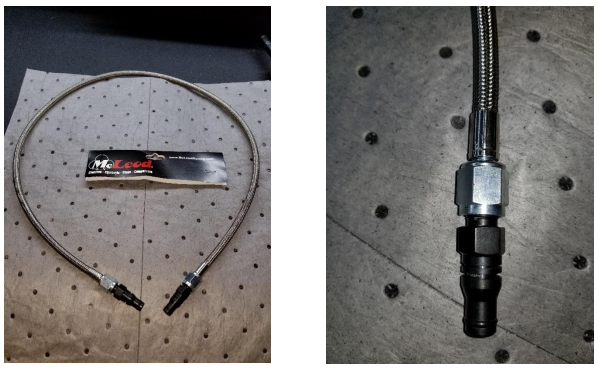
Shop Parts in this Guide
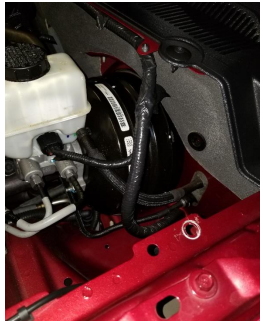
Before
Installation Instructions
Step 1: Using a floor jack at the designated lifting points raise your mustang so the vehicle is as high as you can safely make it and install jack stands under the frame rails or on the pinch weld. If using a lift set the lift at the lifting points shown by little arrows on the side skirt on all 4 corners and lift the car just so the wheels are off the ground and check it is secure.
Step 2: Open hood and remove the sound tube if it is still equipped on your vehicle. Mine was already removed so I skipped this step. To remove the sound tube, you will take your channel lock pliers and remove the clamp that holds it to the air intake pipe. Next you will find a silver 10mm bolt on the top side of the driver fender area. Remove this bolt, then pull the sound tube straight out of the firewall. Finally, just under the strut brace on the inside of the strut tower there is a rubber tab you will slide off and then remove the tube.
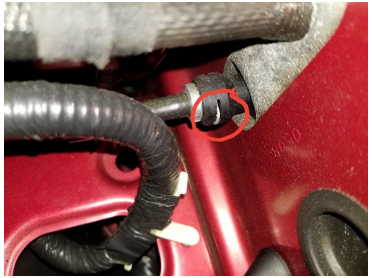
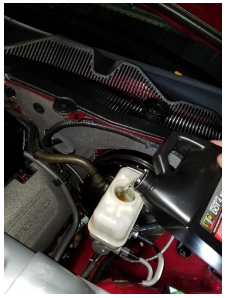
Step 3: Locate the clutch line just to the right and below the master cylinder. Place a rag or towel under the line to catch any fluid that spills out. Using a pick tool, you will slide the small silver clip out. Be extremely careful when doing this as you can easily drop the clip and lose it! The new line does not come with new clips they will need to be reused. Pull the line out of the firewall and rest it on the rag to catch any fluid that drips out.
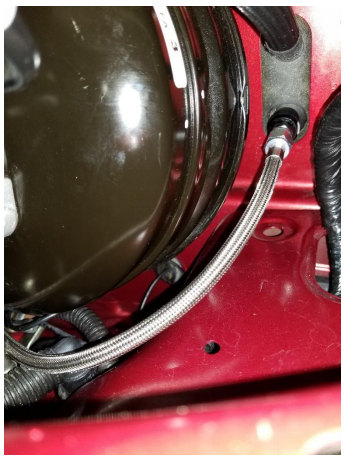
Step 4: If using a lift, completely raise vehicle. If using floor jack and jack stands get vehicle set as high as safely possible. On the driver side of the transmission bellhousing locate where the clutch line connects to the slave cylinder, it should look like a black plastic 90-degree angle. A flashlight will help a lot for this part. Using your pick tool remove the silver clip from the 90-degree piece where it connects to slave cylinder. Again, be very careful when removing as to not lose this clip because it needs to be reused. Position a catch pan below the line and pull it from the transmission.
Step 5: From the top side again, pull the factory clutch line out of the vehicle. Once the line is out you will see another silver clip, remove this and remove the 90-degree plastic elbow, this will also be reused. Clean and inspect the elbow for any damage. Install the fittings in each side of the new clutch line using a 13mm and 14mm wrench to tighten. NO Teflon tape or any type of thread sealer is necessary for this connection. Install the plastic elbow to one end of the new line.
Step 6: Snake the new line through from the top, under the brake lines over the steering shaft along the firewall down to the transmission. Install the silver clip into the opening where you removed it on the firewall. Use a little fluid on the O-ring before installing so it slides in smooth. Push the end of the line into the firewall fitting until you hear an audible click. Push a little more and you will hear a second click. This is the reason the clip is installed first before the line is in, it gives you peace of mind to audibly hear the double click to know the line is installed properly.
Step 7: Install the other silver clip on the elbow and then slide the elbow over the exposed fitting from slave cylinder on transmission until you hear the audible click. You can use the brake cleaner here to clean any fluid that dripped on the transmission and anything else.
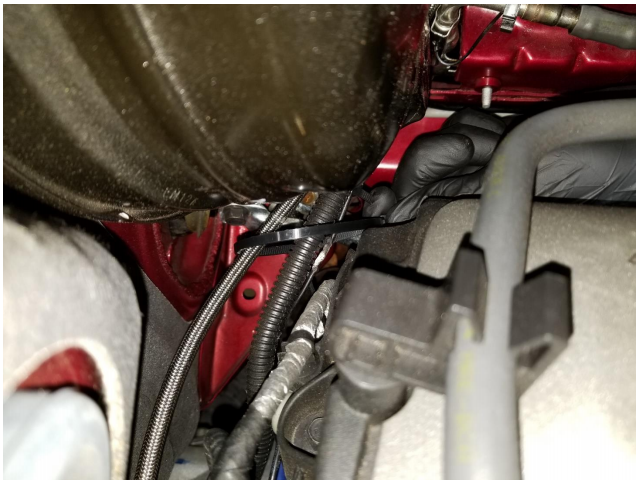
Step 8: From the top side use 1 or 2 zip ties to secure the new line off to the side with the harness that is there to keep it away from the exhaust manifold and the steering shaft. Be extremely careful to keep the line away from both things! Use your diagonal cutters to trim the extra from the zip ties.
Step 9: Top off brake fluid reservoir to max line. There are 2 Methods to bleed the clutch at this point. If you have access to A vacuum pump and a suitable grommet adapter that fits Securely in the reservoir install this, and pump it up to about 20. Hold the vacuum for 1minute, then pump the pedal 10-15 Times. Repeat 3 times, or until pedal feels normal. If you do not have a vacuum pump there is another method that I used. Ensure the fluid is full, and get in the vehicle and pump the pedal. At first the pedal will go all the way to the floor and not return so you will need to pump it with your hand. Just keep pumping the pedal until it feels firm and normal. This can take much longer than the first method but it doesn’t require having a vacuum pump. I had to pump my pedal approximately 300 times before pedal felt normal.
Step 10: If on a lift you can do this step on the lift with all wheels off the ground. If not, lower vehicle completely and don’t forget to reinstall brake fluid reservoir cap! Start vehicle and put it in gear. Obviously, this is the first test. If the clutch isn’t operating properly you will not be able to get it in gear. Slowly release clutch pedal and make sure it is operating properly and the vehicle rolls. If all is operating properly, double check for any leaks and top off fluid. Reinstall sound tube if applicable. Take vehicle for a road test. After road test check fluid level one last time and you are finished!
After
Installation Instructions written by American Muscle customer Corey Davis 10.06.17
