Installation Time
(approx) 3 Hours
Difficulty Level:
Light to Moderate mechanical skill required.
FREE 2 or 3-Day Delivery on Orders $119+ Details
$2,276.99 (kit)
FREE Shipping Market Price $2,663.99 You Save 15% ($387.00)Add Local Shop Installation
Saved - View your saved items
We're sorry. We couldn't save this product at this time.
or use
Jake: Jake here for AmericanMuscle. And today I'm taking a look at the Borla Atak Axle-Back Exhaust with Ceramic Black Tips for the 2016 and newer Camaro SS with the NPP dual-mode exhaust.If you've got a Camaro SS with the dual-mode exhaust and you're looking to up your sound game without losing the functionality of those switchable exhaust modes, then this one is gonna appeal to you. It's a high-quality, no-compromise system that fully integrates with your Camaro while still enhancing the sound and the driving experience.Borla is well known in the enthusiast community for making some of the best exhausts you can buy, especially when it comes to upping sound, and Atak series is the loudest of the bunch. On our loudness meter, this one is going to get very near the top with a four out of five. Definitely enough to make a big difference in the experience of driving your Camaro, though not quite as loud as the full cat-back equivalent.Now, like you heard in the clips at the beginning of the video, you are gonna get that really deep verbally-aggressive race-car-inspired note on the outside. You're also gonna get quite a bit more volume on the inside versus your stock setup as well, but Borla has some neat tricks up their sleeve to make it all a very pleasing sound and eliminate drone. So, this system goes beyond just being loud.Now, the Atak name stands for "acoustically-tuned applied kinetics," which is a Borla exclusive technology that allows them to tune each exhaust for specific vehicle application. They use something they call polyphonic harmonizing technology, which sounds like a buzzword but that is exactly the point here, there's no buzz. Now, this is, essentially, the same type of science that goes into tuning pipe organ, so, they use different lengths of pipe to control the different frequencies, thus eliminating obtrusive or dissonant sounds. And since this is an axle-back setup, all that trickery is inside the muffler here, which, unfortunately, you're not gonna be able to see. However, these trick bits utilize different sizes and diameters of pipe, perforated tube-shaped cores and different patterns on those pipes and cores to make the frequencies harmonized. You're gonna get a really nice sound with the volume that you want and zero drone.And that is the big key here, in my opinion. So many exhausts sound good but they can have some pretty terrible drone, especially just an axle-back setup, and that's gonna negatively impact the experience of driving the car. Now, I'm sure some of you have had some really drony exhausts in the past, I certainly know that I have, and they really can grate your nerves after a while no matter how good they sound. And if there's a way to avoid that drone, I know that I would go out of the way to do that, and I'm sure most of you would too.Now, the other big feature to note here is that this is still a valved system that's designed to work with your Camaro stock exhaust valve actuators. So, you are gonna need to transfer the actuators themselves over to the new system here, on this bit of pipe, on either side, but, as you can see, this is a bolt-on process, so, there's no modification needed. That means you're gonna retain the functionality of your Camaro's stock dual-mode exhaust and you're gonna be able to control it just like you would the stock system. So, you're gonna get the benefits of being able to quiet it down when needed or just crack it wide open and let that LT-1 sing at the touch of a button. It's really the best of both worlds here, especially when you consider all the tech that Borla has included to eliminate drone.Now, as far as construction goes, again, this is a really really high-quality system. Borla makes all of their exhausts out of T304 stainless steel, so, you're gonna get excellent corrosion and rust resistance. As you can see, it's just a really nice piece of kit. The piping here is all 2.75-inch mandrel bent tubing, so, there's no rear wrinkles or creases or anything and that means the exhaust gases are gonna flow nice and smoothly through allowing your engine to breathe better than the stock system and reduce back pressure. It also comes with these awesome 4-inch ceramic black tips to finish the whole thing off. So, it's a really nice visual upgrade as well.Now, these are also a staggered setup, much like your stock system, so, it's gonna keep it looking pretty similar but not quite the same as stock. And that's pretty in keeping with most of Borla's offerings. Their systems do tend to err more so on the side of subtlety in comparison to others on the market, when it comes to style, but I really don't think that's a bad thing here.Now, these are double-wall rolled slash cut tips and, of course, they have the Borla logo stamped up on the top here. It's a nice subtle update and it's going to look really nice on your Camaro. Those who are paying attention are definitely gonna notice.Now, as with any Borla system, or any of this quality for that matter, this one does not come cheap. The system here is gonna run you about $2,400, which does put it at the top of the category when it comes to axle-back exhaust for the Camaros. Of course, that means there are less expensive options but they're not necessarily gonna measure up in sound or construction and they aren't gonna retain those active exhaust valves. So, while, yes, you are spending a lot of money here, you are getting excellent quality and all of the functionality of your stock exhaust with killer sound to boot. So, when you look at it from that perspective, I do think that you're getting a pretty good value for your money here. If you don't wanna compromise with your exhaust but still wanna make an upgrade, this one's got your name on it.Now, in regard to installation, this one, like most exhausts, is going to get a two out of three on our difficulty meter. And it should take you around 3 hours to get this all done. Since the stock system on the Camaro SS is not a bolt-together setup, you are gonna need to make a couple cuts to your stock system, namely you're gonna have to cut the mufflers off. However, that's very easy to do and you do get instructions on how to measure it out in the box, plus, we'll show you that in a couple of minutes. You are gonna also have to transfer those exhaust valve actuators over to these other pipes, like I mentioned earlier, but, once you've got that done, the new system is just gonna bolt right on. And it does use all of your existing exhaust hangers, so, there's no modification needed to your car itself. And you also get all new hardware included in the kit.Now, if you've done an exhaust in your driveway before, you know it can be a little bit fiddly just because of a lack of space. But even with the cutting here, this is absolutely something you can manage at home, especially since you're only removing the mufflers and not the entire exhaust system. And with that out of the way, let's head to the install bay now and we'll show you how to get this one done.Man: Tools required for this install include an impact gun, an electric ratchet, a hand ratchet, an exhaust hanger-remover tool, a wire wheel, 5/16 ratcheting wrench, a 3/8 to 1/4-inch adapter, 7, 13, and 15-millimeter sockets, 8-millimeter Allen, a tape measure, a pair of safety glasses, a marker, and a Sawzall.What's up, guys. Today we're gonna be installing an exhaust on our Camaro. So, let's get started.So, our first step to removing our exhaust is gonna be to disconnect our valves. Now, these are gonna be found on the outside of each side tip. So, we'll get the harness, press the tab, and disconnect them. So, now our first step is gonna be to disconnect the wiring harness to our valve controller. To do that we're gonna remove these two 7-millimeter bolts to clear up some access. You're gonna have to take these out later on eventually because we're gonna have to slide our exhaust back this way, and the valves are gonna slide under this. So, I'll get a 7-millimeter socket to get these off.And then we can push that back out of the way...and then reach in there and disconnect our wire harness. And then we'll do that same thing on the other side.So, the factory exhaust system has six hangers. We have two here, two here, and then two by your tips. So, we're gonna remove the inner four here, that way we can still have our two hangers in the back holding our exhaust up while we disconnect our flanges up front.So, we can get the two on our passenger side first. So, I'll grab an exhaust hanger remover tool and pop off these isolators. And then on this one the hanger on our pipe's a little longer than the one from our chassis. So, we'll pop off our top isolator and then we can pop it off at the bottom and slide it back on the top. Now we can do the same thing on our driver's side.Now, our next step is to remove our brace here. We have five 13-millimeter bolts holding that in. So, I'll get a 13-millimeter socket on an impact gun to get these off.Now, our next step's gonna be to disconnect our O2 sensors on both sides. Now, you can do this either by unscrewing the O2 sensor or simply just unplugging the harness. We're gonna unplug the harness. So, there's a white tab that you're gonna push up and then push in and then it will separate our connector. So, we'll take our white tab, push up on it, and then we can press down and slide our connector up. Now, this side is gonna be the same thing, just a little deeper in there. Pull back on that tab...and then disconnect our connector.So, now we can work on our two flanges. We'll get those disconnected with a 15-millimeter socket. I've got a pole jack here to hold the exhaust in place so it doesn't drop down once we disconnect it. And then, once we have our two flanges disconnected, we'll grab a buddy to help us pull the whole exhaust out of the car.So, now, on this side, we don't have much clearance, so, I'm gonna get a 15-millimeter socket with a ratchet on this side. And then we can use our impact gun on this side. So, I've got some penetrating lubricant, I spray it on here just to make it a little bit easier to get these off. Now, on this side, we can use a 15-millimeter socket on an impact gun to loosen this clamp.So, now I have a pole jack set up underneath our muffler to keep it in place. And then we're gonna be removing the two bolts on our hanger, on both sides, to release the muffler. So, now we can take a 15-millimeter socket on a ratchet to get our two nuts off. And then we'll do that same thing on the other side. So, now would be a good time to grab yourself a buddy, and you can take one end while your body takes the others, and then we'll just simply slide it out and remove it from the car.So, now, with the exhaust removed from our car, we can take our valves off. Now we'll be using a 5/16-inch ratcheting wrench to remove this. And then we can repeat that same process on the other side. And now we can remove our final two hangers on our stock exhaust using an exhaust hanger remover tool.So, now with stock exhaust removed, we're gonna come to right behind the rear muffler where we're gonna make our cut for our new exhaust. So, now we can grab our tape measure and a marker and we're gonna measure out 8 inches from the rear muffler back. Eight inches puts us right here, so we'll make our line. And then we'll do the same thing on the other side, measure out our 8 inches, and mark our spot.So, now with our measurements made and our cut lines in place, you can grab yourself a Sawzall, or your cutting apparatus of choice, and a pair of safety glasses and we can make our cuts.And now that we have our exhaust flipped over to the other side to make it a little bit easier to cut, we can make our cut on our other pipe.So, now with our cuts made, we're gonna take a wire wheel to clean up our edges a little. So, now with our exhaust cut and our edges cleaned up, now's a good time to grab yourself a buddy to help you line up the secondary caps in the front while you get the hangers into the isolators.Now we'll reinstall our two 15-millimeter nuts on our passenger-side secondary cap. Now we'll take a 15-millimeter socket, going back and forth, tightening these down, to put even pressure on our flange. And then we'll take a 15-millimeter socket to tighten down the clamp on our driver's side. And now we can reconnect our O2 sensor harness. So, we're gonna slide that up out of the way so it doesn't hang on anything hot or moving, and then we'll just click it in like that.And now we can reinstall our brace with our five 13-millimeter bolts...and then we'll just make sure all of our holes are centered and then take our 13-millimeter socket to tighten these bolts down.Now, before we get down with our install, we're gonna have to install our valve actuators onto our exhaust. So, if we come in here, we're gonna have to rotate our valve, and we'll rotate it so it's straight up and down so it can match up to our tailpipe. And then we'll just slide it in like that and then we can take our three 5/16 bolts and thread them in. And then, once we have those threaded in, we can take our 5/16 ratcheting wrench to tighten our bolts down. And we'll just go around evenly so we get even pressure on our actuator. And then we can do the same thing for our other side.So, now, with our valve actuators installed into our tailpipes, we can connect our tailpipes into our muffler. So, we'll take one of our included clamps, slide that over our tailpipe, and then we'll slide our tailpipe into our muffler. And then we can take a 15-millimeter socket to our clamp to tighten that down. And now we can repeat that same process for our other muffler.Now we can take another one of our clamps, we'll slide that over our stock exhaust pipe. Now, when we raise our muffler up, we're gonna wanna get our valve actuator tucked in behind our diffuser first. That way we don't have to cram it up in there once we have our pipe on our stock exhaust pipe. And then we can put our hanger into our isolator. Now we can slide our clamp into position, and we'll take a 15-millimeter socket to tighten it down.So, now we can plug in our actuator. So, we've got the harness here. I'll push this heat shield back out of the way and I'll push that tab down to lock it into place. And then we'll grab our two 7-millimeter screws that'll secure our heat shield. And I'll grab a 7-millimeter socket to tighten these down.Now we can install our hanger bracket. So, we're gonna slide this over our hanger first and then slide it onto our studs. Then we'll grab our two 15-millimeter nuts that go on our studs and then a 15-millimeter socket to tighten these down. And then, once we're done with that, we can repeat the same process on the other side.So, that'll wrap up this review and install of the Borla Atak Axle-Back Exhaust System with Ceramic Black Tips for your 2016 and newer Camaro SS with NPP dual-mode exhaust. Thank you for watching. And for all things Camaro, keep it right here at americanmuscle.com.
Subscribe to our YouTube Channel
Features, Description, Reviews, Q&A, Specs & Installation
Brand | Borla |
Exhaust System Type | Axle-Back System |
Exhaust System Material | Stainless Steel |
Exhaust System Tip Finish | Black, Black Chrome |
Exhaust System Tubing Diameter | 2.75 Inch |
Exhaust Loudness | Loud |
Loud Aggressive Exhaust Note. Add a touch of Borla excellence to your Chevrolet Camaro with an "ATAK" Axle-Back exhaust system. Featuring acoustically tuned ATAK mufflers this Axle-Back will add a loud aggressive tone to the sound of your Camaro's exhaust.
Increases Power and Performance. Borla's ATAK Axle-Back Exhaust will not only wake up your neighborhood, but it will also wake up your Camaro's engine as well. By upgrading the restrictive factory piping to ultra smooth mandrel-bent tubing, along with high flow straight-through ATAK mufflers, you will significantly increase your Camaro's exhaust flow. As a result of this increased exhaust flow you will see a dramatic improvement in horse power, torque and engine performance.
ATAK Technology. The included mufflers were engineered using Borla's ATAK (Acoustically-Tuned Applied Kinetics) technology. Delivering the highest dB (decibel) levels possible for a street legal muffler, ATAK mufflers are tuned like a graphic equalizer to shape and focus sound waves for optimum high-volume output, all while avoiding distortion and retaining clarity of sound. ATAK mufflers are ideal for those hardcore muscle car enthusiasts who prefer to hear the sound of their exhaust over the sound of their stereos.
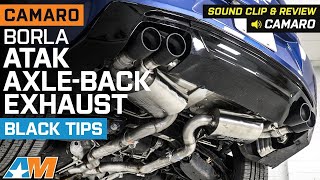
Premium Stainless Steel Construction. Borla manufactures their exhaust systems from premium 304 stainless steel tubing for superior strength and enduring corrosion resistance. Featuring ultra smooth mandrel bent 2.75-inch diameter piping and straight-through ATAK mufflers, this Borla Axle-Back will significantly out flow your Camaro's original factory exhaust system. This system also includes a pair of quad 4-inch black ceramic coated T-304 stainless steel exhaust tips for impressive good looks.
Cut and Clamp Installation. The installation of this Borla Axle-Back Exhaust system will require cutting and removing the stock muffler assemblies. The new Axle-Back assemblies will install in place of the old. Installation of this Borla Axle-Back can be completed in about two hours. This Axle-Back reuses the existing factory hangers for installation. Clamps and instructions are provided.
Application. This Borla ATAK Axle-Back Exhaust with Ceramic Black Tips is designed to fit 2016-2023 Chevrolet Camaro SS models equipped with NPP Dual Mode Exhaust.
Fitment:
Borla 11925CB
CA Residents: WARNING: Cancer and Reproductive Harm - www.P65Warnings.ca.gov
Installation Info
Installation Time
(approx) 3 Hours
Difficulty Level:
Light to Moderate mechanical skill required.
What's in the Box
10 More Questions