 FREE 1 to 3-Day Delivery on Orders $149+ Details
Steeda Sport Mustang Lowering Springs (2005+) - Installation Instructions
Installation Time
4 hours
Tools Required
- Socket Wrenches
- Torque Wrenches (Youll need to be able to torque from 15-148 ft/lbs)
- Socket Extensions
- 10mm Socket
- 13mm Socket
- 15mm Socket
- 18mm Socket
- 5/16 in. Socket
- Wrenches in Sizes Listed Above (Optional)
- 21mm Open End Wrench (or Adjustable Wrench)
- Spring Compressor Set (See note below)
- Jack
- Jack Stands
Installation
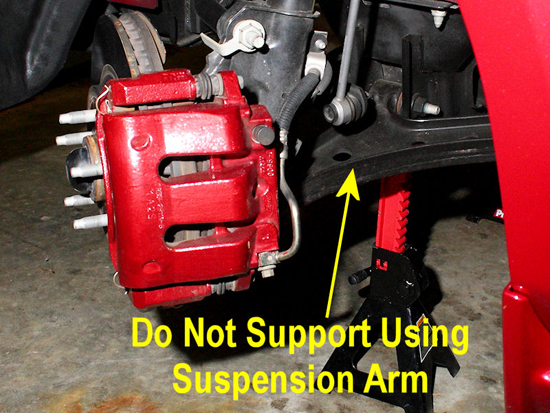
1. To start, you’ll need to get the car up on jack stands. Placement of the stands is important when swapping the springs. The front stands should not be placed on the front suspension arms. You will be disconnecting the struts, which will allow the suspension arms to hang freely. Obviously this is a problem if the jack stands are supporting the car under the suspension arms. You can place the stands on the cross-member, directly behind the suspension arm on each side of the car. Make sure theca is in gear, or Park for an Automatic, and the parking brake applied. Break the lug nuts loose, before you raise the vehicle up. Otherwise you’ll have to have someone apply the brakes while you break them loose. Then once you have the vehicle placed on the jack stands, remove the front wheels.
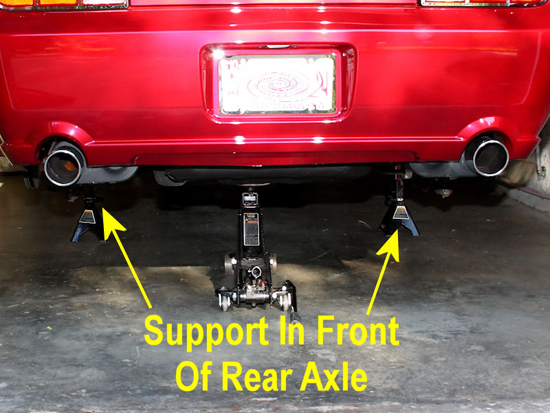
2. Next, raise the rear of the vehicle, and support it with jack stands paced in front of the rear axle close to the side jacking points. You do not want to support the car by the rear axle, as you will be lowering the axle. For now, support the axle with a jack under the center of the housing. Remove the rear wheels, and set them aside.
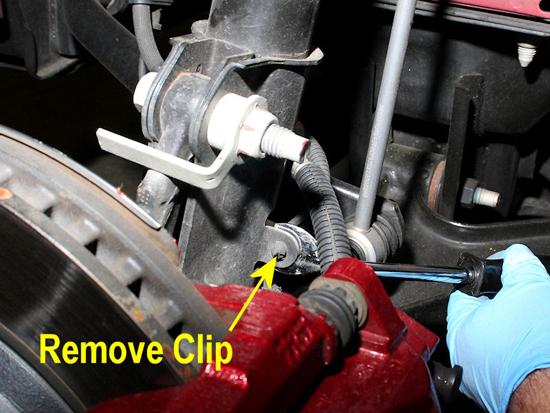
3. Now it’s time to get to work. You can start with the front or rear, but I suggest tackling the front first. The rear is easier, and starting with the front gets the hard part out of the way. Start by popping the brake sensor mount loose with a body clip tool. It’s simply a plastic push pin that holds it in place, so a quick and simple prying job is all it takes.
4. Next you’ll want to tackle the task of detaching the sway bar link. The area of interest is indicated below.
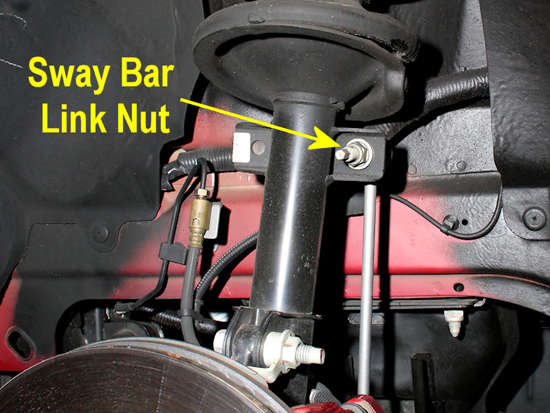
5. Use an 18mm wrench on the nut, and a 5/16 in. socket and socket wrench on the bolt. Hold the bolt still with the socket wrench while loosening the nut with the 18mm wrench. Once the sway bar is free, swing it out of the way.
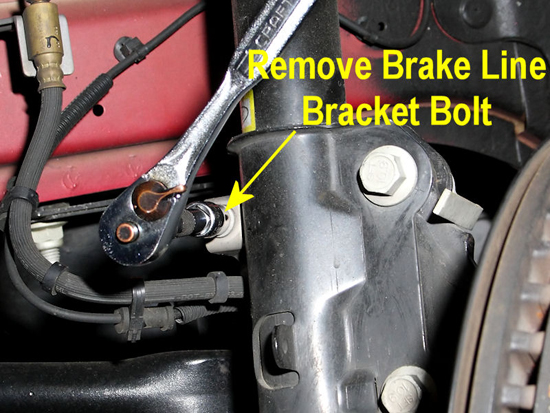
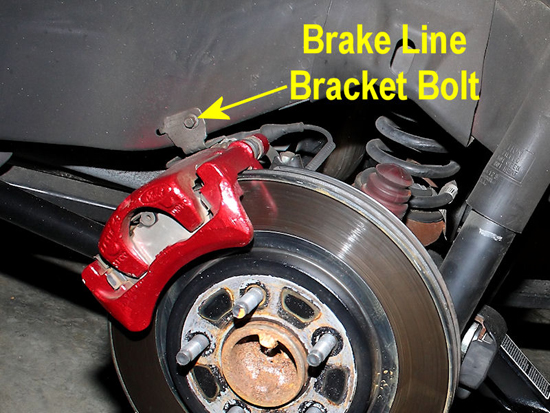
6. Next free the brake line bracket from the strut assembly. You’ll need a 10mm socket for this bolt. Remove the bolt, and move the bracket off of the strut and out of the way.
7. Last, you’ll want to focus on the two strut bolts shown below. You’ll need an 18mm socket to loosen these bolts.
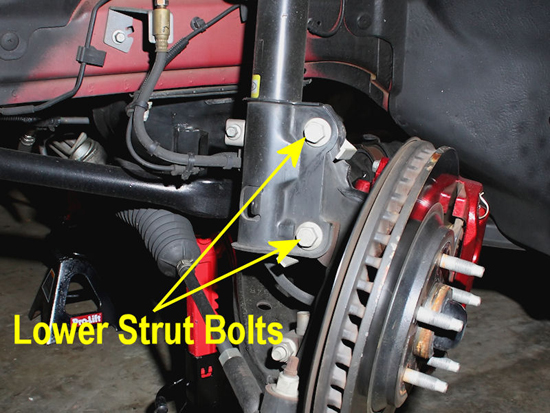
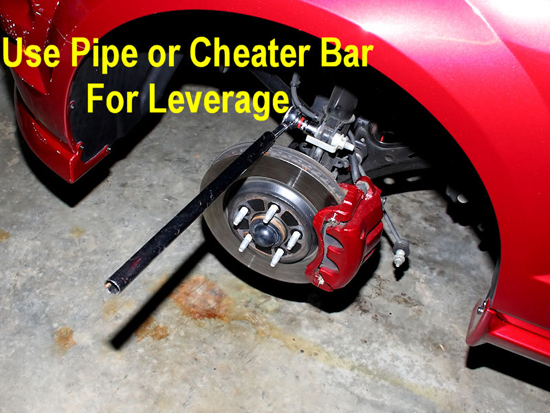
8. The lower strut bolts are tight. The use of a pipe or cheater bar to gain leverage is recommended. It will lessen the effort needed to break the bolt loose, and allow you to maintain better control of the socket wrench.
9. Once the lower strut bolts are removed, the suspension arm will fall free. Support it with something similar to a jack stand or a cinder block. Be careful not to damage the threads on the wheel studs when doing so.
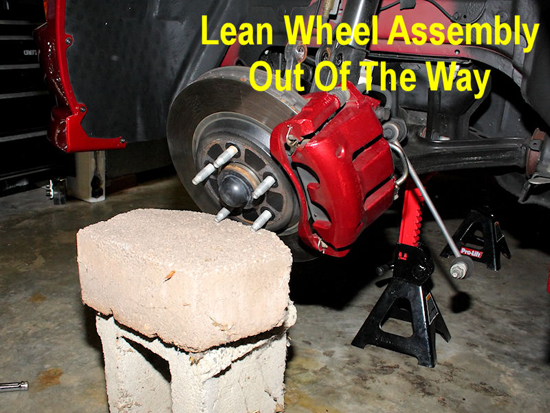
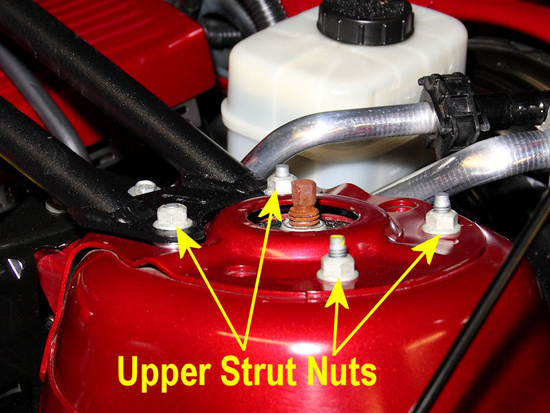
10. All that is holding the strut in at this point are the nuts at the top of the shock tower. Raise the hood, and remove the nuts shown below with a 13mm socket and socket wrench. Be careful when removing the last nut. The strut is fairly heavy, and you don’t want it to fall. If you can have someone else to help hold the strut, you’ll appreciate their assistance for this step. The same applies for when you’re reinstalling the strut after the new spring is installed.
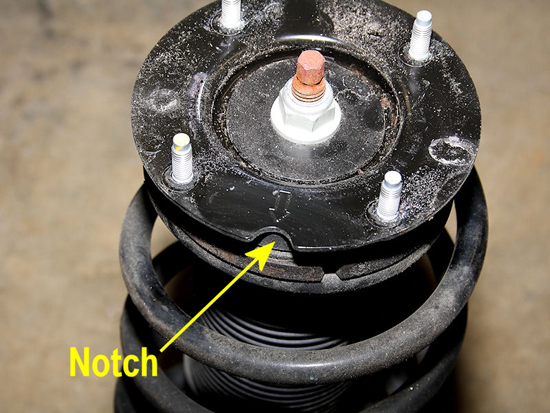
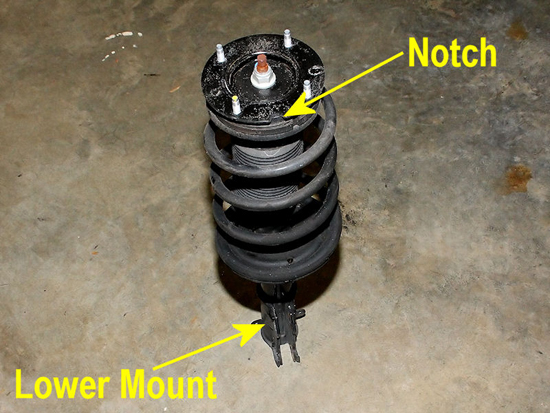
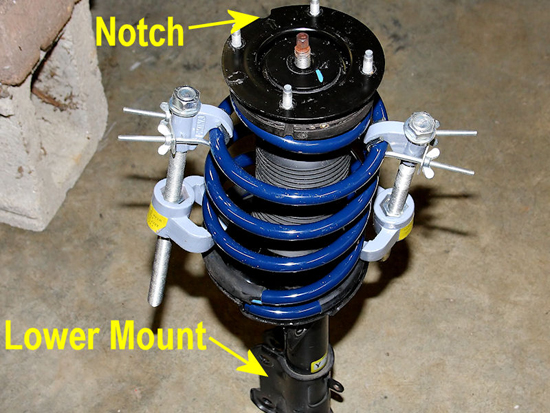
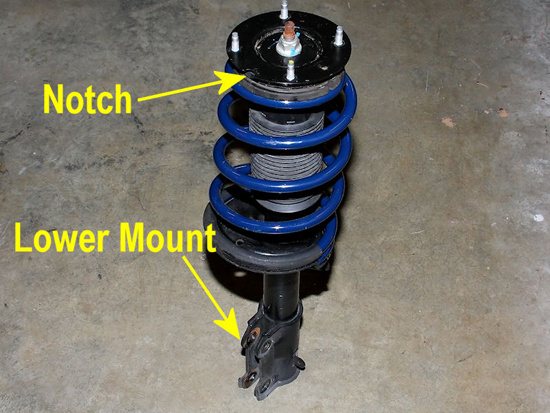
11. Once the strut is removed, you can begin working on removing the spring. However, before you do this, take note of the notch at the top of the strut. This notch should be directly over the lower mount on the bottom of the strut, as shown in the second picture. This is how you’ll want to position the upper plate upon reinstallation of the Steeda strut spring.
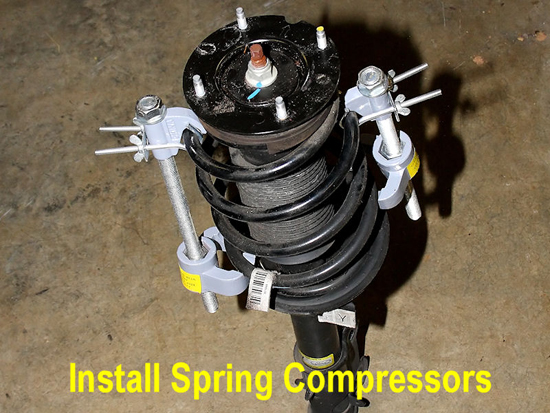
12. Install your spring compressors, as shown in the directions that accompany them. Carefully compress the springs, alternating between each compressor every few turns.
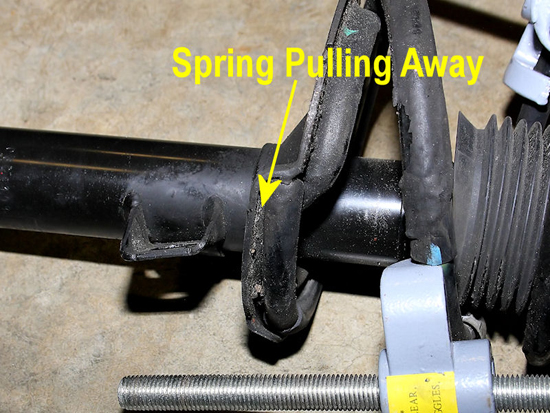
13. Once the spring pulls away from the top and the bottom of its resting position on the strut, and a gap forms, the spring has been compressed enough to disassemble the strut. You don’t have to fully compress the strut, just simply compress it enough that there is no tension against the upper or lower plates.
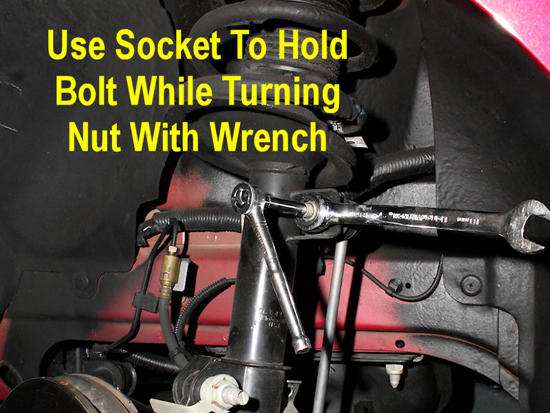
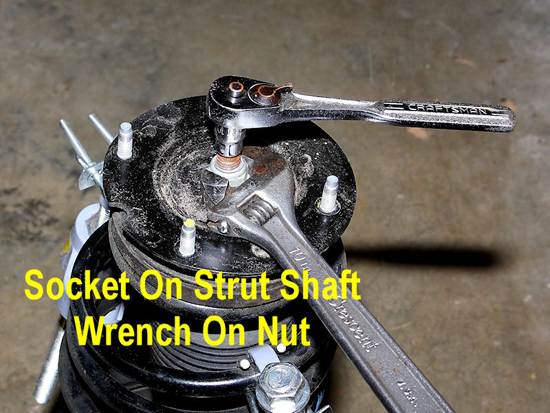
14. Use a 21mm open end wrench (or an adjustable wrench) to hold the strut’s nut, while turning the shaft the nut resides on with a 10mm socket and socket wrench. Remove the nut and set it aside.
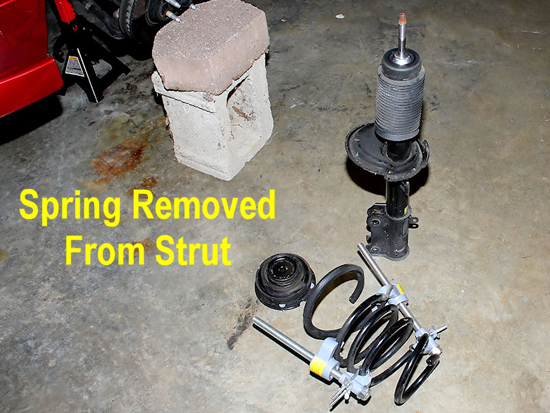
15. Disassemble the strut, by removing the upper plate, followed by the spring. Be careful with the upper plate, because it can separate which would result in the potential loss of the ball bearings located inside of it.
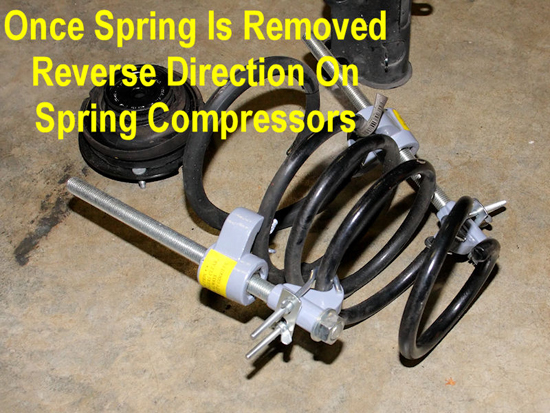
16. Reverse the turning direction of the spring compressors to expand them, switching between them every few turns. This will take a little longer than compressing them, as the strut already had them partially compressed and now they will be fully extending. Remove the compressors once the spring’s tension has been fully released.
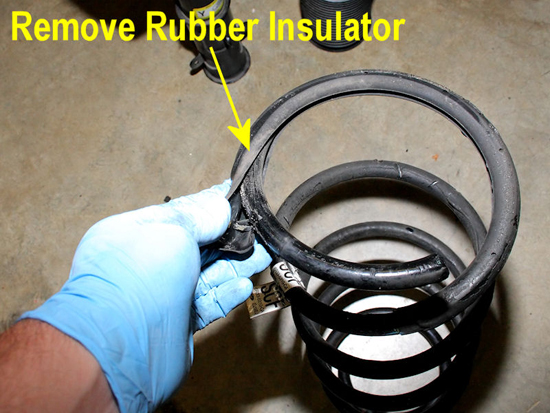
17. After removing the spring compressors, peel off the rubber insulator from the stock spring.
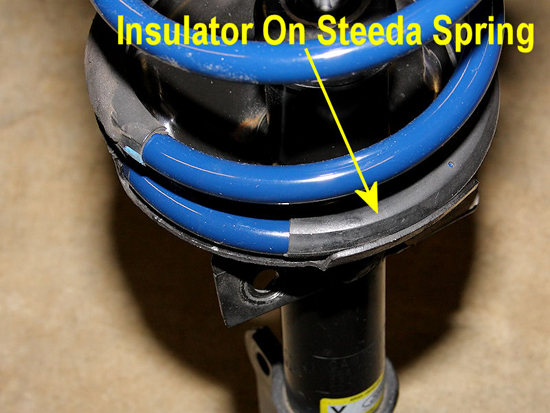
18. Install the insulator on the new Steeda spring.
19. Install the spring compressors on the new spring, and then compress it. Since the Steeda Sport Springs are shorter than the stock springs, it doesn’t take as much work to compress them for installation.
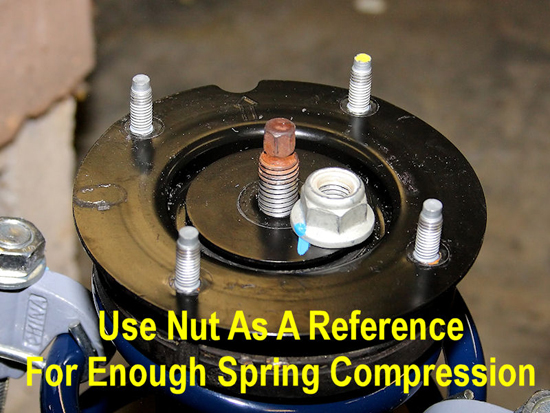
20. Use the strut’s nut as a reference point to determine if you have compressed the spring enough for installation. While the factory rust at the top of the strut is an eyesore, this is one time it comes in handy. It’ll let you know how far down the nut was threaded previously, and whether you’ve compressed the Steeda spring enough for reinstallation.
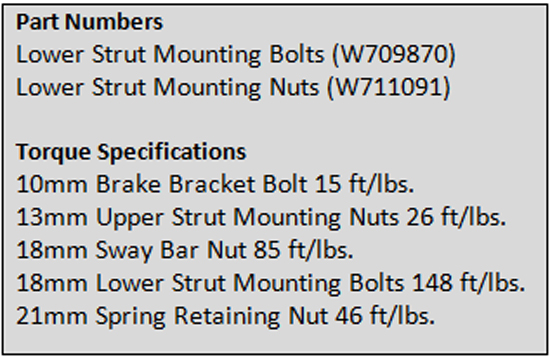
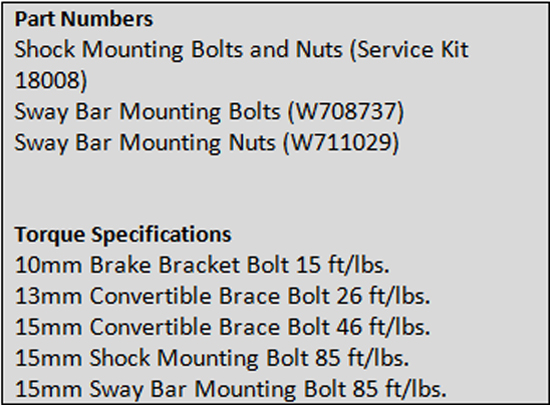
21. Double check that the notch on the upper plate is lined up over the lower mount of the strut, and then decompress and remove the spring compressors. Then simply reinstall the strut in reverse order of how you removed it. Repeat this for the other strut. To assist in torqueing the fasteners back, I’ve listed the torque specifications for the front suspension below. The lower bolts and nuts for the strut are specified by Ford as one-time use fasteners. In the event you wish to follow those recommendations, I’ve listed their parts numbers as well. I simply reused the factory fasteners.
22. With the front springs installed, it’s now time to focus on the rear springs. The rear spring installation is much less of a chore than installing the front springs, since there is no need to compress them. If you are installing these springs in a convertible you’ll be required to perform a few extra steps, but it’s nothing major. The first thing to remove is the bolt for the brake line bracket. A 10mm socket is what you’ll need to remove it.
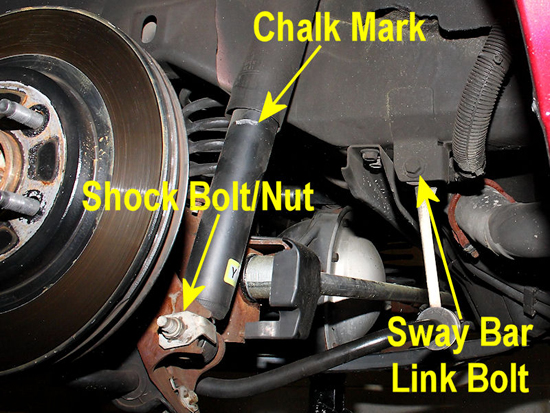
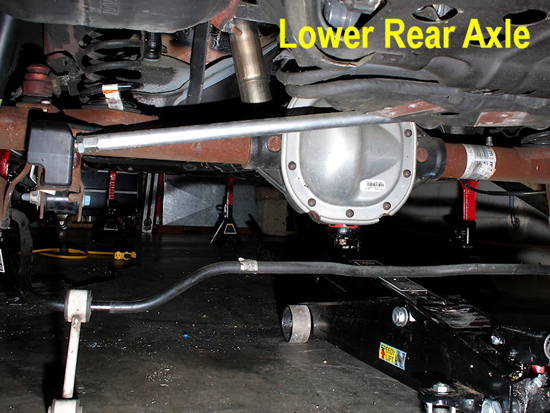
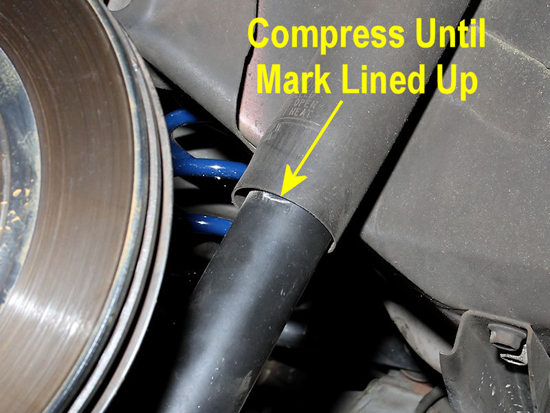
23. Before going further and lowering the rear axle, mark the shock with a piece of chalk where the two halves of the shock meet. I’ve already lowered the suspension slightly in the photo below, so you can see the mark. This mark will indicate where your suspension is once the rear axle is compressed. This is important as the rear suspension must be at ride height when you are torqueing the fasteners back down after the spring installation. This will be covered in more depth a little later. The shock bolt and nut, as well as the sway bar bolt are indicated below as well. You’ll need to remove these fasteners. Use a 15mm socket or wrench on both of these items to remove them.
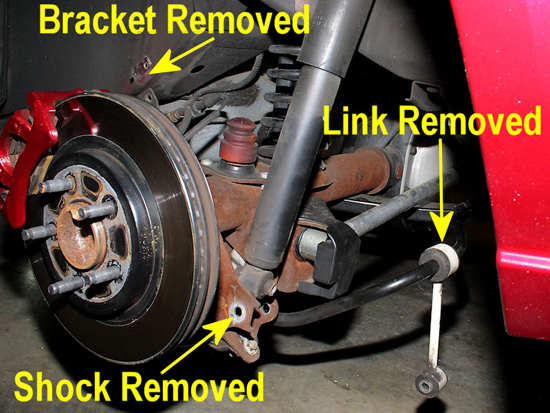
24. Turn the bottom of the shock so that it will clear its mount on the rear end when you lower it. Then swing the sway bar link out of the way as well.
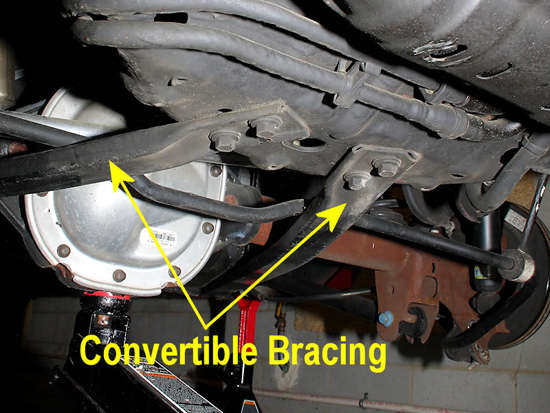
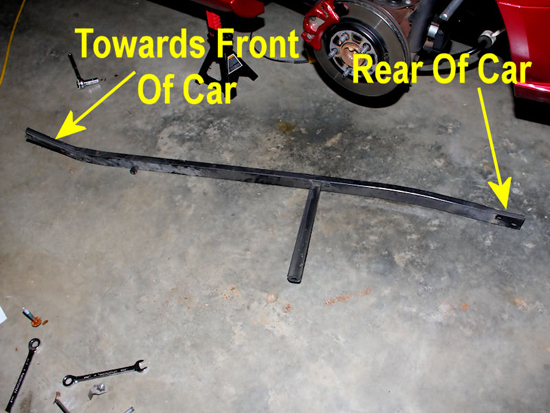
25. If you are installing the Steeda springs in a coupe, you can skip the information involving the rear convertible bracing. Coupes do not have these braces, so only the convertible guys get the additional fun of removing these braces! The braces run from the front of the spare tire well, at the rear of the car, to a couple of feet in front of the rear tires, along the sides of the car. With these braces installed, you will not be able to lower the rear axle enough to get the rear springs out. Each brace has a total of six bolts that hold it to the underside of the car. Five of the six bolts require a 15mm socket or wrench to remove.
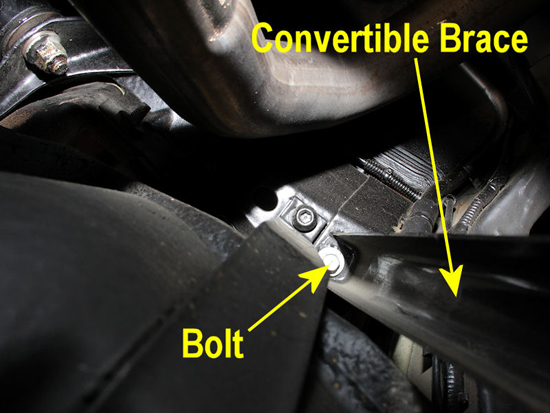
26. One of the bolts is located in the area directly in front of the rear axle. The brace has a long bar that reaches up into this area, and is home to the sixth bolt holding the brace in place. The sixth bolt has a smaller head than the other bolts, and you’ll need to use a 13mm socket to remove it. A long socket extension will make this task much easier as well.
27. The image below provides a visual of what the brace looks like once it out of the car. There are 3 bolts located towards the front of the brace, two at the rear, and one for the bar in the middle. There are a total of two of these convertible braces you’ll need to remove, one for each side of the car.
28. With the convertible bracing removed, if you have a convertible, it’s now time to lower the rear axle. Using the jack, slowly lower the rear axle as far as it will go. Notice that the panhard bar, stock or otherwise can remain attached.
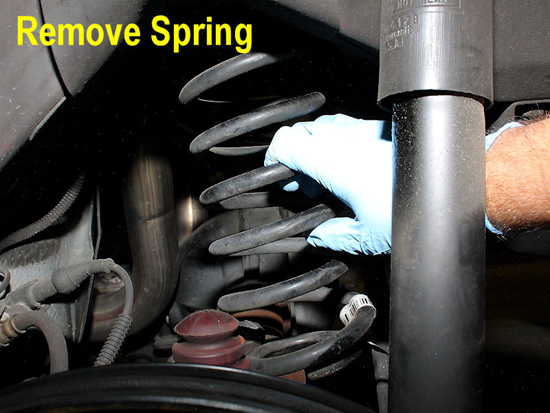
29. Once you’ve lowered the axle, you should be able to remove the rear springs with a slight amount of effort. You’ll have to pull up on the spring as you are pulling it out, so that it will clear the lower spring perch.
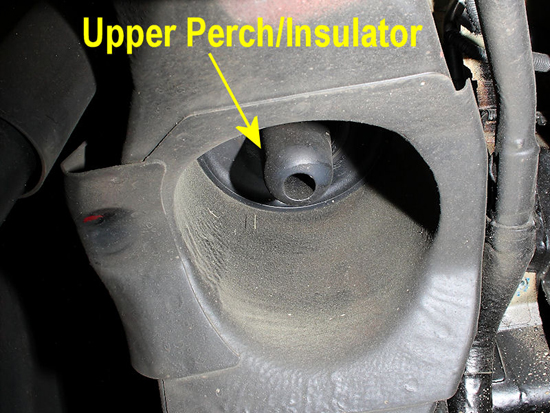
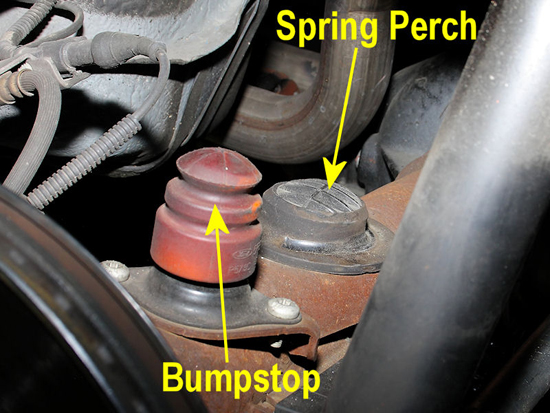
30. Take note of the upper spring perch/insulator. When reinstalling the spring, place the center of the perch inside the spring coils.
31. The lower spring perch is similar. The high part of the spring perch should reside inside the spring coils. Also note the bump stop. Some people trim this down with the installation of new springs. I do not recommend this, as the Steeda springs were designed with the factory bump stop in mind. Altering it could damage the axle or underside of the car at the worst, and cause a rough ride at the least.
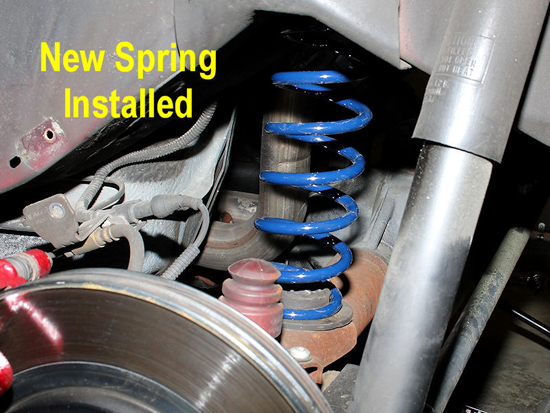
32. To install the new spring, simply place it into position. These particular springs do not have a certain orientation, so there is no “up” or “down”. Note that they will be shorter than the factory springs, so there will be some gap that will be removed when you raise the rear axle back into position.
33. Raise the rear axle back up to the point you can place the shock bolts back in. Then raise the rear axle up until the mark on the shock lines up with the upper half of the shock. At this point, you have compressed the rear suspension back to its initial point, and can reinstall the bolts you removed earlier. To assist in torqueing the fasteners back, I’ve listed the torque specifications for the front suspension below. Some of the fasteners are specified by Ford as one-time use fasteners. In the event you wish to follow those recommendations, I’ve listed their parts numbers as well. Again, I simply reused the factory fasteners.
Post Installation:
After the springs are installed you’ll still have one more task you’ll need to complete to properly finish the job. You’ll need to take your car to an alignment shop, as lowering your car will adversely affect the front alignment. Having a shop readjust your front end alignment will correct this. Plan this out ahead of time, as the Ford shop manual recommends the use of camber bolts which the shop may want to make arrangements to have beforehand. Alternatively you can install camber plates, but the extra expense for them over camber bolts may not be appealing if you don’t need the adjustability for handling purposes. Some shops may prefer to slot the upper strut mounts. The Ford shop manual does not recommend this, but some people choose this route anyway. I opted to go the route of installing camber bolts.
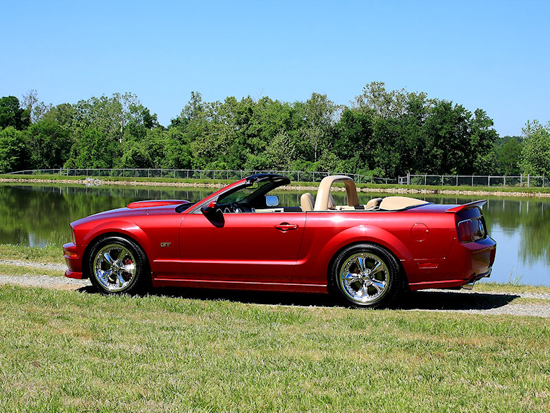
The End Result:
While the Steeda Sport Springs are a mild drop when compared to other springs, they were perfect for my convertible. The drop was a tad more than listed in the spring specs, but that’s to be expected as a convertible is a little heavier than a coupe. The car looks much more aggressive than before, and the end result is well worth the effort involved. Gone is the 4x4 factory look, and the entire car has a more level stance as opposed to the higher rear end factory stance.
Installation instructions provided by AmericanMuscle customer Eric Hege 5.6.10.

