 FREE 1 to 3-Day Delivery on Orders $149+ Details
Installation Instructions & Warranty Information for American Muscle Wheels
Installation Time
30 minutes
Tools Required
- Lug Wrench or 1/2" Breaker Bar or Impact Gun
- 1/2" Drive 13/16" (21mm) Socket
- Torque Wrench
- Floor Jack
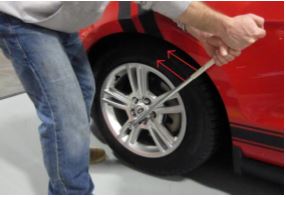
Step 1: Use your lug wrench or breaker bar and loosen the lug nuts approximately 1/4 of a turn. Note – If you are using an impact gun, skip to Step 2
Step 2: Lift the vehicle enough with a floor jack so that the tire is not longer making contact with the ground (reference owners’ manual for proper jacking points). Once the vehicle is safely supported, remove the lug nuts and factory wheel/tire.
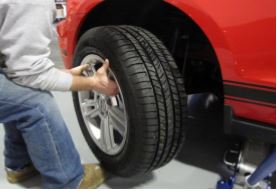
Step 3: With the factory wheel removed, inspect the wheel studs, mounting surface, and wheel hubs for any dirt or rust. If necessary, use a wire brush to clean all surfaces before installing new wheel & tire. Place the new wheel & tire on the vehicle and start threading lug nuts on by hand.
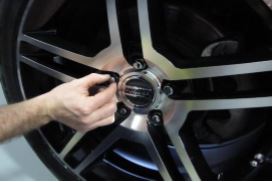
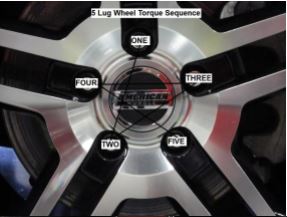
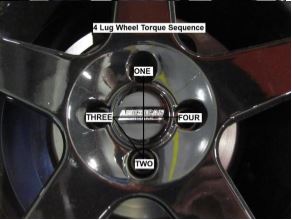
Step 4: Tighten lug nuts until snug and lower vehicle fully. Using a torque wrench and 13/16” socket, tighten the lug nuts to the manufacturers recommended torque specification using the sequence illustrated below. Torqueing the lug nuts is a critical safety measure and should be re-checked after 100 miles of driving when installing new wheels.
Step 5: Once the wheel is properly torqued, Repeat Steps 1-4 for any additional wheels that need installation.
Caring for your Wheels
Chrome Wheels – Use mild (non-abrasive) soap and water to regularly clean the wheels. Try to avoid excess brake dust build up and never use harsh wheels cleaners or wheel acid on the chrome finish. Chrome polish may be used to remove oxidation and restore brightness.
Painted Wheels – Use mild (non-abrasive) soap and water to regularly clean the wheels. Try to avoid excess brake dust buildup and harsh chemical cleaners that could potentially damage the clear coat. Wax may be used on the painted surface to protect the finish.

