 FREE 1 to 3-Day Delivery on Orders $149+ Details
CDC Mustang Squirter Nozzle Relocation Kit ('05-'11) - Installation Instructions
Installation Time
60 minutes
Tools Required
- Masking Tape
- Fork Tool
- Eye Protection
- Short Phillips Screw Driver
- Drill Motor
- Hammer
- 1/8" Drill
- Pliers
- 5/16" Drill
- Ratchet
- Razor Blade
- 13mm Socket or Wrench
Installation
1. Raise hood and remove under hood blanket and set aside. Use a fork tool to remove all fasteners.
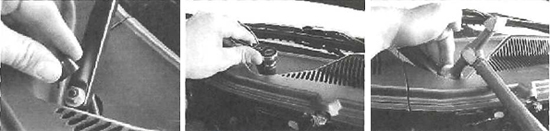
2. Remove Squirter hoses from squirter nozzles.
3. Remove fasteners that attach the hose to the hood with a fork tool. Cut the tape from the T shaped fastener with a razor blade and set aside for reuse.
4. Separate the squirter hose at the tee fitting and set aside.
Note:Mark the location of the wiper blades on the windshield withapiece of masking tapefor ease of reinstallation.
5. Remove Wiper Arms. Remove the rubber nut covers and loosen nuts with a 13mm socket and ratchet. Apply pressure from the backside of the wiper arms and tap on the nuts with a hammer to release arms from splined shaft. Take nuts off and remove arms.
Note: Label "Driver" and "Passenger" before removing.
6. Remove Cowl Trim from vehicle. There are 4 plastic pieces to be removed, start with the small parts that are closest to the fenders. Use a short Phillips screwdriver to loosen the center of the fasteners and extract them with a fork tool. Once the 2small parts are removed the large center parts can be removed, start with the passenger side.
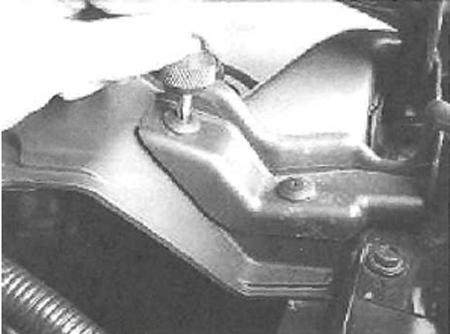
7. Drill two 5/16" holes in Drivers side cowl trim piece. Line up your drill with edge of the rubber seal and approximately 1/2" from the corner of the part. The new squirter hoses provided in the kit will be routed through these holes.
8. Locate Squirter Hose Assembly provided in kit along with 5 large adhesive back clips.
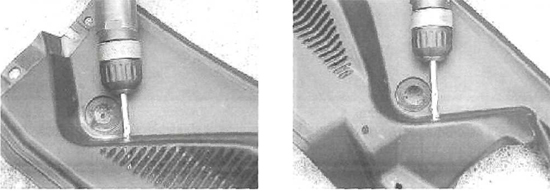
9. Clean backside of cowl trim (the part that was just drilled) with Isopropyl (rubbing) alcohol.
10. Peel the backing of the large adhesive back clips and place on backside of cowl trim as pictured.
11. Feed hose through 5/16" holes from the backside of the cowl trim part. The end with the tee goes to the passenger side and should be pressed tightly into the 5/16" hole.
12. Push hose into clips, creating a loop at the driver side to avoid any kinking
13. Temporarily close hood to gain access to cowl area. Clean area inside cowl adjacent to the fresh air filter with Isopropyl (rubbing) alcohol.
14. Peel backing from 2 large adhesive back clips (part# 115066) and press firmly to sheet metal as pictured. First clip should be placed adjacent from top corner of fresh air filter housing. The second should be approximately 16 inches from the first, toward the center of the car.
15. Connect new Squirter Hose Assembly to existing hose by sliding hose over barbed fitting. Press hose into Large Adhesive Back Clips.
16. Reinstall all other cowl parts.
Note:Existing hose will be routed under cowl trim. Make sure hose will not be pinched.
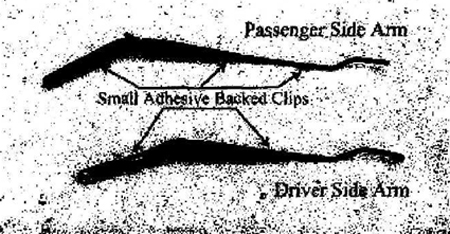
17. Clean backside of wiper arms with Isopropyl (rubbing) alcohol.
18. Peel backing from Small Adhesive Clips (part# 115066) and place on backside of wiper arms as pictured. The longer arm (passenger side) receives 3 clips while the shorter arm receives 2.
19. Reinstall wiper-arms. Tighten nuts and replace rubber caps.
20. Snap provided Squirter Nozzles onto wiper arms as pictured.
21. Route hoses to Squirter Nozzles under wiper arms and snap hoses into Adhesive Back Clips.
22. Verify squirters are working properly.
23. Replace hood blanket using original fasteners.
Installation instructions provided by CDC
