 FREE 1 to 3-Day Delivery on Orders $149+ Details
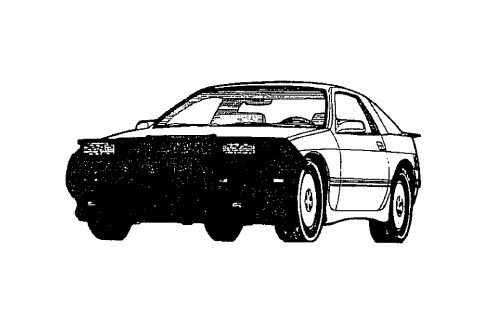
How to Install Covercraft Colgan Original Car Bra - Black Vinyl (1993 Cobra) on your Ford Mustang

Shop Parts in this Guide
- Covercraft Colgan Custom Original Front End Bra; Black Crush (1993 Mustang Cobra)
- Covercraft Colgan Custom Mirror Bra; Black Crush (07-09 Mustang GT500)
- Covercraft Colgan Custom Mirror Bra; Black Crush (10-14 Mustang)
- Covercraft Colgan Custom Mirror Bra; Black Crush (15-23 Mustang w/ Mirror Signals)
- Covercraft Colgan Custom Sport Bra; Black Crush (87-93 Mustang GT, LX)
- Covercraft Colgan Custom Sport Bra; Black Crush (94-98 Mustang GT, V6)
- Covercraft Colgan Custom Sport Bra; Black Crush (94-98 Mustang Cobra)
- Covercraft Colgan Custom Sport Bra; Black Crush (99-04 Mustang, Excluding Mach 1)
- Covercraft Colgan Custom Sport Bra; Black Crush (03-04 Mustang Mach 1)
- Covercraft Colgan Custom Sport Bra; Black Crush (05-09 Mustang GT, V6)
- Covercraft Colgan Custom Sport Bra; Black Crush (07-09 Mustang GT500)
- Covercraft Colgan Custom Sport Bra; Black Crush (10-12 Mustang GT, V6)
- Covercraft Colgan Custom Sport Bra; Black Crush (15-17 Mustang GT Premium, EcoBoost Premium)
INSTALLING THE HOOD SECTION
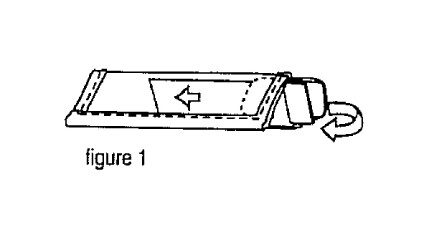
1.1 If you see 2 or more black plastic strips in the bag that held these instructions, insert each into a pocket of the air deflector and tuck the vinyl flap over the end as shown in figure 1.
1.2 If your bra does not have a separate hood piece, look for a second piece of vinyl sewn to the back of the bra. Perform steps 1.3 & 1.4 only if your one-piece bra has a hood pocket, then close your hood securely and go to page I "INSTALLING THE BODY SECTION."
1.3 Open the hood. Insert hood prop if necessary.
1.4 Insert one corner of the hood 2" into the hood pocket, then insert the other corner 2" into the hood pocket. Advance alternate sides in 2" increments until the front seam of the hood pocket is snug against the leading edge of the hood. Make certain that neither the hood latch nor the hood release lever is covered by the bra material.
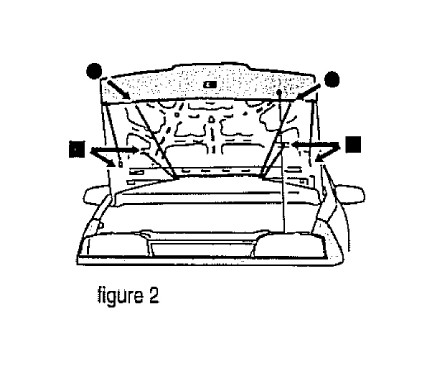
1.5 If you have a 'T' style hood section, wrap the trailing portion of the hood piece over the rear edge of the hood. If there are only two straps, secure the s-hooks to the webbing loops on the underside of the hood piece as shown at in figure 2. If there are more than two straps, stretch the straps in the direction in which they are sewn and attach the s-hook to the opening in the underside of the hood as shown at ■ in figure 2.
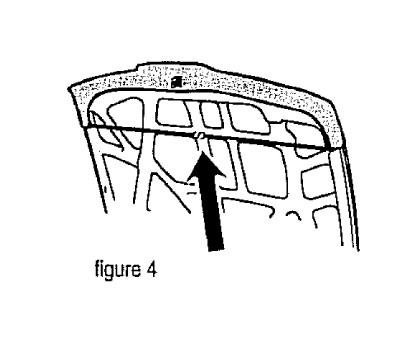
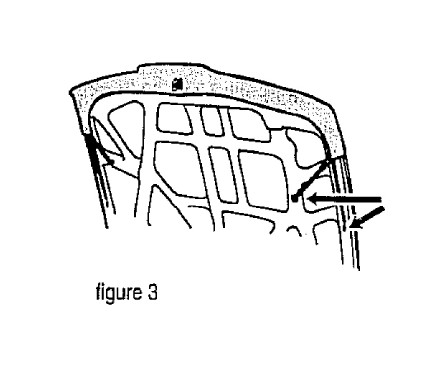
1.6 Stretch the hood section's straps in the direction in which they are sewn and attach the s-hook to the opening in the underside of the hood as shown in figure 3. If the straps are sewn so that they point directly across the underside of the hood and/or an s-hook is present on only one strap, that hook will catch the elastic or webbing loop on the opposite strap or opposite side as shown in figure 4.
INSTALLING THE BODY SECTION
2.1 Before performing steps 2.2 & 2.3, check the back of your bra for mounting tabs (vinyl- or cloth-covered ABS plastic that keep the bra snug against the vehicle and are usually found at the bra's major seams or at its edges.) Mounting tabs will align with spaces above, below, or at the sides of the grille, the head-lights, the turn signals, or the driving lights. Do not install them yeti
2.2 Fit license plate opening behind license plate/ license plate bracket. The plate usually slips through the plate opening like a button slips through a button hole. if the plate is sur-rounded by the bra on only 3 sides, the opening slips around the plate like a yoke and is held in place using two straps/hooks that stretch in the direction they are sewn. The hooks most often attach to the grille of the air intake but will on rare occasions attach to each other. If the connection point is unclear call technical support at (800) 447-2727.
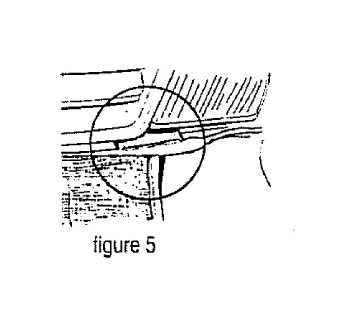
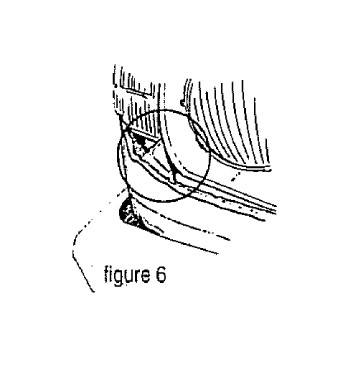
2.3 If step 2.1 revealed the presence of mounting tabs, insert them into the appropriate spaces. See figures 5 & 6 for examples. If yours is a one-piece bra, skip to step 2.5.
2,4 Engine compartment connection components are used to keep the body section of multi-piece applications snug and secure. These components are usually some combination of the following: fender corner pocket or mounting tab, elastic strap/s-hook or chassis clip or elastic loop. Determine which of these is applicable to your installation.
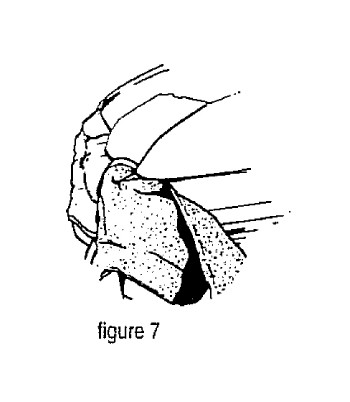
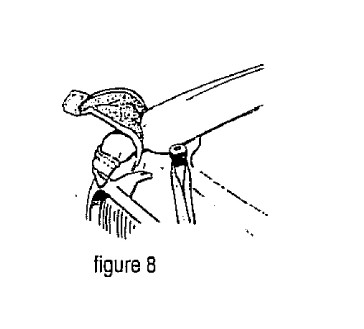
2.5 Fender corner pockets slide around the forward point of the fender like a hand slides into a mitten as shown in figures 7 & 8.
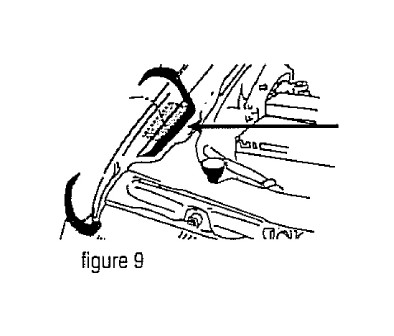
2.6 Fender corner and engine compartment mounting labs usually insert (in a downward and slightly outboard direction) into an opening in the engine compartment at or just behind the forward point of the fender as shown in figure 9.
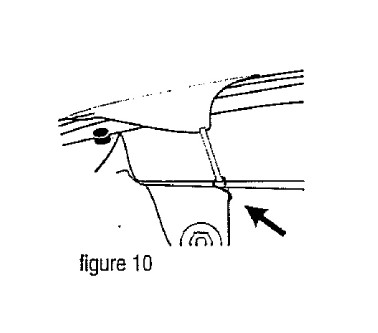
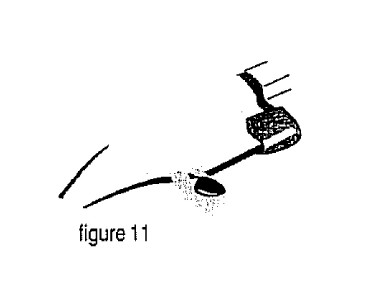
2.7 Elastic strap/s-hooks will attach to an opening in the engine compartment sheet-metal or to the hood's height adjustment post as shown in figures 10 & 11, or to the rolled edge of the sheelmetal crossmember that traverses the distance between the fenders.
2.8 Elastic loops always attach to the hood's height adjustment post as shown in figure 11.
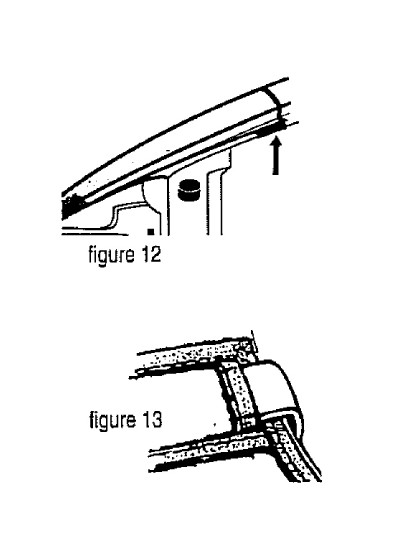
2.9 Chassis clips attach to the sheetmetal of the fender at the junction of the fender and engine compartment sheetmetal or on a diagonal of the sheetmetal crossmember that traverses the distance between the fenders as shown in figure 12.
2.10 Felt covered hooks must be bent into the correct shape to maximize their grip at various attachment points. Use pliers to achieve a sharp, straight crease across the body of the hook so that the creases are parallel to-and tightly hug-the edges of the attachment point. These hooks must be bent into one of the following shapes as deter-mined below: the flat-bottomed U shape, the right-angled L shape, and (less commonly) the tight-radiused V shape.
2.11 Attach the wheel well hooks. Begin with the uppermost hook in each wheel well and bend to the appropriate shape as determined in the following steps. If you have a one-piece unit attach the rubber-coated top strap hook by grasping the bra material and the hook and stretching both to the wheel well on each side. The hook must pinch the material against the lender as shown in figure 13.
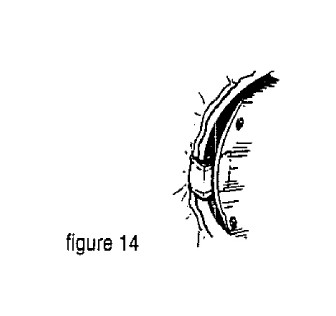
2,12 Look to see if your vehicle has an uncountoured wheel well liner that overlaps the fender's sheetmetal as shown in figure 14. If so, the felt covered hooks that attach into your vehicle's wheel well must be bent into an L shape and inserted between the fender sheet-metal and the liner so that the hook's crease rests against the sheetmetal of the fender/wheel well (figure 14). During the first installation you may need the included black plastic shim/slat to create enough space to get the hook started as it slides into position.
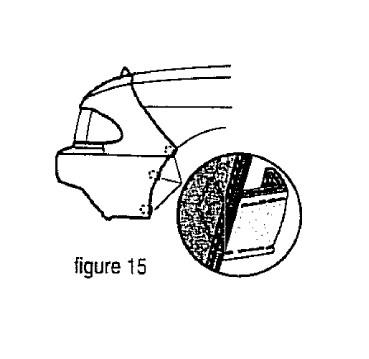
2.13 In most cases the wheel well hooks must be bent into the flat-bottomed U shape as shown in figure 15, with the distance between creases determined by the depth of the rolled edge of your vehicle's fender.
2.14 Once the uppermost hook is secured, attach the next highest hook on each side, alternat-ing sides and working down until all wheel well hooks are bent and attached.
2.15 Bend and attach the hooks across the bottom of the valance panel.
2.16 Secure all s-hooks and/or bend and attach felt covered hooks into lower air intake as appropriate. These usually attach to either the rear edge of the molding that forms the air intake or to the vertical intake grille supports as they meet the air intake's edge.
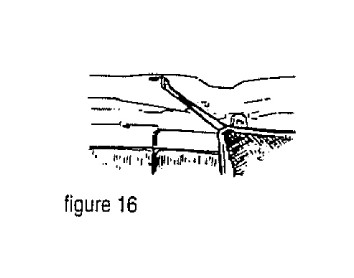
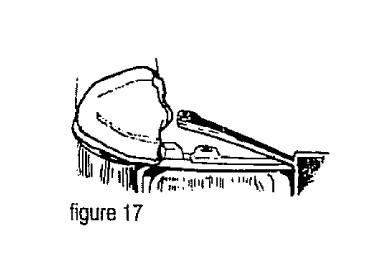
2.17 Secure the screen over the radiator grille by attaching the s-hook to the opening in the sheetmetal crossmember that traverses the space between the fenders as shown in figure 16, or loop the elastic loop over the hood's height adjustment post as shown in figure 17.
2.18 Double Check to ensure that all hooks, elastic loops, felt covered hooks and mounting tabs are securely attached to the vehicle. Failure to secure all connection components will void your warranty and may result in damage to your vehicle.
INSTALLING RETRACTABLE HEADLIGHT COVERS
3.1 We provide some type of cover for most vehicles with retractable headlights. Only one type of headlight cover will work on a particular vehicle. Headlights must usually be in the up position when installing the forward portion of the headlight cover. If the headlight cover for your car is elasticized around its edges, see step
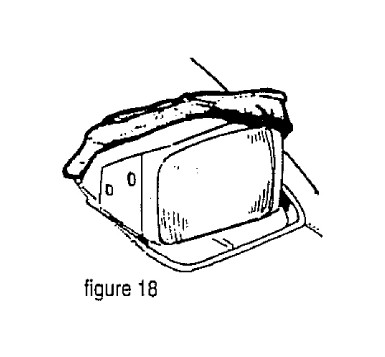
3.2.1f your headlight cover has mounting tabs, go to step 3.3. If you have a one-piece bra, see step 3.4 for information on headlight flaps. 3.2 Stretch the elastic of the "shower cap" cover over the rear edge and the corners of the headlight unit. Making sure that the vinyl fully overlaps the rolled sheetmetal edges to allow free movement of the headlight door, stretch the cover over the front edge and corners as shown in figure 18. Be sure the headlight's face is exposed. When properly installed, the headlights will raise and lower without interfering with the normal movement of the headlights, and the headlight covers will not shift from their original position.
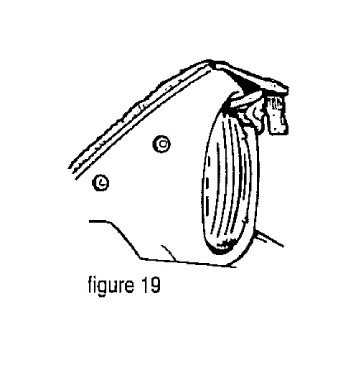
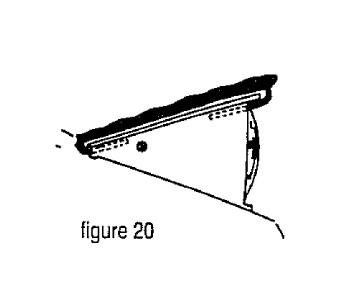
3.3 Insert the forward mounting tab(s) into the space between the headlight and the sheet-metal, the headlight and the bezel, or between the sheetmetal and bezel as shown in figures 19 & 20. Lower the headlights and stretch the material so that the material can be wrapped over the trailing edge of the headlight door. The rear mounting tab inserts into the space behind the headlight as shown in figure 20. When correctly installed, the headlights can be raised or lowered without interfering with the normal movement of the headlights and without affecting the tension of the vinyl as it stretches over the headlight door.
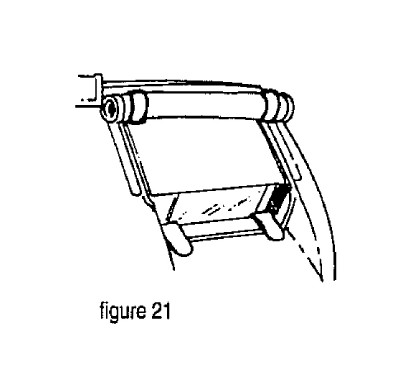
3.4 You must roll and secure headlight flaps as shown in figure 21 before switching on your headlights. Roll the flaps under-so that the
IMPORTANT INFORMATION
Colgan Custom Manufacturing takes full responsibility for the materials and construction of this product. Colgan is not responsible and will not be held liable for damage resulting from the improper installation, misuse, or abuse of this product. If you have a question about installing this product, please call technical support between 8:00 a.m. and 4:30 p.m. ( Central ) Monday through Friday. Call at (800) 447-2727.
methods used on our auto bras. The bra you purchased may not have all of the connection components described here, and some components may be implemented differently from others shown even when they perform an identical function. Where the instructions for the one-piece unit differ from the multi-piece application. the one-piece instructions appear in gray. Each step is listed in the order that most simplifies the installation process. Read the instructions completely before beginning the installation of your Colgan bra.
The connection components differ at some attachment points. Illustrations at each step show the possible connection components for that particular attachment point and text describes the sequence of actions that lead to successfully securing that connection component. Use the method that best corresponds to your bra's connection component and the configuration of your vehicle at each attachment point.
BEFORE YOU BEGIN
The following hints will simplify the installation process:
• Make sure the box's ID label describes the make, model, and year of your vehicle.
• Read all instructions before attempting installation. If instructions are unclear or you have a qUestion, call technical support at (800) 447-2727.
• Consult your body shop if your vehicle has been repainted. Repainted areas must be fully cured before using an auto bra.
• Wax, glaze and sealant compounds must be fully cured before using an auto bra.
• Install the bra only when your vehicle is both clean and dry.
• Your bra may be used in all weather conditions. If the backing gets wet, remove the bra and allow it to dry before reinstallation.
• The vinyl is pliable and easier to stretch when thoroughly warm. It will be easier to install your new auto bra if you choose a warm day and/or leave the bra laid out in the sun for twenty minutes before you begin the installation process.
vinyl side of the material faces outward - to ensure that bugs, dust and debris are not trapped next to your vehicle's paint when the headlights are not in use. Secure the rolled flaps using the hook and loop tabs or elastic loops. Headlight flaps must be flat to prevent flap or flutter when driving at highway speeds with the headlights retracted. Line up the hook and loop strips on all three sides and press firmly to achieve a secure grip.
BRA MAINTENANCE
• Remove your auto bra every time you wash your vehicle. Reinstall only when vehicle is dry.
• Periodically inspect the underside of your auto bra and shake to remove any accumulated road grit, insects or other debris that might damage your paint.
• Clean your auto bra with any water soluble detergent and warm water.
• Tar and insect splatters can be removed with a good vinyl cleaner.
• Always let a wet auto bra dry completely before reinstalling it.
• Your auto bra has a topcoat of ultraviolet impervious material that protects it against drying and cracking. Avoid the use of silicone based vinyl protectants that may harm topcoat.
TROUBLE SHOOTING
see that the air deflectors are in place and that each hook on the underside of the hood is securely attached and in its proper location.
If you have any doubt that your Colgan auto bra is performing properly, please remove it immediately and call technical support at (BOO) 447-2727 between 8:00 a.m. and 4:30 p.m. Central ) Monday through Friday.
