FREE 1 to 3-Day Delivery on Orders $149+ Details
How to Install OPR Replacement Foxbody Floor Pan - Right Side (79-93 All) on your Ford Mustang
Installation Time
1 days
Tools Required
- Spot Weld Cutter Tool
- Corded Drill
- Center Punch
- MIG Welder (minimum recommended: 110VAC/135A)
- Straight Die-Grinder with Cut-off Wheel
- Angle Grinder for grinding and sanding
- Angle Die-Grinder for sanding
- Metric socket and wrench socket
- Torx Driver (for sear belts)
- Heat Gun
- Phillips Driver
- Ball Pein Hammer(s)
- Chisel (Air or Manual)
- Utility Knife
- Hand Scraper
- Masking Tape and Sharpie
- Wire Harness Disconnection Tool
- Floor Jack
- Jack Stands (4-required)
- Steering Wheel Puller (optional)
- Patience

Shop Parts in this Guide
Please Note: This install was completed on a 1987 GT Hatchback [“project vehicle”]. Installation procedures may vary on other models; LX or Convertible. Note that on a unibody vehicle, such as a mustang, the floorpans are an integral part of the structure, and welding is the ONLY way to put floorpans in a mustang. If you are replacing the floorpans due to rust, it is more than likely that the structural integrity of your vehicle is compromised due to missing sheet metal and/or weakened metal that has been affected by rust. For this reason, it is strongly recommended at you do NOT simply place the new floor pans directly on top of the rotted or rusted floor pans. All compromised sheet metal must be removed and replaced to restore the structure of your mustang. New floorpans must be welded to the unibody subframe to mimic the factory installation (which is a spot weld). If you are not familiar with welding, or do not feel comfortable removing and replacing the floor pans from your vehicle, consult with a professional body shop.
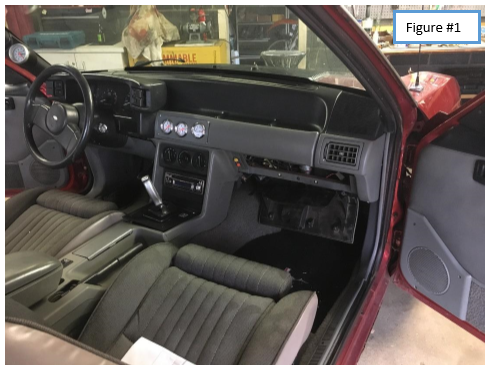
Remove Vehicle Interior:
Note: This guide focuses on replacing both passenger and driver side floor pans, however if you intend on only replacing one (1) side, keep in mind that most of the interior will still need to be removed in order to remove the carpet since it is one-piece from the factory.
Hint: Clean out a staging/receiving area in your work space, garage, etc. Collect some empty boxes or totes for part storage and labeling. Take plenty of photographs to document disassembly; which will make reassembly much easiler.
1. Disconnect Negative (-) Battery Terminal
2. Remove fasteners (4-per seat) holding front passenger and driver seats and remove the seats. Document (using masking tape and sharpie) which wiring harnesses are attached to the seats. A lettering or numbering system is simple and affective, e.g., label “A” on both ends of the harness before disconnecting. ALWAYS use a harness tool to separate these harnesses; they are plastic and usually brittle since these cars are getting old! Stow the seats in a safe place and cover with plastic or tarp to avoid getting dust or dirt on them.
3. Optional: Remove steering wheel to get it out of your way if replacing the driver side floor pan. This is not necessary but will make life a little easier.
4. Begin removing center console by removing fasteners and seat belts; document wiring and place fasteners in zip-lock bags that are labeled for quick reference for reassembly (you will thank yourself later). It doesn’t matter where you begin, e.g., arm rest or radio, but the console is pretty much one piece. The radio and HVAC controls must also be removed. Again, labels and photos as you go.
5. Remove plastic rocker covers, kick panels, etc.
6. Remove rear seats; the bottom of the rear seat is not bolted in, and can be removed by pushing down slightly on the front of the seat while pushing it toward the rear of the car. This will release the frame of the seat from the bottom of the car. The back of the rear seats could remain, but should be covered to avoid dust/dirt. If your interior is in good condition, and you do not want them to get damaged they can be easily removed by leaning them forward slightly and unbolting the left, center and right brackets. Again, stow in a safe place and cover.
7. Once the seats, console, misc. plastics, front seat belts that bolt to floors have been removed, the carpet can carefully be removed and stowed. Try not to rip and tear the carpet out unless you intend on replacing it.
8. Using a heat gun and hand scraper, remove the factory sound deadener from the floor pans. The heat gun will help to soften the glue to make this come off a bit easier.
9. Once the carpet and sound deadener has been removed, begin inspecting the condition of the existing floor pans and the extent of rust damage that may have not been immediately visible from the underside of the car.
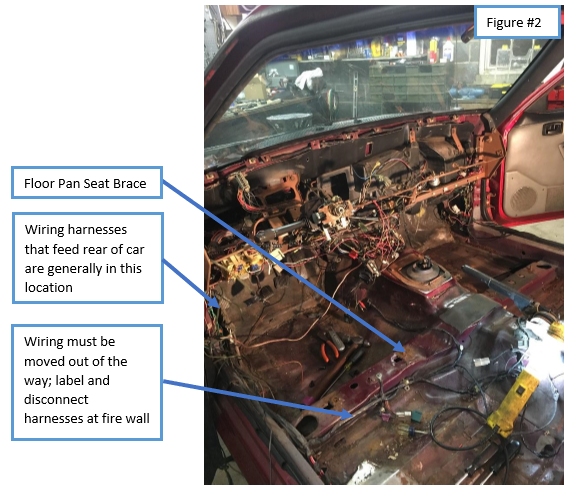
Note: The project vehicle used to create this instruction had a failing heater core, so the entire dash was removed to remove the HVAC system so the heater core could be replaced (as shown in Figure #2). If you are not replacing the heater core, the dash and HVAC system can remain in the car. However, if the core is original to the car now would be a good time to replace.
10. Raise vehicle off the ground using floor jack and jack stands. Use Vehicle Owner’s Manual and follow recommended safe lifting and jacking points. Having the car elevated will make access to the underside of the vehicle easier.
11. From underside of car, remove any interfering wiring, wiring harnesses (on transmission), exhaust or other lines that may prohibit the removal of the existing floor pans.
12. Remove fuel lines (feed and return) from the underside of the vehicle where they attached to the floor pan.
13. Remove rear brake hard lines from where they connect to floor pans.
NOTE: FUEL FEED & RETURN LINES, AND BRAKE LINES MUST BE REMOVED TO AVOID CUTTING OR DAMAGING THESE LINES DURING REMOVAL OF THE EXISTING FLOOR PANS. IN ADDITION, FUEL LINES MUST BE KEPT CLEAR OF ANY GRINDING OR WELDING DURING THE INSTALLATION OF THE NEW FLOOR PANS.
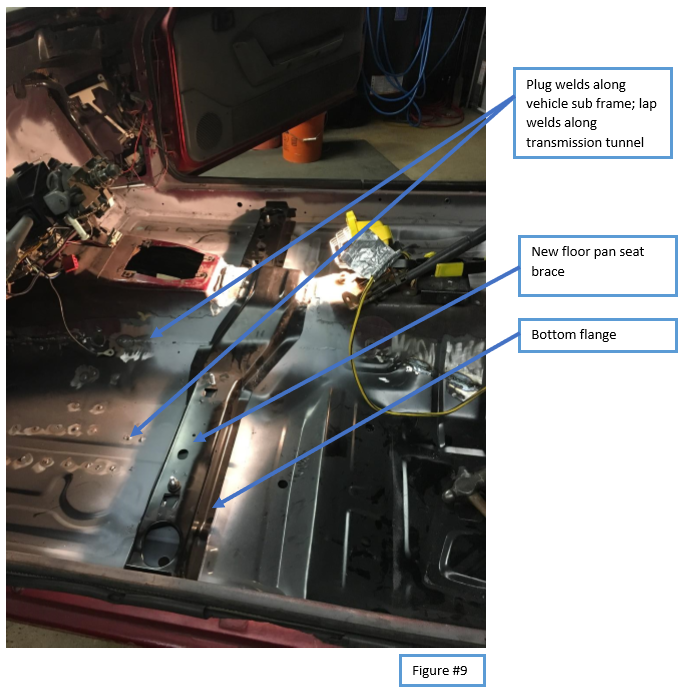
14. Remove Floor Pan Seat Brace (See Figure #2) by removing the factory spot welds using a Spot Weld Cutter Tool. Locate each spot weld, and use a center punch to help keep the cutting bit from walking. This tool will leave a hole in the seat brace which would be sufficient to plug weld the factory seat brace back into the car if it is still in good shape (after installation of the floor pans). The project car in this instruction received a new seat brace since the original seat brace was rust damaged.
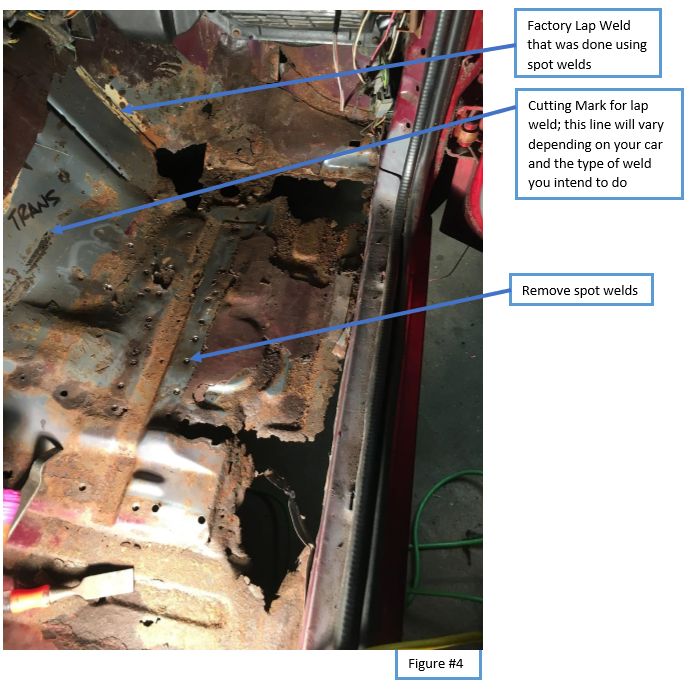
15. Once the Floor Pan Seat Brace has been removed, dry fit the new floor pan and mark the outline of the new floor pan along the transmission tunnel. This will provide guidance on the extent of how much of the existing floor pan will need to be removed along the transmission tunnel. For this project car, the new floor pan was lap welded ½” along the transmission tunnel. This can also be butt welded. The extend of the material that will be cut along the transmission tunnel will depend on the type of weld intended. A ½” lap weld (as done on this project car) requires that ½” of the existing transmission tunnel be left so the new floor pan will lap over it and be welded in place. If a butt weld is preferred, the cutting mark is very critical since the metal must butt together and be welded. A butt weld is a more “professional” looking seam and can be ground from the underside of the car leaving a more factory appearance. However, it is worth mentioning that although butt welding is no more difficult than seam welding on the bench top; it is considerably more difficult while working inside and/or under a car with a relatively large floor pan.
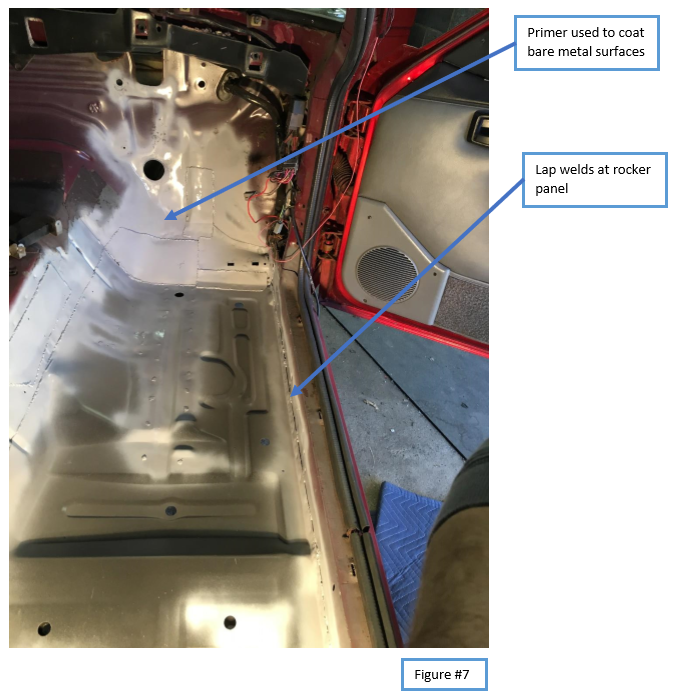
16. Begin removing the existing floor pan by removing each of the factory spot welds (with Spot Weld Cutter Tool) along the unibody frame at the front of the floor pan, along the rocker panel and at the rear of the floor pan where it meets the rocker boxes (see Figure #4).
17. Once the factory spot welds have been removed, carefully cut along the mark that was made at transmission tunnel using a straight die grinder and cut-off wheel or other appropriate cutting tool. Take every precaution to ensure that everything has been cleared out of the way, and none of the unibody substructure is being cut or removed. The only portion of the car being cut is the existing sheet metal floor pan.
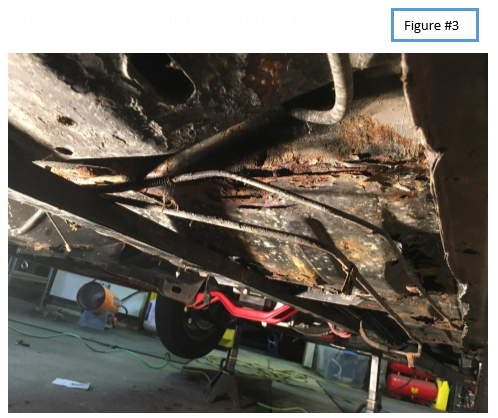
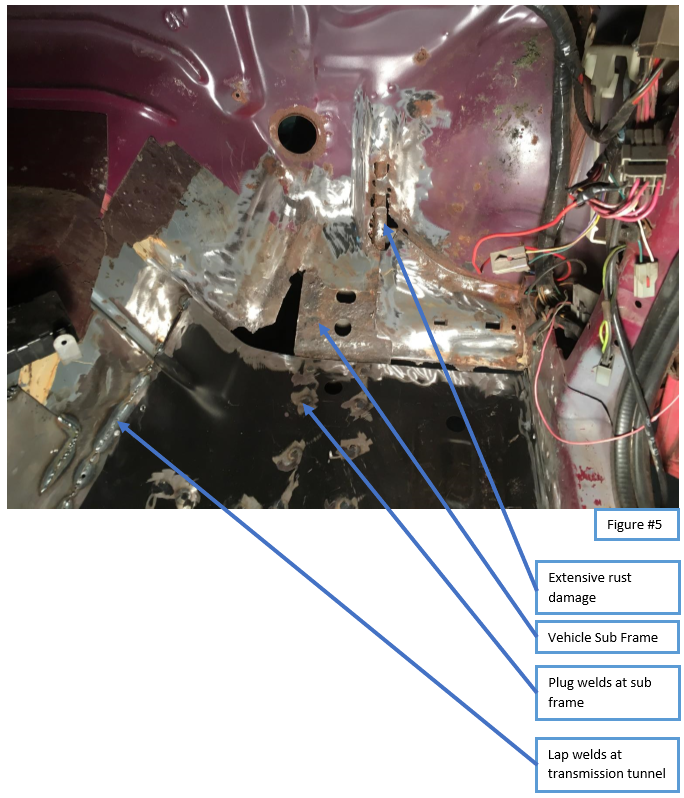
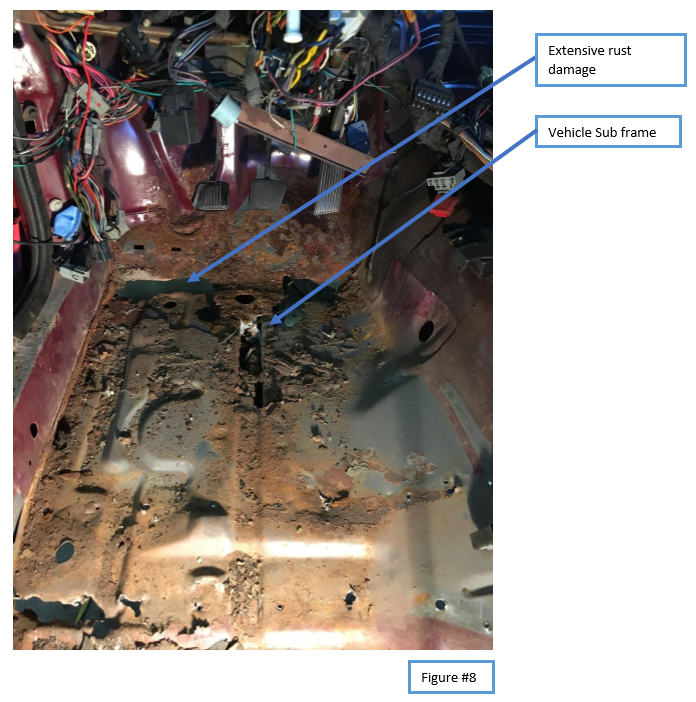
18. Carefully cut away floor pan at the fire wall; a shim can be used to lift the existing floor pan away from the subframe now that the spot welds have been removed to avoid cutting the subframe. The rust damage on this project vehicle was very extensive due in part to a leaking heater core; this was only revealed through the removal of the HVAC system and sound deadener (see Figure #5).
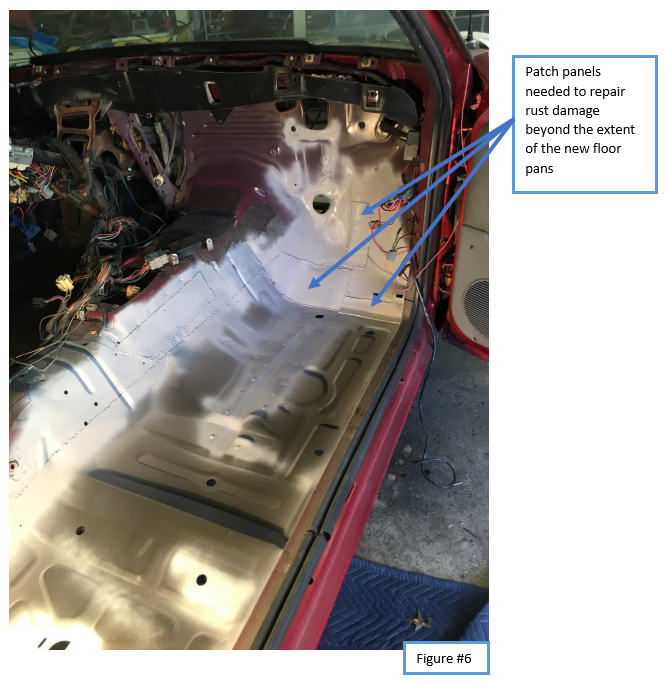
19. Once existing floor pan has been completely removed, dry fit the new floor pan to ensure everything still lines up correctly, and no additional cutting or shaping is required. The new floor pan should rest on the subframe and be tight against the rocker panel(s) and the transmission tunnel.
20. Once the new floor pan has been fitted, prep areas for welding. Surfaces to be MIG welded do not need to be extremely clean, as is the case with TIG welding, but it is strongly recommended that paint and surface rust is completely removed. Always follow manufacturer recommendations for your MIG welder for surface preparation. Fumes generated by welding can be harmful, so always take necessary precautions to avoid producing toxic fumes.
21. Drill 5/16” – 3/8” holes in the new floor pan that will align with the vehicle sub frame. Use the existing floor pan as a template so that the new plug welds will line up with the existing factory spot welds.
22. MIG welding does require a GOOD GROUND! Be sure to place grounding close to your work area, and always conduct a test weld on scrap material to ensure your wire feed and voltage settings are correct. The new floor pan is roughly equivalent to 16-guage steel (1mm thick), so warping during weld is likely to occur. To avoid excessive warping, work welds in small sections and move around to avoid heating up the panel to the point where it will warp. It is recommended that welding begin in the center of the pan with the plug welds that will attach the new floor pan to the vehicle sub frame. Assistance may be needed to hold the new floor pan tight against the sub frame to get a good solid weld. Complete a few plug welds at the sub frame (alternating front to back), and continuously check that the floor pan is not warping and that fitment is still correct. Tack welds can be done at the rocker panel(s) and the transmission tunnel, but keep the beads short to avoid warping.
23. ONTO THE DRIVER SIDE! This project vehicle had extensive rust damage to both passenger and driver side floor pans. The passenger side was completed first. The procedure for completing the driver side floor pan replacement is the same as the passenger side. Cut out old pan and weld in new pan.
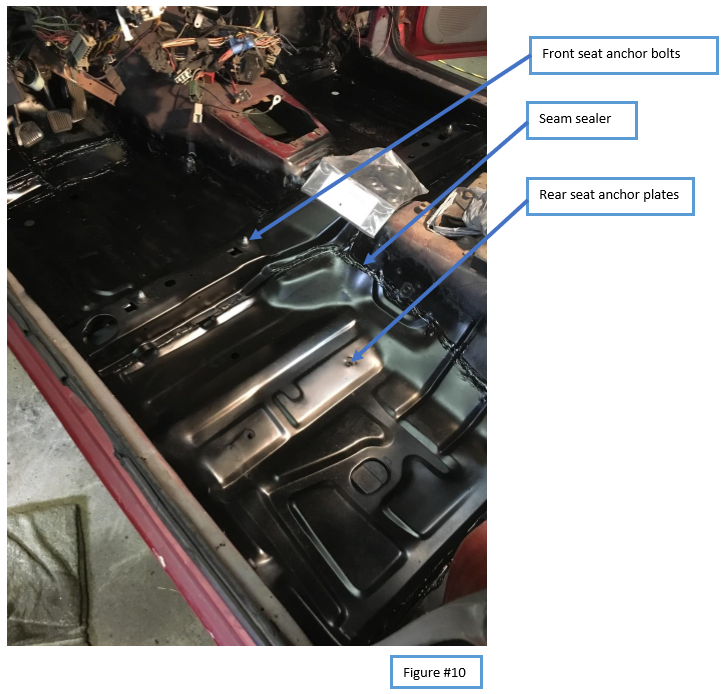
24. Once driver side floor pan has been installed, the next step is to re-install the Floor Pan Seat Brace and the Rear Seat Anchor Panels. This project vehicle received a new floor pan seat brace and rear seat anchor panels (4total), but if your vehicle does not require a new seat brace, the old one could be re-used if it was able to be removed without damaging it. The new seat brace is dry fitted into place to ensure proper fitment, and to determine if any adjustments are required. It is recommended that BOTH seats are installed at this time, and the rear seat anchor panels can be held into place with the bolts. Visually inspect that the seats are true as compared the rocker (equal reveal along the seat), and that all four bolts for the seats can be installed. Make any necessary adjustment in the front seat brace or the rear seat anchors at this time. Mark the location of the floor pan seat brace and all four (4) of the rear seat anchor panels for reference once the seats are in the correct position. The rear seat anchors can also be tack welded to the floor pan at this time.
25. Remove the seats from the vehicle and stow.
26. Remove the front seat brace from the vehicle and drill 5/16”-3/8” holes along the bottom flange in the exact same locations as the factory spot welds if a new front seat brace is being installed. The old seat brace can be used as a template.
27. Use a weldable primer in any areas under the front seat brace where there is bare metal and allow to cure per manufacturer instructions.
28. Plug weld front seat brace to the floor pan and transmission tunnel to mimic factory spot welds.
29. Complete welding rear seat anchor panels (4-total) from underneath vehicle.
30. Apply primer to any bare metal and allow to cure (this is done on both the top and bottom of the floor pan). Apply finish paint coat and allow to cure; 2-3 coats of finish paint should be adequate. For this project vehicle, black satin was used on top and a rubberized undercoating was applied to the bottom.
31. Apply seam sealer to all lap or butt welds on both top and bottom of the floor pan at all seams (see Figure #10).
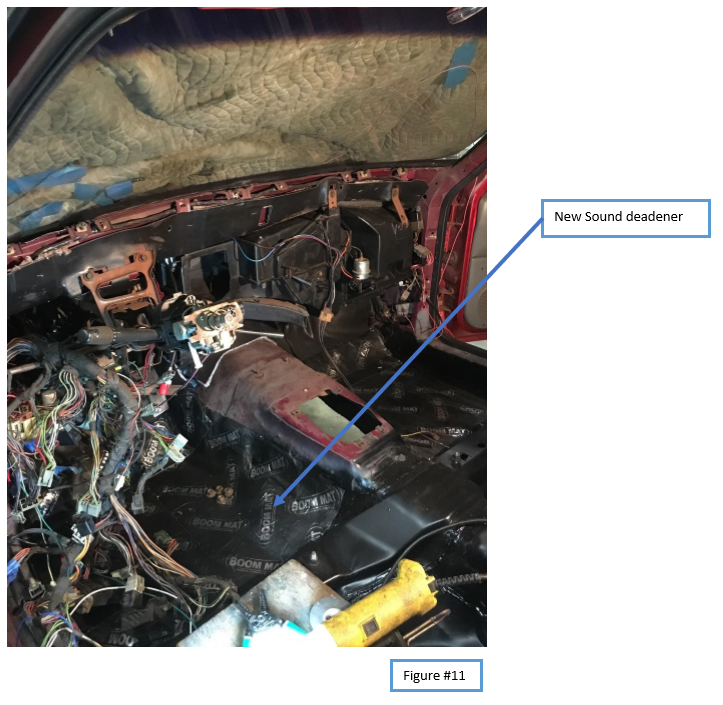
32. Install sound deadener (see Figure #11).
33. Install brake and fuel lines that were disconnected in order to install floor pans. Use rivets to attached hard lines to new floor pan in same locations they were removed. New holes will be required. If brake lines were disconnected at any location, brake system must be bled in accordance with vehicle manual.
34. Install any wiring harnesses removed from transmission or other components from underneath the vehicle.
35. Install all wiring harnesses removed from the interior of the vehicle and re-attached any grounding straps and/or connectors to floor pan. The new floor pans have holes for factory wire loom connectors.
36. Install carpet and re-install vehicle interior in reverse order that it was remove. Use photos, notes and labeled containers for re-connecting harnesses and re-assembling interior panels correctly.
37. Re-connect negative (-) battery terminal, and conduct a full systems check to ensure all components function correctly. Note that certain harnesses removed provide function to the rear of the vehicle, power windows, locks, etc.
38. Enjoy dry feet and a more structurally sound vehicle!