FREE 1 to 3-Day Delivery on Orders $149+ Details
How to install a Flowmaster American Thunder Catback Exhaust on your 2011-2012 GT Mustang

Shop Parts in this Guide
Installation
Removal:
1. Remove the two 15mm bolts that secure the upper panhard bar/brace to the body on the left side, just forward of the muffler. Pull the bar down to gain clearance for muffler removal.
2. Loosen the 13mm bolts on the clamped connections between the mufflers and the over-axle pipes. The bolts need to be backed out to the end of the threads in order to open the clamp enough to allow the flared ball connection of the inlet pipe to be removed.
3. There are three hangers on each muffler, two in the front and one in the rear. Separate the rear hanger rods from the rubber mount first, and slide the mufflers forward and out of the front mounts. A silicone spray lubricant will help the hangers to slip out.
4. Use a 15mm socket to loosen the nuts on the clamped connections at the rear of the factory Hpipe and remove the intermediate pipes. Slip the pipes off and remove from the vehicle.
5. Use a 13mm ratcheting box end wrench to loosen the clamps on each side of the H-pipe where it connects to the back of the catalytic converters. The bolts need to be backed out almost all the way to allow the joint to separate. Remove the H-pipe from under the car. The factory H-pipe clamps will be used to install the new system however they are fastened to the original pipes with a small tab and will need to be removed. This can be accomplished by wiggling the clamp back and forth to break the tab, or using a die grinder with cut off wheel.
6. Use a 13mm socket to remove the bolts securing the double muffler mounts from the frame on the left and right side.
Installation:
1. Place the two factory band clamps that were removed in step 4, onto the inlets of the new Scavenger X-pipe assembly. Then place the assembly up into position and onto the back of the cats and support the rear with a stand of some sort. It’s important that the connections line up closely. If they don’t, check the center to center spread of the inlet pipes of the X-pipe - It should be 22-1/4”.
Use a little muscle to adjust the spread if necessary. Snug the clamps up and then wiggle the pipe up and down a bit to help seat the connection before final tightening.
2. Place a 3” clamp onto the slip fit end of the new intermediate pipes and then install the pipes up over the axle and onto the back of the X-pipe. When you install the clamps, make sure that they are oriented so that the nuts are offset to the outside.
3. Push the upper panhard bar back up into position and re-attach with the original bolts.
4. Place a 3” clamp onto the inlet pipes of the mufflers. Slide the hanger mounts removed in step 7 onto the new mufflers. Place the mufflers up into position and onto the over-axle pipes, and connect the rear hanger mounts to support. Secure the double hanger mounts back into position on the frame using the factory bolts.
5. Adjust the position of all muffler, pipes and tips to provide a satisfactory fit. This is a tight fitting system, so take your time and be patient, tightening and adjusting a little bit at a time. Be sure to maintain at adequate clearance around all parts of the system to avoid rattles or damage to heat sensitive components. Once you’re happy with the fit tighten all connections down very securely.
6. For a cleaner appearance and more secure installation, we highly recommend welding all slipfit connections.
NOTE: If you experience an exhaust leak at the X-pipe/Cat connection, take a hammer and tap on the clamped ball flare connections while the engine is running. Doing this will help the ball flare to seat properly.
PACKING LIST
| Qty | Description | Part# |
|---|---|---|
| Box #85053 | ||
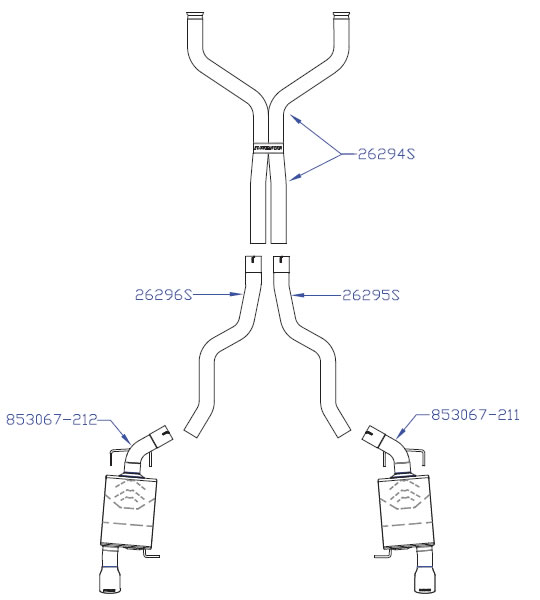
| 1 | Left Muffler Assembly | 853067-212 |
| 1 | Right Muffler Assembly | 853067-211 |
| Box #81081 | ||
| 1 | Scavenger Assembly | 26294S |
| 1 | Left Intermediate Pipe | 26296S |
| 1 | Right Intermediate Pipe | 26295S |
| 1 | Parts Kit | PK515 |
| 4 | 3” Band Clamp | MC300BS |
| 2 | 3/8” Hanger Keepers | HW301 |