 FREE 1 to 3-Day Delivery on Orders $149+ Details
How to Install a Ford Racing Hot Rod Performance Camshafts on your 2005-2010 Mustang GT
Installation Time
8 hours
Tools Required
- 10mm Deep Socket
- 11mm Socket
- 8mm Deep Socket
- 15mm Deep Socket
- 18mm Deep Socket
- Universal Joint Socket (articulated joint)
- Socket Extension
- Ratchet
- Breaker Bar
- Torque Wrenches capable of 89 in-lbs and 30 ft-lbs
- Flathead Screwdriver
- Gasket Sealant
- Cam Install Oil
- Shop Towels/Rags
- Timing Chain Wedge or Garden Hose
- Vacuum or Compressed Air (optional, for dirty engine bays)

Shop Parts in this Guide
Parts Required:
• 2 new cam phaser bolts (Item #53672)
Note: This install can be done alone but can be completed more easily with the help of a friend.
Note: While some manuals say that the roller followers (rockers) must be removed this install can be completed without a valve spring compressor and without removing any other additional parts.
Preparing to Install the Cams
1. Put the car in neutral and pull the handbrake or set to N
2. Disconnect the negative then positive battery terminals.
3. Using a 8 mm socket remove long bolt holding in the battery.
4. Pull out the battery and set aside.
5. Using the same 8 mm socket with an extension, remove the 3 bolts that hold the battery tray.
6. Pull out battery tray and set aside.
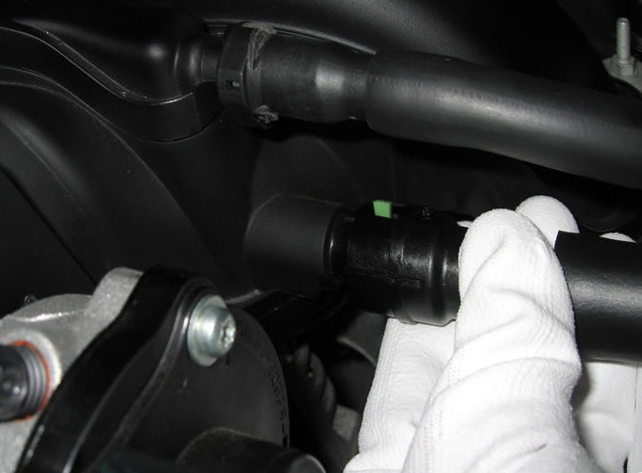
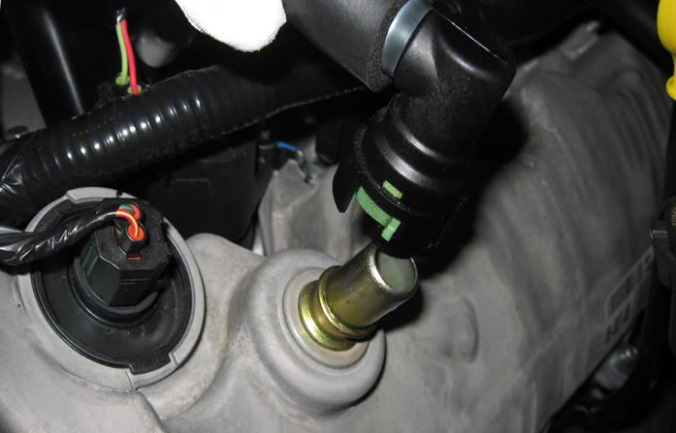
7. Disconnect the 2 PCV hoses by sliding the green tab. Disconnect both ends and set aside.
8. Unplug the MAF sensor plug attached to the intake.
9. Using a flat head screwdriver and a 10mm socket, loosen and unbolt the factory air intake or CAI.
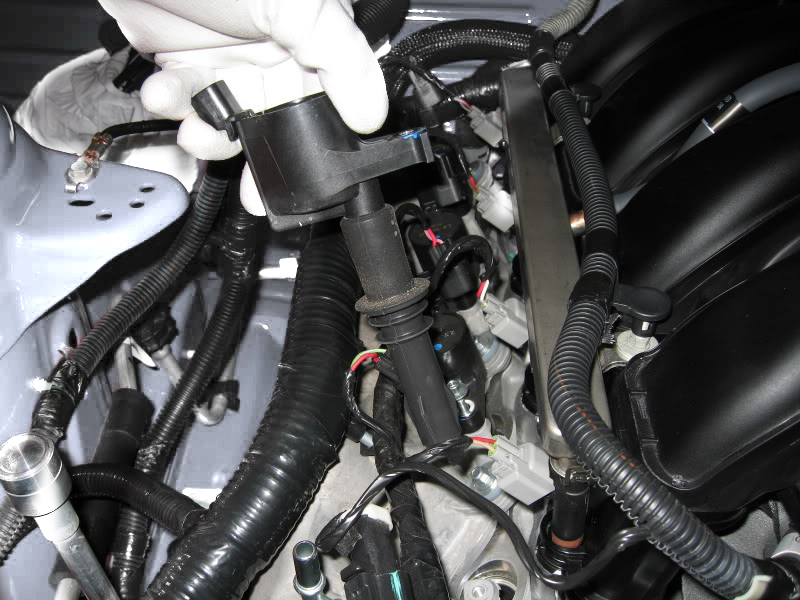
10. Using a 7mm socket remove the 8 bolts that hold down the 8 Coil On Plug (Coil packs). Disconnect and pull out, then set aside. Retaining original order is not necessary.
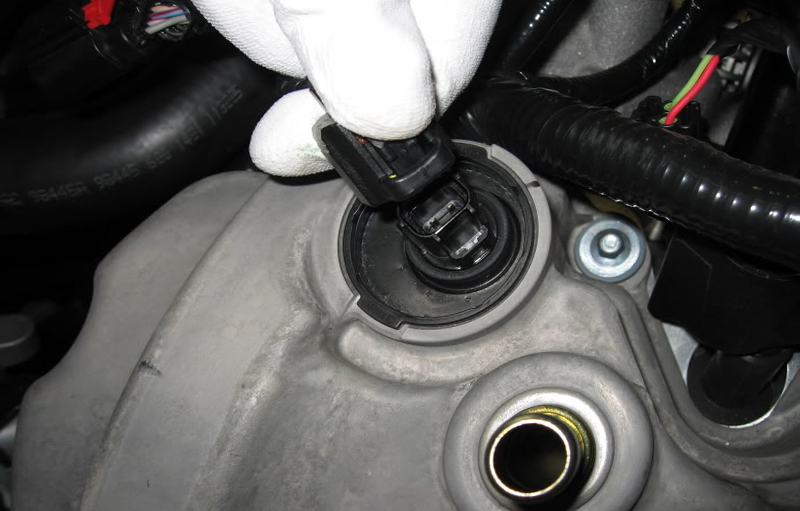
11. Disconnect the Variable Camshaft Timing Oil Control (VCTOC) Solenoid.
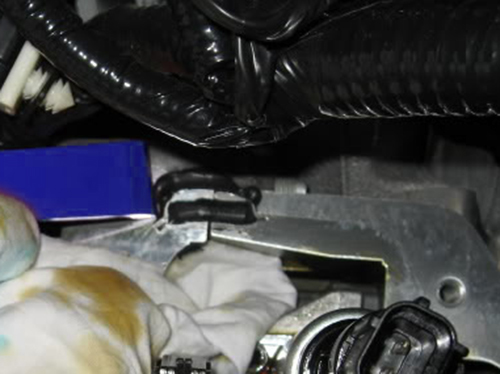
12. Pull the wire supports off the valve cover studs.
13. Pull the wire support clips up off of the valve cover. They are located on the top and bottom.

14. (Optional) Place a rag over the exhaust manifold/headers to lessen the chance of oil spilling onto them.
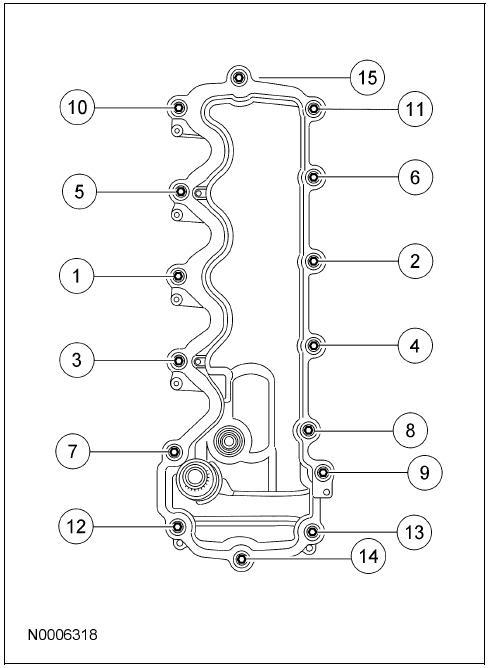
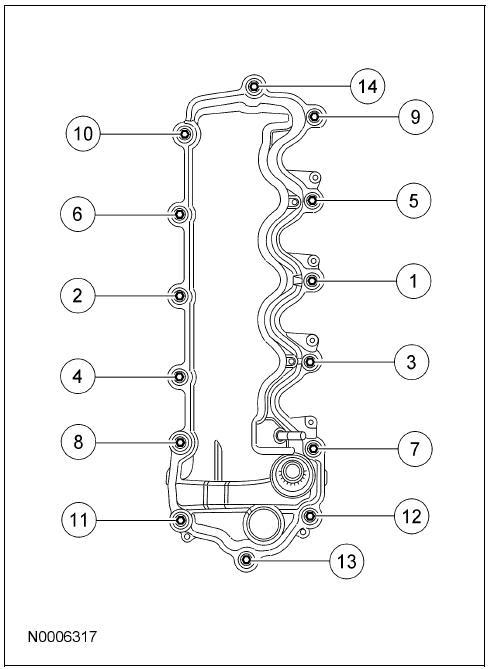
15. Using an 8 mm socket, an extension, and a universal joint socket loosen the 15 bolts on the driver’s side and the 14 on the passenger’s.
Reference for bolt locations:
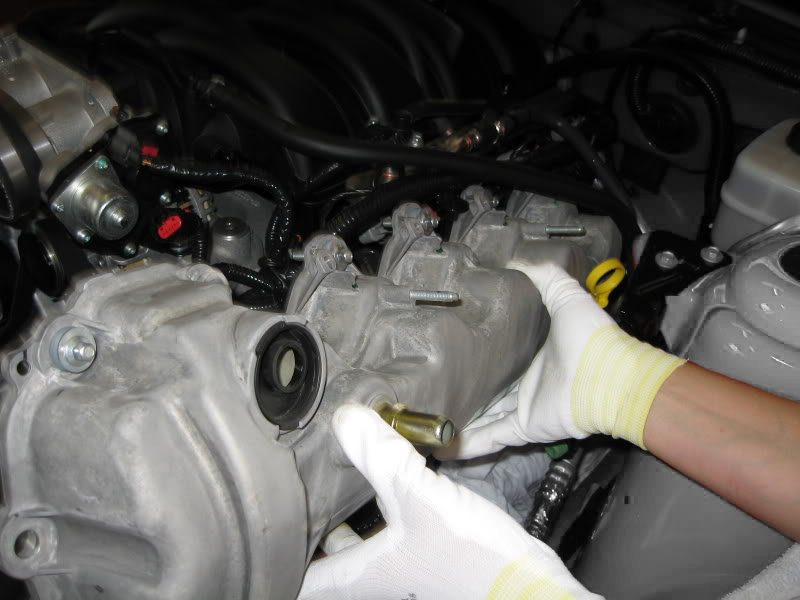
16. Remove each valve cover and set aside. When removing, be careful to pull straight up as to not damage the VCTOC plug and not tear the valve cover gasket. The gasket should come off with the valve cover.
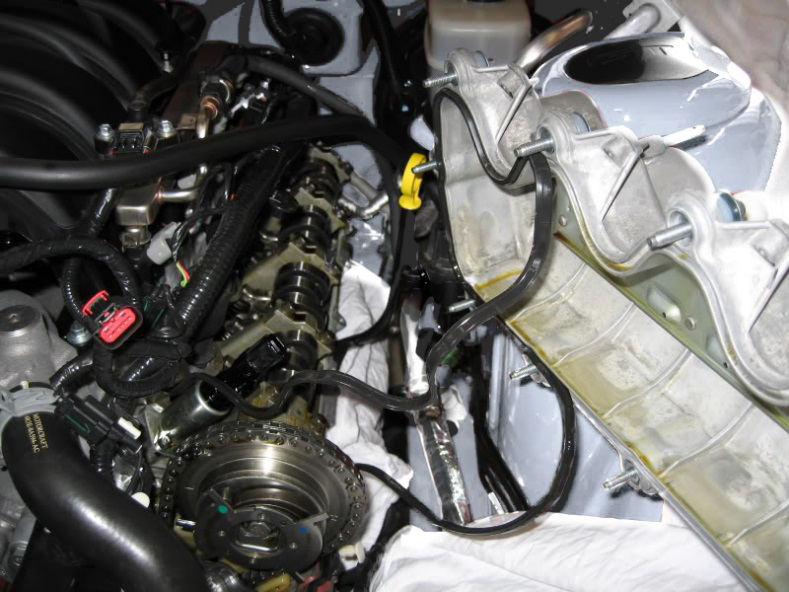
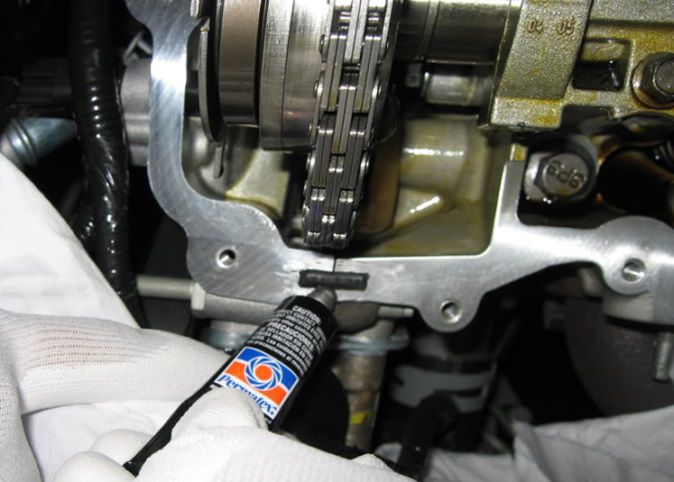
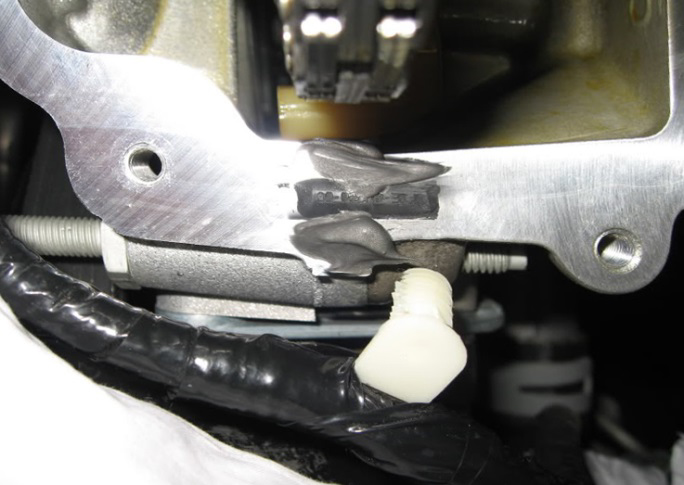
17. Using a non-metallic scraper remove the excess gasket sealant making sure to leave a square in the center. Take care not to have any existing sealant fall into the engine.
18. Clean and wipe the area where the gasket was. Vacuum, if necessary, any large amounts of dirt or grime.
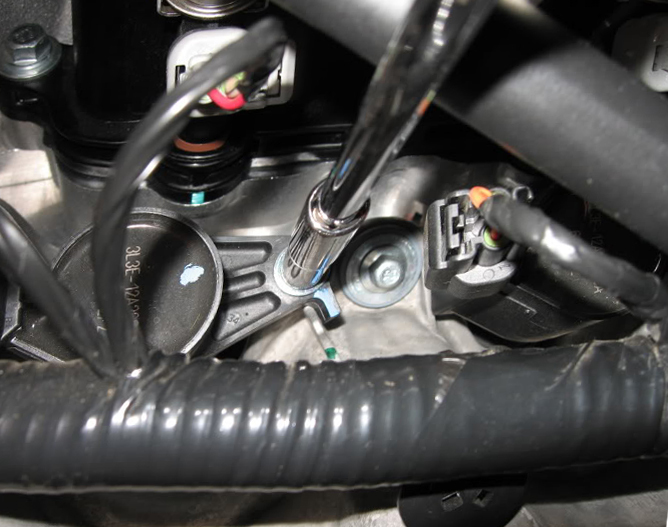
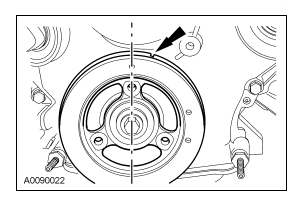
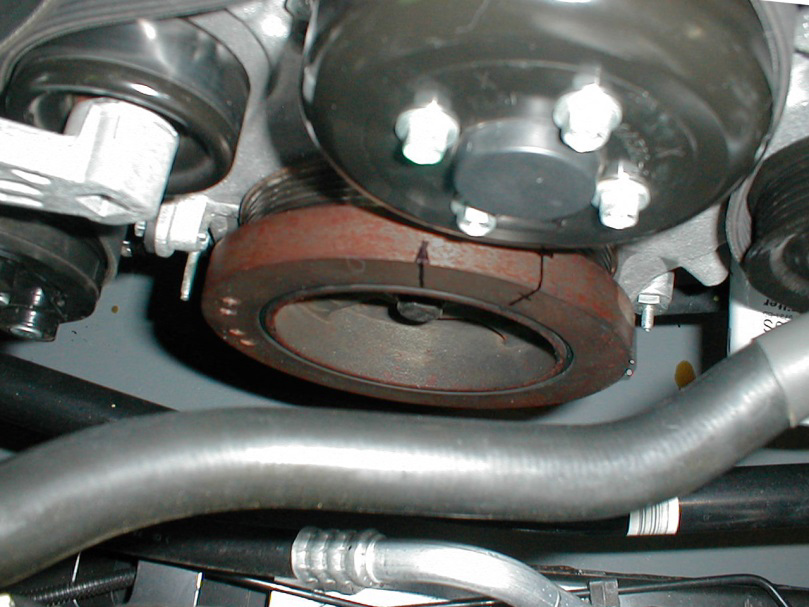
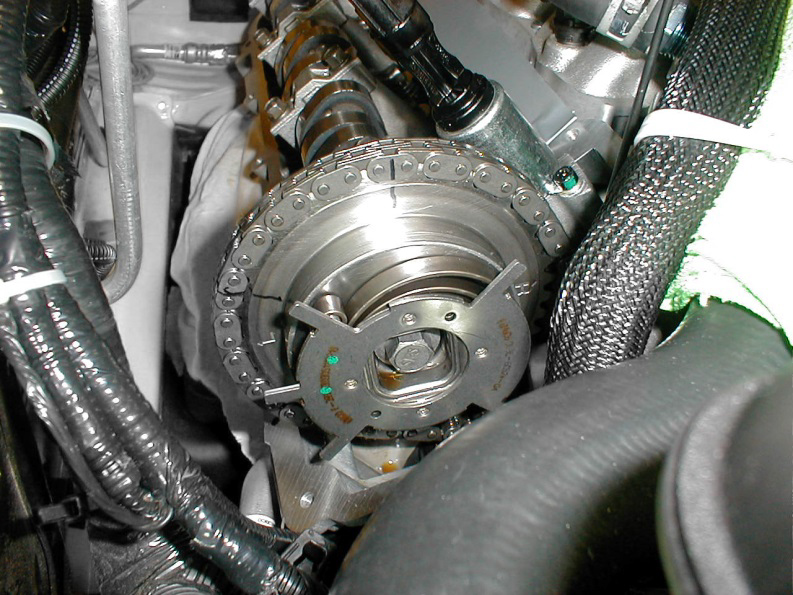
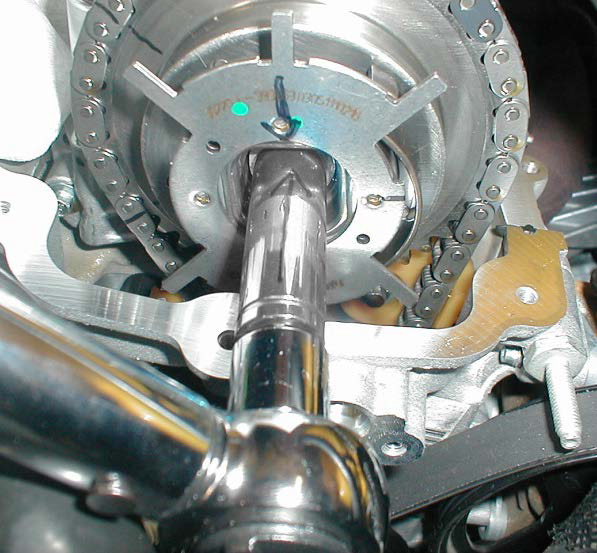
19. Using the breaker bar and an 18mm deep socket rotate the balancer so that the mark is at the 1 o’clock position and the spoke at the 12 o’clock. The small mark is located closest to where the block and balancer meet. The engine is now TDC in cylinder #1.
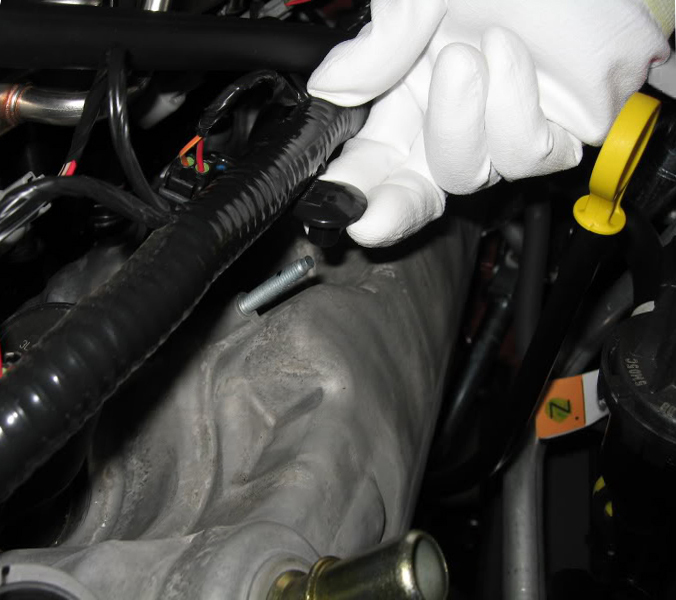
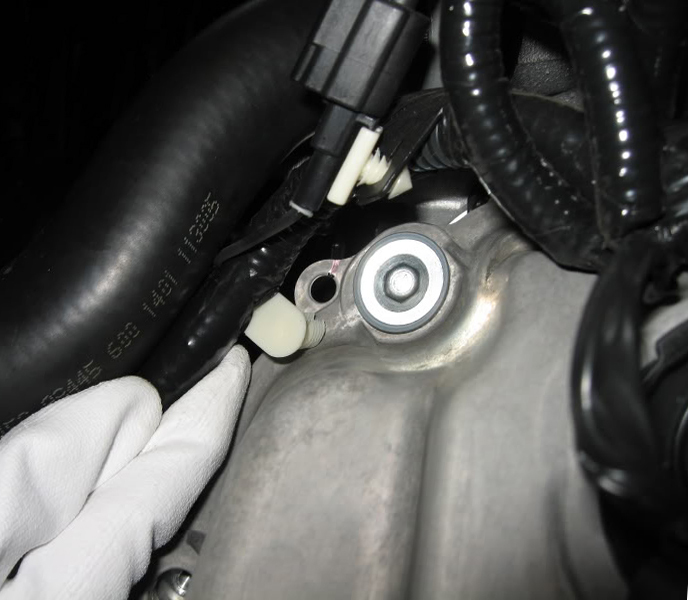
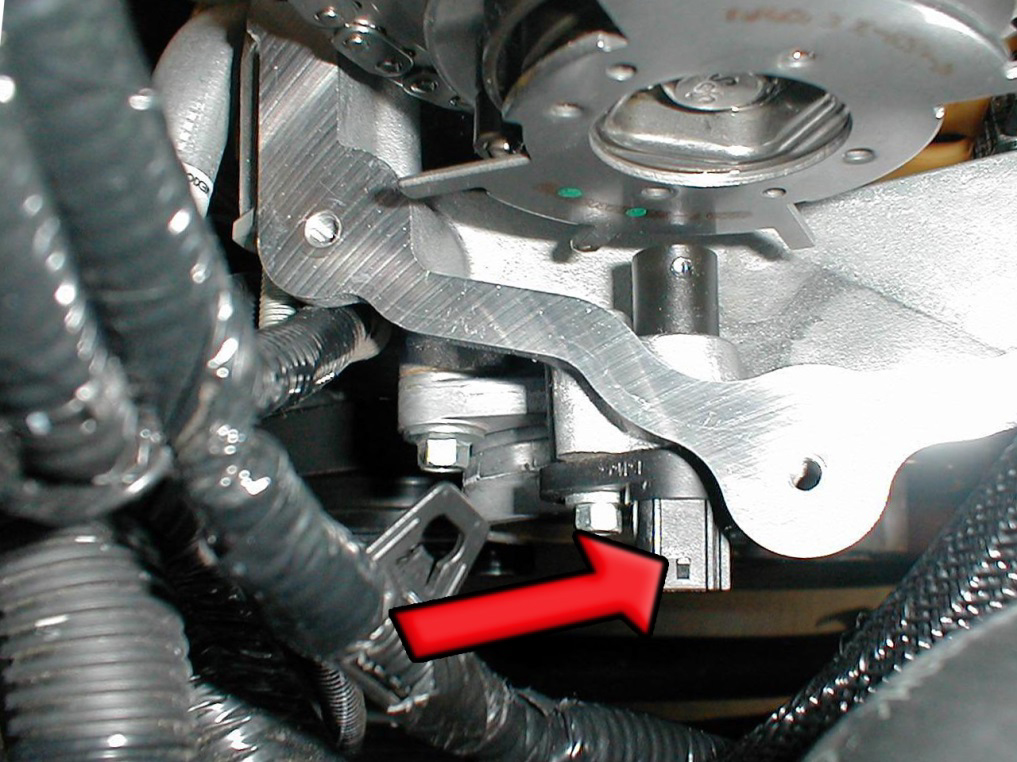
20. Unplug then unbolt both the left and right hand camshaft position sensor using an 8 mm socket.
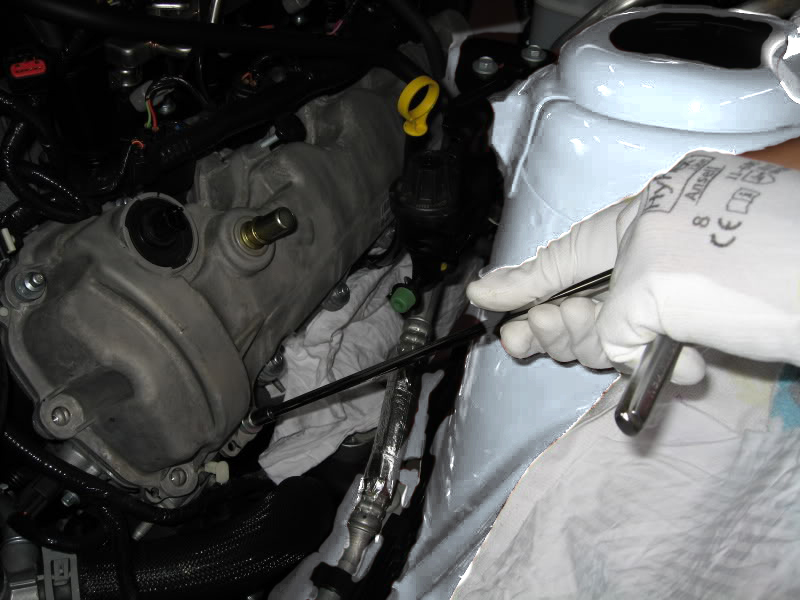
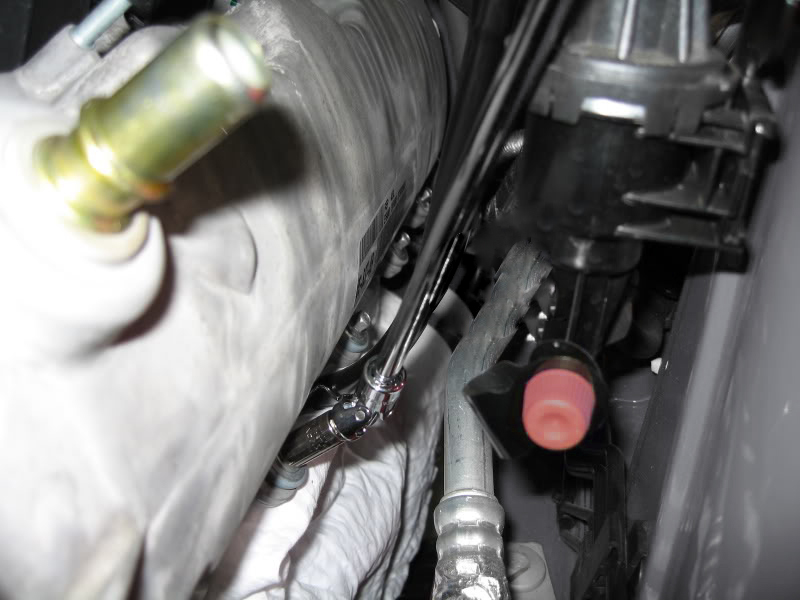
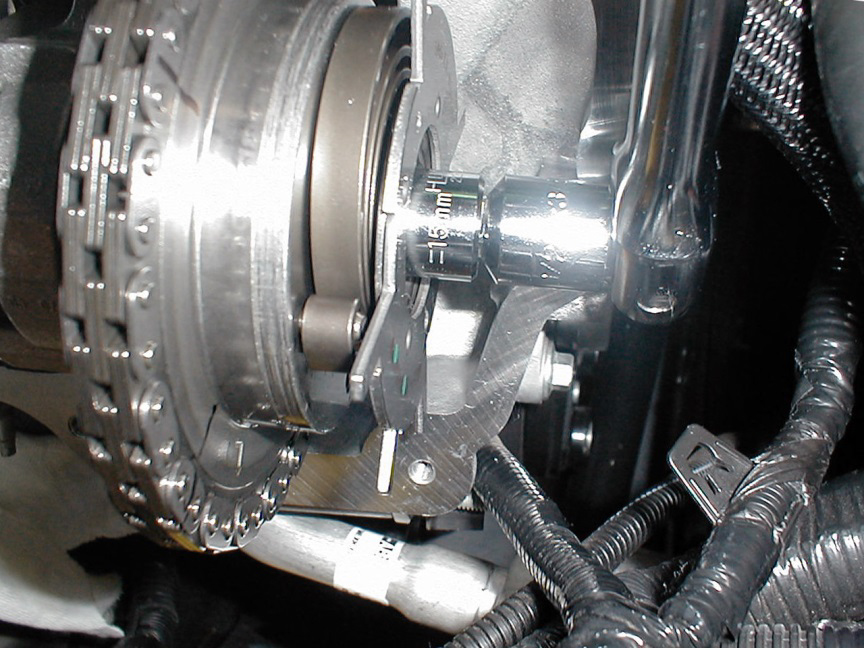
21. Using the breaker bar and 15mm deep socket loosen both cam phaser bolts but don’t remove it completely. Try to loosen the bolts without the engine turning. Use the breaker bar with a socket on the balancer to hold the engine in place if necessary.
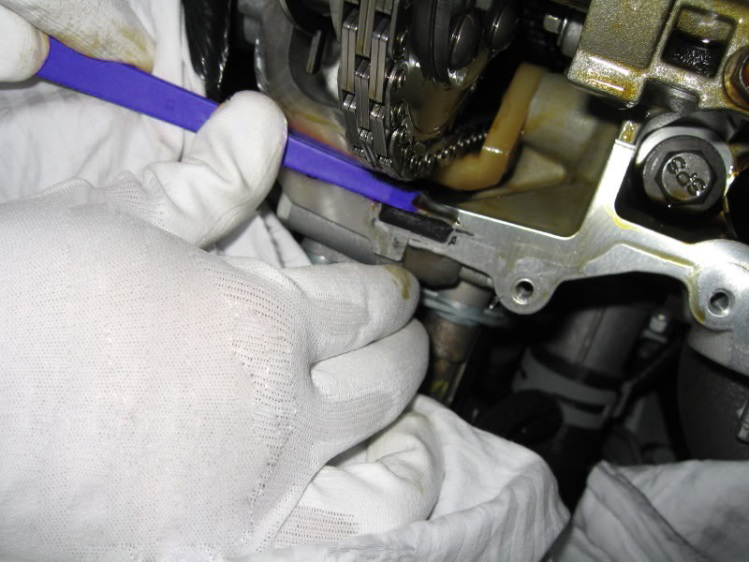
22. After both cam phaser bolts have been broken loose the timing chain wedge/ hose can be inserted down in between the timing chain and engine block.
Note: If using the timing wedge the curved part will face down for the passenger’s side and up for the driver’s side.
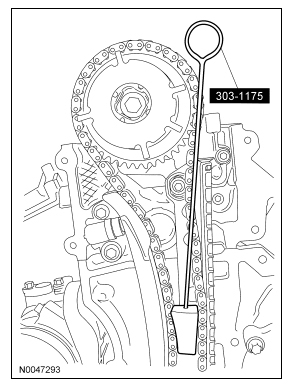
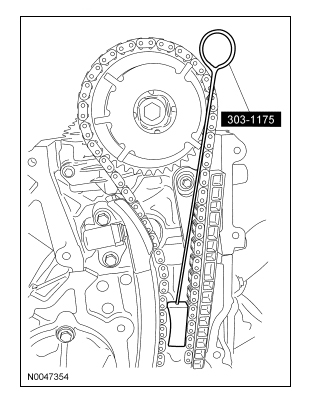
23. We will begin the process on the passenger’s side camshaft first. Insert the wedge or folded in half hose as shown. Push hard to wedge the piece into place. The goal is to prevent any movement of the chain. You should be able to tug gently on the wedge or hose without it coming loose. Do not remove this wedge until after this side of the cam install has been completed.
Removing the stock camshafts
1. After you are sure that the chain will not move, mark both the chain and cam phaser sprocket with a sharpie or marker. This will ensure that the chain can be relocated in the correct tooth if the sprocket and chain separate.
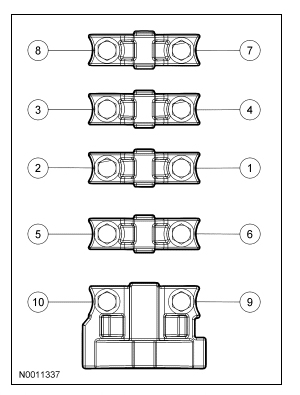
2. Using an 8mm socket, loosen the Camshaft bearing caps slowly in this order.
Note: Since we have not removed the followers the cam needs to be evenly and slowly release pressure off of the valve springs. To do this multiple passes of the loosing order will be completed. Only a couple turns per bolt until all the bolts can be removed at the same time.
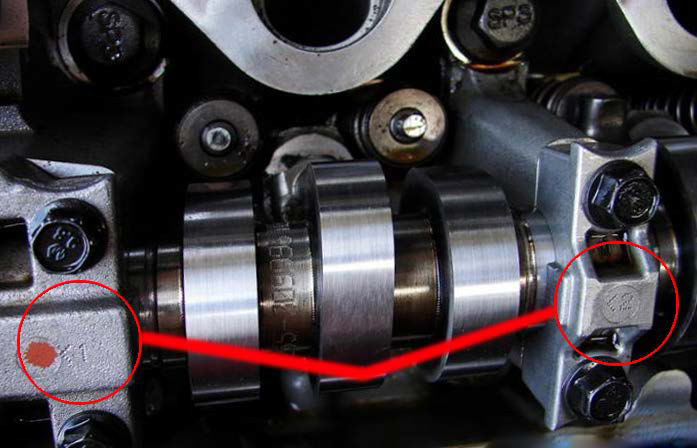
3. While the bolts are loose but still in place, remove the bolts for the front bearing cap first and pull off the cap and set aside. Now continue to remove the rest of the bolts and caps. Set the caps in correct order and direction. All caps have an arrow which points forward and an accompany number.
4. With all the camshaft bearing caps removed we can now unbolt the cam phaser bolt from the sprocket. Make sure not to allow the sprocket to fall out of place.
5. Once the old bolt has been removed discard the bolt as it is a one-time use bolt. Tip the end of the cam closet to the firewall upwards. At the same time lift the cam phaser sprocket. This will allow you to easily slide out the cam from the sprocket.
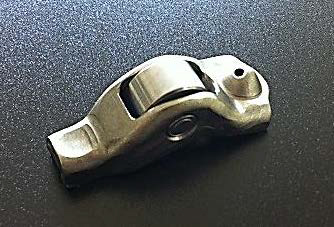
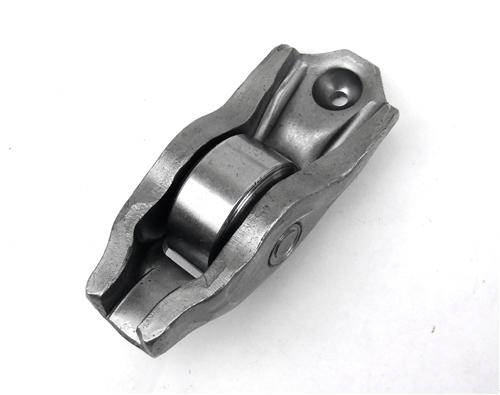
6. With the cam removed check to see that all of the roller followers are still aligned and in place. These are just resting and are easy to become misaligned or fall out of place. If they happen to fall off they can be placed back to their original position by sliding the open end over the pin of the spring and resting the concave area over the lash post.

7. Once all the followers are aligned take some cam install oil and apply to the followers and the lower cam bearings.
8. After oil has been applied you are ready to install the new camshaft. First you must make sure the new camshaft is free of debris. Wipe with a rag and new motor oil. The cams have been pre-oiled to prevent rust but this layer can hold in dirt and small metal pieces from the machining process.
Installing the new Camshafts
1. Now that the new cam is clean we can set it into place. The install process will be similar to the removal process. Each side has a different length cam match the length of the new cam to the old one to know which side is which. When placing them next to each other match the ends, one cam will be longer than the other.
2. First hold the sprocket at an angle and take note of where the hole is. Looking at the cam locate the pin. When installing the cam, make sure the pin locks into the hole of the sprocket. Slide the cam into the sprocket; twist the cam until you are confident the pin is in the hole.
3. Obtain a new cam phaser bolt and loosely install it to hold the cam and sprocket together.
4. Take the bearing caps and loosely tighten them, slowly bringing the cam into place. Make sure the lobs of the cam are centered on their respective followers.
5. Take the first cam bearing cap and check to make sure the oil grove is clear and clean.
Place the bearing cap on the cam and make sure the disk on the cam fits into the slot of the bearing cap. Make sure that the cap will seat properly. If necessary loosen the other bearing caps and slide the cam until the first bearing cap fits into place. Note when sliding cam the followers may tend to fall off. Refer to Step 6 of Removing the Stock Camshaft to reinstall them correctly.
6. Add more cam install oil to the entire length of the cam and adding more to the sections without lobes where the bearing caps will be placed.
7. Once you are sure the first cap will fit tighten the other bearing caps in order to evenly bring the cam to the followers. Only tighten until the bearing caps are resting on the lower bearings. Be sure the bearing caps are even when being pulled down.
8. Go back and check that all bearing cap bolts are sung. Then set the torque wrench to 89in-lbs. This is a low torque setting so make sure not to miss the click of the wrench and over tighten the bolts.
9. Once all the bolts have been tightened take the larger torque wrench and tighten the phaser bolt to 30ftlbs. Be careful not to turn the engine or pull the timing chain wedge further into the engine. After the bolt has been torqued to 30ftlbs you will have to turn the bolt an additional 90 degrees. To ensure you do not overtorque the bolt, mark the socket and the sprocket with a line, then mark the sprocket an additional 90 degrees. Turn the socket until the mark on the socket meets the 2nd mark at 90 degrees. If needed use a breaker bar to turn the 90 degrees.

10. We can now remove the timing chain wedge.
11. Once the wedge is removed you can repeat the stock cam removal and install on the other side following the same steps and procedures. Remember to install the wedge on the other side as well.
Reinstalling the Valve Covers
1. After both cams have been installed you can place the valve covers back on and retighten.
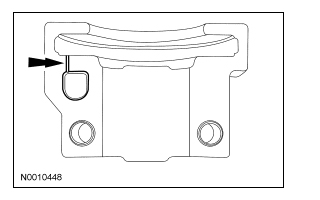
2. First we will apply gasket paste to reinsure a good seal and that no oil will leak. Just a little dab around this black square is all that is needed.
3. Clean the original gasket with a rag and new motor oil. Place the gasket firmly into the valve covers.
4. Place the covers back over the cams and onto the block. Tighten all bolts in the following order. Note the #14 bolt on the driver’s side is a threaded stud. Torque all valve cover bolts to 89in-lbs.


5. Bolt in the cam sprocket position senor. Re-attach the wire connection. Push in the coilpacks and bolt in and torque to 89in-lbs. Re-attach all wire supports. Reconnect MAF and all PCV connections.
6. Double check that all connections are complete. Then reinstall battery tray and then place in battery. Connect battery; positive first then negative.
7. Turn on car but don’t start motor. At this time your custom tune can be loaded.
8. Once tune upload is complete, start the engine and check for leaks. There may be some smoke from oil dripped on to the manifolds/headers from when the valve covers were removed. Check the engines oil pressure. Turn off engine if there are any grinding noises.
Cam Break-in Cycle
1. After the cams have been installed they need to be properly broken in to wear properly and be durable.
2. After the engine is started and you are confident there are no instant problems, drive the car for at least a half hour keeping the revs between 2500 and 3000rpm. Every so often bring the rpms up to 3500 to spread oil over the new cams. After the first 10 minutes, with the engine still running, pull over and check again for any leaks or problems. I found the best way to do this is to drive around staying only in 1st and 2nd gear.
After your test drive you can turn off the car and again check that there are no problems. It is better to catch a small problem now to prevent it becoming a larger problem later.
Now you can enjoy the great lopey sound and the power increase of your new FRPP Hot Rod cams.
Installation Instructions written by AmericanMuscle Customer Garrett Parlo 08.05.2014

