FREE 1 to 3-Day Delivery on Orders $149+ Details
How to Install Full Tilt Boogie Subframe Bushing Kit (99-04 Cobra) on your Ford Mustang
Installation Time
4 hours
Tools Required
- Jack and Jack Stands
- Metric Sockets: 8mm, 12mm, 15mm, 21mm
- 12Pt 12mm Socket
- T40 Torx Bit
- Flathead Screw Driver
- Vice Grip Pliers
- Channel Lock Pliers
- WD-40
- Rubber Mallet or Dead Blow
- Lug Wrench
- Torque Wrench
- Subframe Bushing Removal Tool
- Drill and Drill Bits
- Wire Wheel Bit
- Dremel With Sanding Bit
- Blue Loctite
- An Assistant
- Impact Wrench (Optional)
- (Optional) Fuel Filter and Fuel Line Disconnect Tools
Note: It is recommended, if not done so already, that the front subframe bolts be replaced with Ford replacement 14mm bolts or FTBR’s 9/16" bolts. Ford put in 12mm bolts from the factory that were too small and cause a clunk in the rear end. American Muscle carries the larger FTBR bolts that will properly fit in the front of the subframe. It is also highly recommended to use OEM rear subframe bolts (with a shaved head for wide tires) to prevent cross threading. During this install it would also be a good time to check halfshaft nut torque as well as the factory nuts can come loose
1. Chock the front wheels of the car.
2. Raise the rear of the car with a jack and support it with a set of jackstands.
3. Loosen the rear lugs and remove the rear wheels.
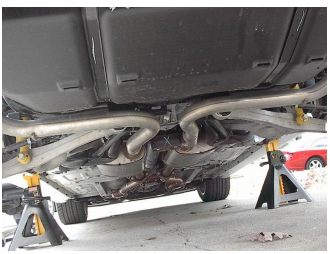
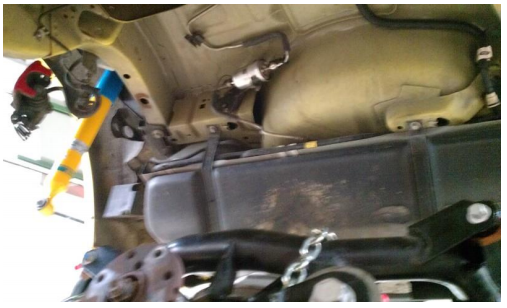
4. Disconnect the catback and remove from hangers (this is where the WD40 and pliers really come in handy).
5. Mark your driveshaft position relative to the pinion and then using a 12pt 12mm socket loosen the driveshaft bolts and tie the driveshaft out of the way.
6. Remove the e-clip on the ebrake cable with a flathead screwdriver.
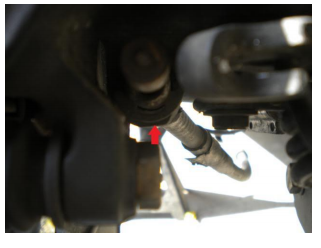
7. With a set of vice grips, securely grab onto and pull the end of the cable and use a flathead screwdriver to unhook the cable end from the caliper. (A detailed video on how to do this is on youtube from FTBR, just look up “IRS emergency brake cable removal”).
8. Remove ebrake cables and secure them out of the way.
9. Using a 15mm, loosen and remove the bolts securing the brake caliper brackets to the spindles. Or you can use a ratcheting 12mm wrench to remove just the rear calipers from the brackets.
10. Remove the rear brake line brackets connected to the upper control arms and slip the brake caliper under the upper control arm so it is out of the way of the IRS. Securely tie the brake calipers out of the way so they are not hanging by the brake lines.
11. Remove ABS sensors from the diff housing using a T40 torx bit.
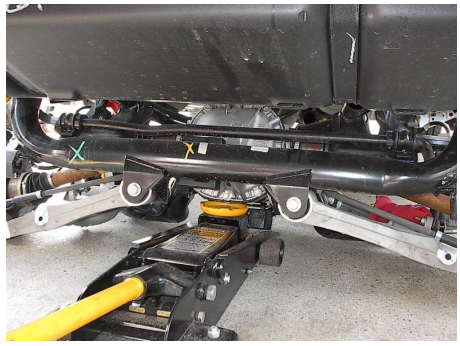
12. Using a 21mm socket, remove the lower rear shock bolts (you may have to support the control arms slightly to take some weight off the bolts).
13. Place the jack under the differential and jack up enough to support it slightly.
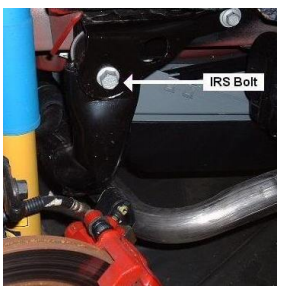
14. Remove the rear IRS subframe to bracket bolts with an 18mm socket.
15. Lower the rear of the subframe slightly and remove the rear springs.
16. Remove the front subframe bolts with an 18mm.
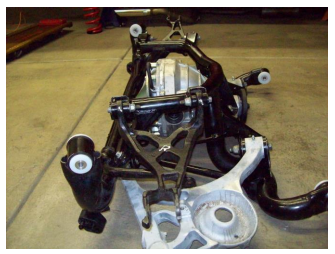
17. The IRS should now be free to drop. Slowly lower the IRS subframe with a second pair of hands and wheel the IRS out from under the car.
18. With the IRS removed you should have lots of room to access your fuel filter. This is the perfect time to replace it since it is nearly impossible to get to with the IRS in place.
19. If you have access to a torch, heating the metal around bushings would make the bushings come out a lot easier. If not, using a drill to make swiss cheese out of the bushing helps in the removal as well.

20. In the metal inner sleeve there are nubs in the inside that need to be ground down in order for the threaded rod from the MM bushing removal kit to fit through. A dremel makes short work of these.
21. Using the bushing removal tool remove the bushings from the subframe.
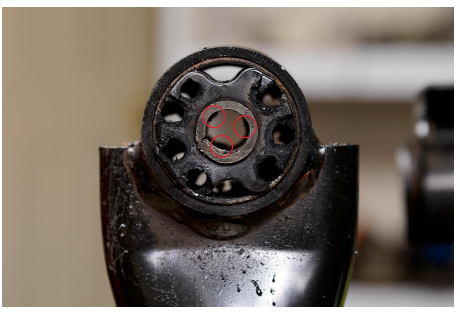
22. Once the bushings have been removed, use a wire wheel or sanding bit to clean the inner bushing shell of all rubber.
23. Slide the subframe bushings into the subframe from the inside of the subframe going outward. It’s recommended to leave the bushings in the freezer for a few hours or overnight to help them slide in further. Use a rubber mallet, dead blow, or plastic hammer to help get them the rest of the way in until they are flush with the inner flange.
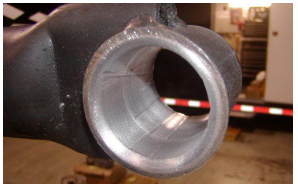
24. Use the threaded rod and spacers from the bushing tool kit to slide the inner aluminum sleeves into the bushings. Going inside to out works best here as well. The bushings are all the same but the aluminum sleeves have different bore diameters for the bolts. The smaller diameter sleeves go in the rear bushings and the larger diameter sleeves go in the front. No grease is used when installing the bushings and sleeves.
25. With that, your install should be finished! Just wheel the IRS back under the car and install the IRS in reverse order, starting with the front of the subframe. (Torque specs down below)

Installation Instructions Writen by American Muscle Customer 10/23/2017.