 FREE 1 to 3-Day Delivery on Orders $149+ Details
How to Install a Grant Steering Wheel for a 2010-2012 Mustang
Tools Required
- T-20 and T-30 Torx Drivers
- Socket Set
- Safety Glasses
- Torque Wrench
- Flat Blade Screwdriver
Installation
1. Position the steering wheel so that it is pointed straight ahead. Write down all of your radio presets as these may be lost when you disconnect the battery cable in step 2 below. 2. At the Smart Junction Box (SJB) located in the right hand lower kickpanel, remove the cover and pull the Restraints Control Module (RCM); this should be fuse number 17 (10A). Turn the ignition to ON and monitor the airbag indicator light for at least 30 seconds, the light should remain lit continuously if the correct fuse has been removed. If it does not remain lit you have pulled the incorrect fuse and
NOTICE -Disconnect the negative battery cable and wait at least1 full minutefor the circuit to completely discharge before proceeding. (If your vehicle has any auxiliary batteries or power supplies disconnect these as well).CAUTION:Failure to fully deplete the backup power supply could result in an accidental deployment and possible injury. 3. Refer to Illustration 1 below and remove the plastic bolt caps (1) from the sides of the steering wheel by prying out with a small screw driver. Remove the airbag module bolts (2) found underneath these bolt caps with either an 8mm or 10mm socket.

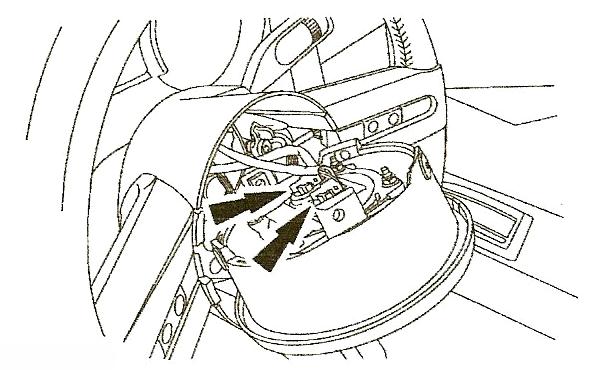
4. Lift and partially remove the airbag module (4) from the steering wheel in order to expose the electrical connectors (3) on the back side.Take care not to pull on any of the wiring. The connectors are unique and cannot be reversed when connected so there is no need to mark them.
5. Disconnect the electrical connectors from the airbag module. (Illustration 2)
6. Remove the airbag module from the steering wheel and place the module face up on the floor, seat or work bench. If you carry the module make sure the trim cover is pointed AWAY from your body.
REMOVING THE STEERING WHEEL FROM THE VEHICLE
1. Remove the three (3) silver spoke trim finish panels by placing your finger tips under the trim at the outside end where it meets the grip of the wheel and gently pull upward. Once it starts to move it is easy to remove; just pull straight up.
2. Refer toIllustration 3and disconnect the horn lead by pulling off horn switch at the upper right tab.
Disconnect the wheel switch wiring harness at the clockspring column connector.Do not pull on the clockspring and do not turn the clockspring now or at any time during installation.
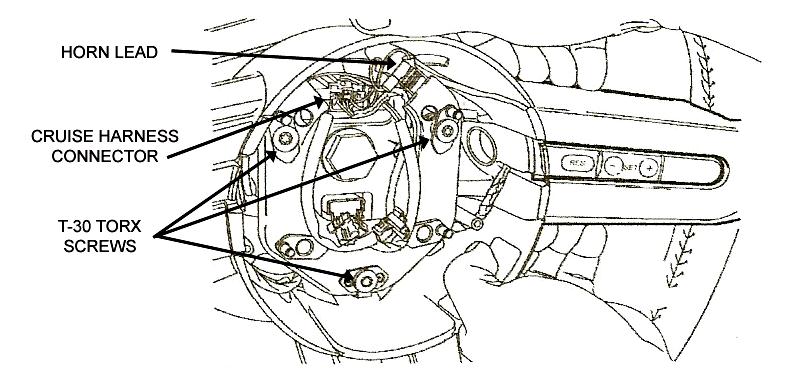
3. Remove the horn switch by loosening the 3 T-30 Torx screws and remove the assembly from the wheel. After removing this assembly you will expose the cruise control switch wiring harness. This will also allow access to aT-20 Torx screw with a green ground wire which needs to be removed as well. (Illustration 3)
4. Loosen the steering wheel retainer bolt several turns, but do not remove completely from the shaft.
Mark the shaft for alignment straight ahead. Pull up on the wheel while rocking back and forth until the wheel is loose on the shaft. Remove the retaining bolt and pull wheel from vehicle taking care to route all the wires through the opening in the wheel without pulling on them.
5. Pull the cruise control switches out of the wheel by inserting a finger under the inner part of the switch where the wiring harness connects. As you pull up you will feel one of the retaining tabs release; at this point you can grab the switch near the center and pull it straight up and out. Do not pull on the wiring harness. Repeat the procedure for the other switch.
6. Remove the switches and wiring harness as a unit from the original wheel by pushing the 2 plastic routing positioners out of the wheel from the backside with a small screwdriver. Pull the wiring out of the small molded in tracks and note how the wires route outside the 2 long projections that are part of the rear wheel shroud.
7. Remove the rear wheel shroud by removing the 4 T-20 Torx screws on the backside of wheel.
1. Reinstall the switches and wiring harness assembly from step 7 above in the same position as it
came out. Pushing the plastic routing positioners back into the holes in the wheel and positioning the harness in the molded in tracks as before.
1. Position the new wheel onto the shaft orienting it to the mark made earlier. (Reference “Removing
The Steering Wheel From Vehicle” step number 1 above). Route wires through opening as before.
connector or module may occur.
8. Position the airbag module into the wheel and reinstall the 2 airbag module retaining bolts removed earlier; tighten to 7 N-m (62 lb-in). Reinstall the plastic bolt plugs into the wheel.
REPOWERING AND CHECKING THE AIRBAG SYSTEM
Make sure no one is in the vehicle and there is nothing blocking or placed in front of the airbag module when the power is being reconnected. Failure to follow these instructions may result in serious personal injury in the event of an accidental deployment.
1. Turn the ignition switch from OFF to ON. Reinstall the restraint control module (RCM) fuse into the correct slot in the Smart Junction Box (SJB) and close the cover. Reconnect any auxiliary batteries or power supplies (if so equipped). Reconnect the negative battery cable.
2. Turn the ignition key from ON to OFF. Wait 10 seconds, then turn the key back to ON and visually monitor the airbag warning indicator. It may take approximately 30 seconds after the ignition switch has been turned from the OFF to the On position for the light to come on as this is the time required for the RCM to complete the testing of the circuit. The light should come on for 6 seconds then turn off. If a fault is present in the system the light will either fail to come on at all or remain lit continuously. If either of these occurs refer back to “Disabling and Removal Of The Airbag Module” to check your connections. If the light should flash and you hear an audible beep this means the RCM is not configured and you should take your vehicle to a Ford dealer immediately.
3. Remember to reset your radio station presets and clock and enjoy your newGRANT REVOLUTIONsteering wheel. When you first start the vehicle the engine may run less smoothly than before as the computer will have to reset itself due to the power loss but this will just take a moment or two.
