 FREE 1 to 3-Day Delivery on Orders $149+ Details
How to Install Raxiom Black Projector Headlights - LED Halo (05-09 GT, V6) on your Ford Mustang
Installation Time
2.5 hours
Tools Required
- 3/8 Drive Ratchet
- 10 mm Socket
- 5/16 Socket
- Blue Painter's Tape Wire
- Crimper
- Solder Gun
- Solder
- Flux
- Small Flat Head Screwdriver
- A Bolt Container to toss all parts in 4/16 Gauge
- Bullet Connectors 1/8" and 1/4" Shrink Tube Bic
- Lighter

Shop Parts in this Guide
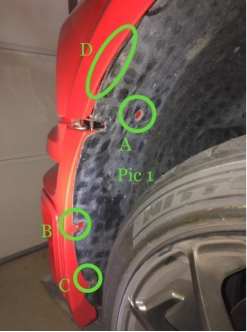
1 ) first use some tape to leave alignment marks on garage door for light alignment when done with install,now remove three push pins from inner fender well with Phillips screwdriver after removing center pin pull push pin out then gradually maneuver inner well over fender lip to allow extra room. Pic ) 1 a,b,c / D is fender well slid over fender.
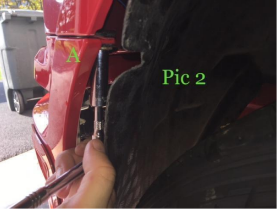
2 ) loosen and remove 2 /10mm nuts on the inside of the fender to loosen the bumper side pic 2.
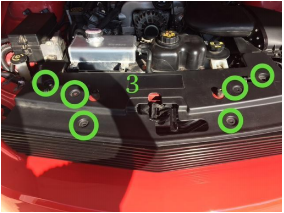
3 ) With hood up remove radiator service panel by sliding the center of 6 pushpin out with your flat blade screwdriver then slide the pushpin out set cover aside pic 3.
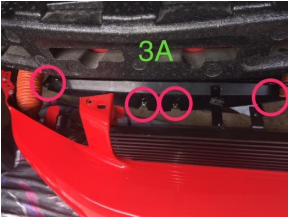
4 ) Remove lower service panel with 5/16 socket to release the lower bumper cover
Shown from top side after bumper is removed for a better visual location pic 3A.
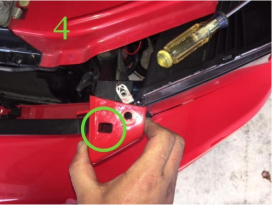
5 ) back on top remove the final push pins right hole from pillars in between headlights and grill lift the top upward to clear wedge hook then loosen to screws holding grill in place pic 4.
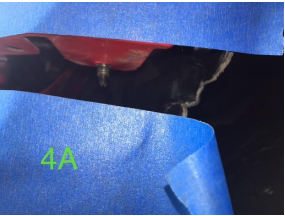
6 ) Before bumper removal use some painters tape on bumper and fender to safe guard paint while removing bumper. If you have an extra body it makes it easier to maneuver bumper removal pic 4 A.
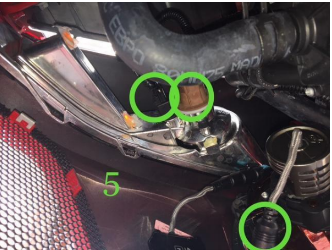
7 ) from the underside a counter clockwise turn removes signal bulb and marker bulb from housing and let them hang free repeat with fog lights if applicable pic 5.
8 ) Gently pull down on bumper sides to clear 10mm studs then lift up on pillars to clear wedge notch the bumper should now continue to slide forward for removal. Set aside on a moving blanket out of harm's way.
9 ) Remove 3 / 10mm bolts fasting old headlights slide them forward enough to remove bulb harness set them aside. There are several ways to connect the led side marker bulbs if you're not confident with a solder gun AM kit provides blue plastic clips for wire connections i chose to solder the wires and bullet connectors shown in 5A.
10 ) Carefully remove the plastic tubing off the factory harness,on the left side black to black and lamp blue to black with pink stripe On the rights side black to black dark green to blue of lamp if you're not sure follow the wires to the 194 wedge marker bulb those will be the two wires being cut and spliced. I soldered a piece on to the factory wire about 1' back from the marker bulb to leave plenty of slack (a pigtail) allowing shrink tube to be used. Then off the pigtail used bullet connectors these can be sealed with shrink tube for very secure connection but the light can be removed at later date if needed without cutting wires.
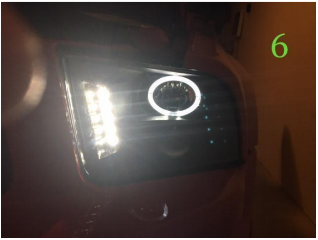
11 ) Connect H13 harness back onto new housing rescuer the 3 /10 mm bolts back in place to hold the new lights before going further at this point check light operation low beam then hi beam with parking lights on your halo and inside markers should be lit shown in picture 6 if not change polarity by switching bullet connectors and repeat check test.
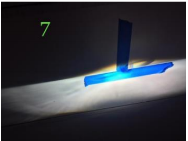
12 ) Check light adjustment on stationary marks lined up by tape in step 1. Mine was close but needed 1/2 adjustment down as seen in pic 7.
13. Reverse procedure for assembly when done final light adjustment on a level surface at 25' the center of your beam should drop off 1/2"-3/4". The high beams are pre-adjusted from factory the don't need adjustments. Below finished shot pic 8.

Installation Instructions provided by AmericanMuscle Customer
