 FREE 1 to 3-Day Delivery on Orders $149+ Details
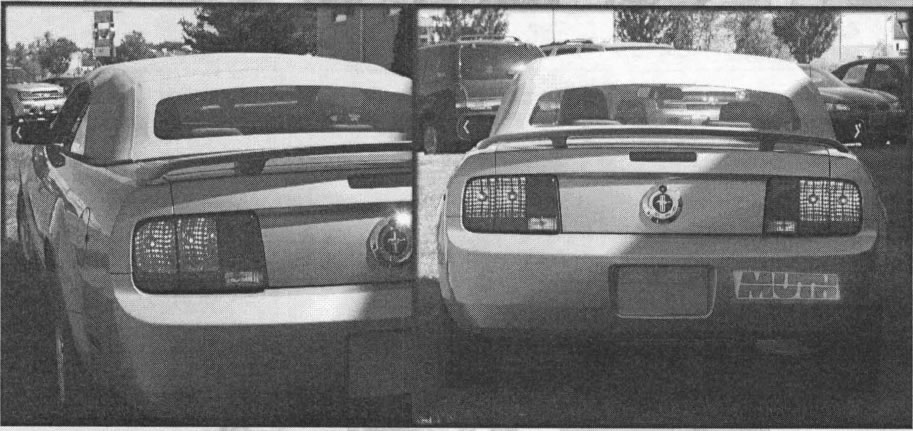
How to Install a Heated Turn Signal Mirrors on your 2005-2009 Mustang
Installation
Note: Professional Installation Recommended
Warranty does not cover damage to the vehicle or mirror housing due to improper installation. The following installation instructions are to be considered as a guide only. Door removal procedures, indicator wire color and location may have changed since publication of these instructions. The installer Is responsible for any damage that may occur during installation.
INCLUDED ITEMS:
- 1 left and 1 right Signal mirror
- 1 left and 1 right wire harness
- 2 wire taps
- 2 rubber grommets
- 2 housing connectors
- 2 ring connectors
- 1 instruction manual
MIRROR REPLACEMENT
WARNING: Safety glasses and sturdy gloves are required for mirror replacement.
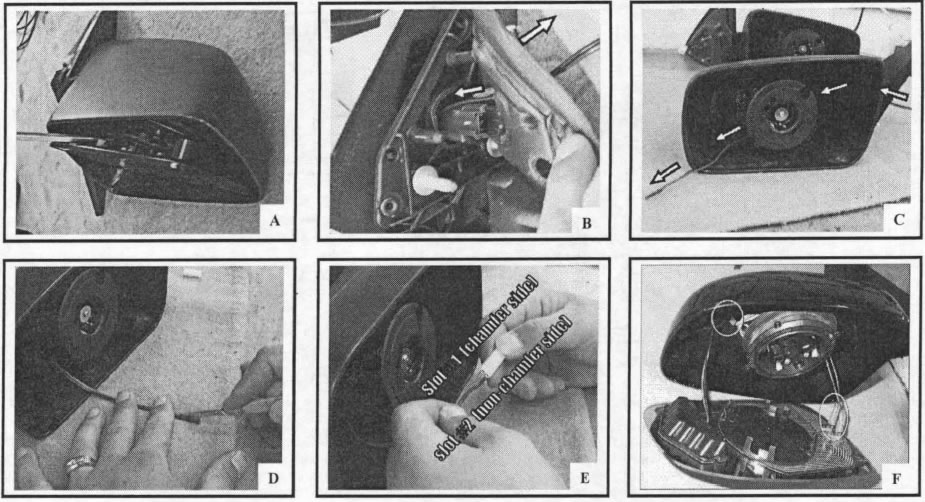
Push down on the lower outboard edge of glass until mirror pivots fully outward. Insert a large slotted screw-driver in between the mirror backing plate and motor actuator (A). Carefully pry and twist screwdriver until original mirror pops off. If heated, disconnect heater wires from heater terminals and remove mirror. Remove the foam insulation on the housing sail (8). Using the shorter of the two harnesses from the wiring kit, guide the end with the shrink tube wrapped around it thru the foam insulation, thru the housing sail (B), and into the mirror housing (C). Use a utility knife, carefully cut the shrink tube and remove it (0). Be very careful not to cut into the wiring harness itself. Using one of the supplied housing connectors, Insert the red wire pin into slot #/ - chamfer side (E). Insert the black wire pin into slot #2 - non-chanfer side (E). Continue to insert each pin into its hole until the pin snaps into place (not removRble). Pull the Signal mirror wire harness thIu housing sail leaving about 4" to 6" of the wire harness inside mirror housing. Connect the mating connectors on the new Signal mirror and the Signal mirror wire harness (F). If heated, reconnect the heater wires to the heater terminals on the back of the new Signal mirror (F). There is no polarity so the wires may be interchanged. Carefully tuck all wiring behind motor actuator. Not doing so, could result in wiring interfering with mirror travel. Remove the PSA liner on the PSA disc. Align and center the motor mount onto the motor actuator. With the palm of your hand, slowly push down on the glass until the new Signa mirror snaps into position. Press down on all sides to ensure the new Signal mirror is fully seated and functional. Replace the foam insulation onto the housing sail.
WIRE ROUTING
WARNING; When routing wire into vehicle, It is extremely important to not lei wire get pinched or crushed at any time.
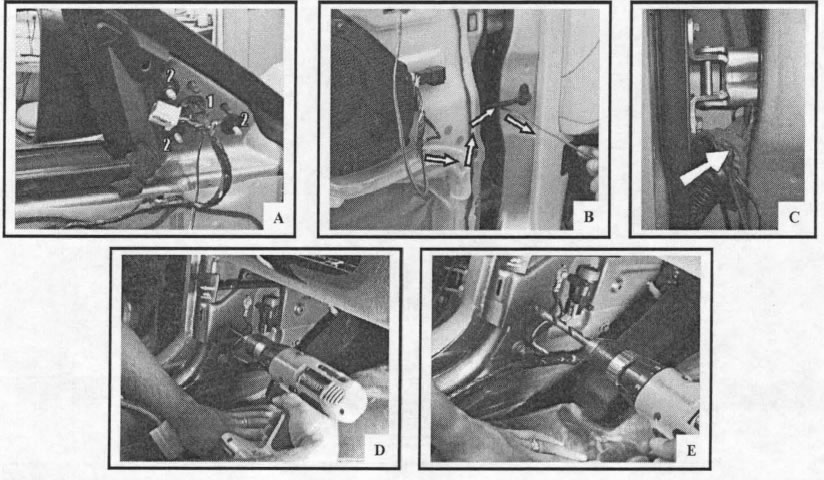
Avoid window track and sharp edges at all times. Not doing so may cause circuit shortage problems in the long ru n. Guide all wire harnesses thm the hole in the door frame and position the mirror housing assembly on the mirror mount. Reconnect mirror harness (A1). Attach the mirror housing to the mirror mount with three mirror mounting nuts (A2). WARNING! Do not over tighten the mirror mounting nuts. Find the rubber boot located between the door frame and vehicle frame. Use a flat screwdriver, push-down from the top and push-up from the bottom to release boot connector from the vehicle frame. Pry out the boot connector. Uncover the rubber boot from the boot connector. Tape the open end of the Signal mirror wire harness to the fish rod. Push the fish rod from inside door frame through the rubber boot (B). Once the fish rod with the Signal" mirror wire harness protrudes through the rubber boot, cut the tape with a utility knife and pull the Signal mirror wire harness through rubber boot, removing any slack in the Signal mirror wire harness. Work the grey boot connector out of the body panel so it faces you. Use 1/4" inch drill bit, drill an access hole though the upper unused section of the connector. Use extreme caution as not to damage anything around this area, including paint or wire harness. Insert the Signor» mirror wire harness thru the drilled opening on the boot connector (C). Remove any slack in the Signal mirror wire harness. Remove plastic trim pieces on the running board and the kick panel. Use a 1/8" drill bit, drill a pilot hole into the side of the kick panel (D). Re-drill using a 1/2" drill bit (E).
