 FREE 1 to 3-Day Delivery on Orders $149+ Details
How to Install Puddle Lamp Kit - White on your Mustang
Installation Time
2 hours
Tools Required
- • Flat head screwdriver
- • Ratchet & Socket set OR
- • Adjustable Wrench
- • Drill & I I/16th bit
- • Torx® T30 bit/driver
- Torx® T20 bit (Convertible Only)

Shop Parts in this Guide
Please familiarize yourself with the parts included as well as the instructions before attempting installation. Please seek the help of a certified technician if you feel unable to complete the installation safely and properly. Failure to read and follow the instructions below may result in personal injury or damage to property.
Removing the Side View Mirrors:
Before beginning the steps below, turn off the car, remove key, and engage the emergency brake.
1. Using a flat head screw driver wrapped in a rag, carefully pry up on the sail cover seen in picture 1 to loosen it. It is held on by clips that will easily pop off.
2. There are 3 11mm nuts holding each mirror on. Carefully remove them. Be sure you have a hand on the mirror so it doesn't slip off and also keep a tight grip on each nut so you don't drop it inside the door panel. See picture 2.
3. After removing the first side view mirror, repeat the process on the other side of the car.
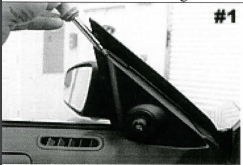
Pry off sail cover. Be gentle and cautious when doing so.
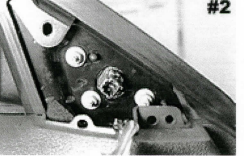
Remove the 3 - 11 mm nuts holding mirror on. Don't drop the nuts!
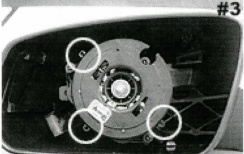
3 Retaining tabs ( circled) hold the mirror glass in place.
Removing the Mirror Glass
See picture 3 above to get an idea of what the mirror looks like once the glass has been removed. There are three retaining tabs that hold the mirror glass in place ( circled in picture). Use gloves or a shop towel to protect your hands and to keep from scratching the glass. For 2010-2012 Mustangs, begin with step 1. For 2005-2009 Mustangs, skip to step 3.
1. 2010-2012 Models Only = Each tab needs to be disengaged one at a time. We will disengage the top retaining tab first. Position the mirror glass facing down and toward the car ( as if it were attached). Moving the glass manually will not damage the motor or mirror.
2. Use a flat head screw driver to 'pop' off the first retaining tab. See picture 4 below.
3. Position the mirror carefully so you can see the 2 retaining tabs on the bottom of the mirror. See picture 5 for a view of the bottom of the drivers side mirror, outboard side. See picture 6 for another view. Note: 10-12 mirror shown, but 05-09 mirror is very similar.
4. Repeat the glass removal on the opposite side-view mirror.
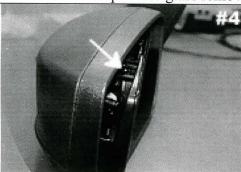
Shows top retaining tab. Insert flat head screw driver here to release tab.
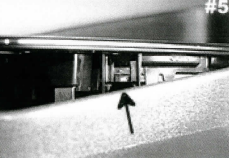
View of Drivers side mirror, bottom. Outboard (left) retaining tab.
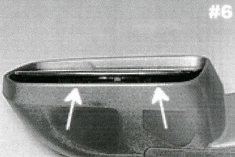
Bottom view of Drivers side mirror. Shown are 2 of the retaining tabs.
Drilling & Mounting Puddle Lamps:
Next we will need to drill an 11/16" hole in each mirror to mount the lamps properly. Take your time during this part of the installation. A drilling template has been included for 2005-2009 models and 2010-2012 models. We strongly suggest using this template to insure the mirror continues to have full range of movement. If you decide to mount the lamp in another location, be sure it will not interfere with the movement of the mirror.
1. 2010-2012 Mustangs only= Remove the long rectangular access cover on the bottom side of each mirror. This can be carefully pulled up from the inside edge. See picture 7.
2. Locate the template placard included with the kit. The 2 templates for your model year will need to be carefully cut out. Each one is marked for 'Driver Side' or 'Passenger Side'.
3. Tape each template onto the underside of the mirror. Painters tape or electrical tape works great.
4. Using an 11/16" drill bit, drill a hole where indicated on the template. Take your time to insure accuracy. If the template is not taped down well enough it will move. See picture 8.
5. Mount the puddle lamp in the mirror and secure it with the supplied white nut. Then route the wiring as shown in picture 9. 05-09 owners should run the wiring in the same direction out the mirror. Use a zip tie to secure the wiring inside the mirror.
6. Re-install the long rectangular access cover on the bottom side of each mirror.
7. Repeat drilling process on the other mirror.

Remove the rectangular access cover on the bottom of each mirror.
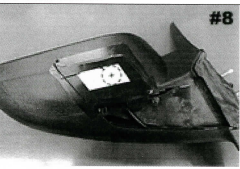
Bottom of driver side lamp with drilling template attached.
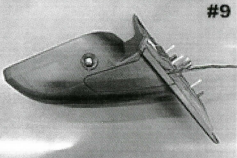
Mount the lamp using the white nut provided, then route wiring as shown.
Removing Door Panels
Now that you have installed the puddle lamps in each mirror, it is time to re-install the mirrors and remove the door panels. Do not re-install mirror glass until you have tested the puddle lamps for proper function. Be sure to roll up both car windows.
1. Route puddle lamp wiring into the door through the large round hole in the center of the mirror mounting location. This is the same hole the large electrical connector goes though. See picture 10. Do not pinch wiring!
2. Re-attach the side-view mirrors with the 3 nuts for each side. Make sure nuts are tight.
3. Remove the 7mm screws around the perimeter of the door panel. There are 7 screws on 2010-2012 models, and 8 screws on 2005-2009 models. See picture 11.
4. Remove trim panel behind the door handle with a flat head screwdriver (wrapped in a rag to prevent scratches). See picture 12.
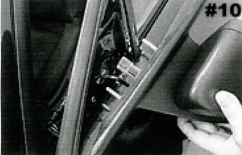
Lamp wiring goes through same hole as the mirror's electrical connector.
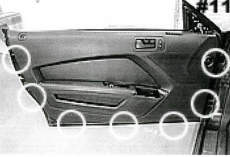
Remove screws around perimeter of door with 7mm driver.
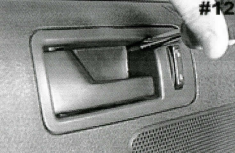
Remove trim panel behind the door handle with flat head screwdriver.
5. Remove the Torx T30 screw located behind the door handle trim panel. See picture 13.
6. Remove the trim piece behind the arm rest shown in picture 14.
7. Remove the Torx T30 screw located behind the panel you just removed.
8. 2010-2012 Mustangs = Use a flat head screw driver to remove the window switch panel and unplug the connector behind it. Gently pry up on the front corner. 2005-2009 Mustangs = window switch panel is removed by pulling straight out from the door. See picture 15.
9. Remove the 7mm screw located behind the window switch panel you just removed.
10. Now it's time to remove the door panel. Gently lift up and pull outward on the door panel to remove it. If you encounter resistance, verify you have removed all screws.
11. Unplug the speaker and door lock connectors from the door panel.

Remove the T30 screw with a Torx driver.
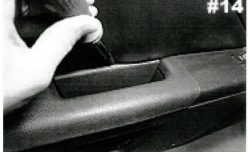
Remove trim piece and Torx T30 screw behind the arm rest.
Remove trim panel behind the door handle. 2010-2012 Mustang shown.
12. Use a pair of needle noise pliers to remove the door handle cable. There are locking tabs on either side of the cable that need to be depressed so it can be pulled through. See picture 16.
13. Place door panel and all pieces in a safe spot for reassembly later.
14. Repeat door panel removal on opposite side.
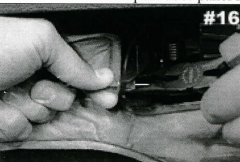
Use a pair of needle nose pliers to remove door handle cable.
Loosen the rubber boot in the door jamb but do not remove it.
Loosen connector by depressing top & bottom tabs and pulling ½ inch out.
Wiring Puddle Lamps:
Running the wiring for each puddle lamp is very similar for both sides.
1. Pull back on comer of the plastic moisture barrier that is below the door speaker. Use one of the existing holes in the plastic to run the wiring into the door. Secure wiring with a zip tie.
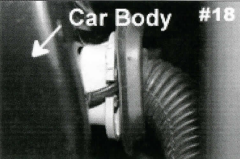
The wiring will need to be run through a rubber boot located in the door jamb. This boot carries all of the door wiring into the passenger compartment. The point where the rubber boot meets the car body, there is a gray plastic connector that we need to partially remove from the door frame.
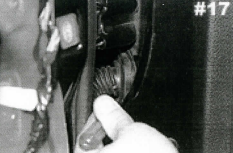
2. Use a flat head screwdriver to gently loosen part of the rubber boot attached to the car body. We highly recommend you do not remove the boot from the plastic connector completely (it becomes more difficult to reattach). All you need to do is loosen it enough so that you can run the wiring through the door and out the rubber boot closest to the car body. See picture 17 and 18.
3. Now run the puddle lamp wiring from the door, through the rubber tube, and out the other end of the tube. This will take some patience and you will have to manipulate the rubber tube to get the wiring through. The wiring should become visible on the side of the rubber boot that you loosened in step 2 above. If necessary, use a pair of needle nose pliers to gently pull the rest of the wiring through.
4. On the top and bottom of the gray connector are retaining clips that can be depressed so that you can pull the connector out. Use a flat head screwdriver to depress the tabs and loosen the connector. See picture 18 for view of connector.
5. The puddle lamp wiring can now be run through the gap beside the connector and into the car. See picture 18. There is a notch on the side of the gray connector that will leave enough room to pass the wiring through. Please note: You must be careful not to pinch the puddle lamp wiring - use caution when re-inserting the gray connector back into the door frame. Make sure the wiring lays as flat as possible.
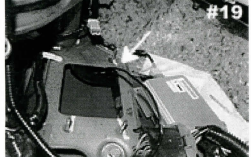
6. Inside the car, locate the wiring that you have pushed into the car. This can sometimes be tricky and you may have to pull the wiring back through the hole and try again a few times. Mustangs equipped with a Shaker 500 sound system may find it easier to remove the small amplifier mounted on the driver side kick panel area. It is a rectangular metal box held on with 3 nuts and has a connector plugged into the top of it. Removing this may make it easier to find the puddle lamp wiring. See picture 19 for a view after the amplifier has been removed ( cars without the Shaker 500 sound system will look like this normally).
7. Repeat these steps for the opposite side mirror.
Connecting the wiring:
Now it's time for you to connect all of the wiring. Included with the kit is a wiring harness which is about 8ft long. Familiarize yourself with the wiring harness and follow the steps below.
1. Locate the a-pillar trim on the passenger side of the vehicle.
2. Near the door jamb, you'll find a trim piece that needs to be loosened ½ inch with a screw driver so that the a-pillar trim is removable. See picture 20. For coupes, follow step 3. For Convertibles, skip to step 4.
3. For Coupes = Loosen the a-pillar trim by starting towards the back of the vehicle and moving forward. Once you have released the clips that line the door frame, the trim can be lifted up and off the a-pillar. See picture 21. Skip to step 5.
4. For Convertibles = you'll need to remove your passenger side visor first. The mirror is held on by Torx T20 screws. Once the visor has been removed, you can pull the trim piece off starting at the top and working your way down the a-pillar. Once the tabs holding the trim have been disengaged you should be able to lift the trim up and off the a-pillar.
Shown is the driver side where the puddle lamp wiring comes through
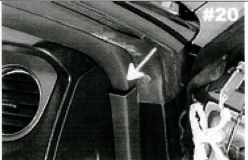
Loosen the trim as shown to remove a-pillar cover.
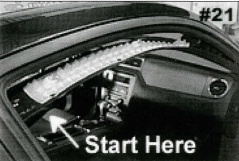
On coupes, remove a-pillar cover as shown.
5. Run the wiring harness through the opening created by the missing a-pillar trim down to the passenger side floor. You' 11 run the entire harness through here with the exception of the short red/black wire with red connectors on the end. See picture 22.
6. Locate the connector that runs up the passenger side a-pillar and unplug it. Then pull back the electrical tape on the high side of the connector to expose the wiring.
7. Using one of the supplied red wire taps, slide the correct wire onto the wire tap. 2005-2009 = Black with Blue stripe (Pin# 6). 2010-2012 = Gray with Purple Stripe (Pin# 3). See picture 23 below. The wire should sit in the middle of the two teeth. Squeeze down on the wire tap making sure it snaps closed. Do not cut wire!
8. Plug the Red wire from the wiring harness into the back of the wire tap. See picture 24 below.
9. Using the second red wire tap, repeat the process. 2005-2009 = Green with Yellow stripe (Pin# 7). 2010-2012 = Black with Yell ow stripe (Pin # 11 ).Plug the Black wire from the wiring harness into the back of the wire tap connected to the wire.
10. Re-connect the factory connecter and secure the puddle lamp wiring with a zip tie.
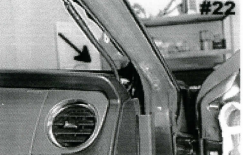
Run wiring harness through gap near a-pillar to passenger side floor
Slide wire into place and close wire tap firmly.
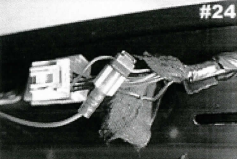
Plug correct wire into the wire tap as indicated in manual.
Turn your attention to the wiring located in the passenger side floor. We now need to connect the wiring harness to the puddle lamp wiring.
1. Using one of the supplied pink wire taps, slide the black wire from the puddle lamp into one of the holes in the side of the pink wire tap. Then take the passenger side black wire from the wiring harness and insert it into the other hole. You' 11 notice that one of the holes is open all the way through while the other has a stop in it. It does not matter which wire is in which hole, as long as no bare wire is exposed outside of the wire tap. Using a set of pliers, squeeze down on the wire tap and close the cover. See picture 25.
2. Repeat process with the red wires.
3. A small gap exists where you can run the remaining red/black wires that connect to the drivers side puddle lamp. The gap is behind the center console. If you are having trouble getting it through, taping the wire to a clothes hanger or similar object may help you pass the wire through. See picture 26.
4. After you have reached the drivers side foot well area, use the remaining pink wire taps to connect the black/black and red/red wires. See picture 27. This will supply power to the drivers side puddle lamp.
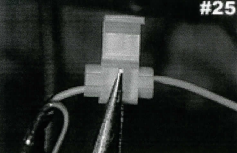
Slide wires in place and use pliers to squeeze metal tap down.
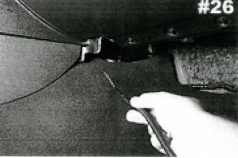
Pass remaining wiring behind center console to drivers side.
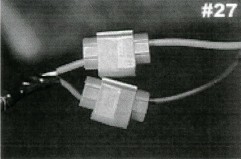
Plug correct wire into the wire tap as indicated in manual.
Final Installation
1. Double check everything to make sure it was connected properly. Test the puddle lamps to make sure they both come on and off. This can be done by unlocking/ locking the doors with your key fob. If the lights do not come on, visit the trouble shooting guide below.
2. Be sure that the 11mm bolts holding the mirrors in place have been re-tightened adequately.
3. Re-install all parts. Remember to re.-connect any wiring/ amplifiers, etc. that were disconnected.
4. Re-install mirror glass. To Re-attach the glass, position the glass inside the mirror housing and firmly but carefully press down on the center of the glass. Then, manually rotate the mirror in all directions while pressing down to insure all clips lock back into place.
5. Enjoy your new puddle lamps! The puddle lamps will activate anytime the doors are locked or unlocked. The puddle lamps will also come on when getting in and out of your Mustang. They will dim automatically with the factory vehicle lighting.
Please Note: Puddle lamps can be turned on manually using your dimmer switch (located next to your head light switch). When the dimmer wheel is turned to the 'ON' position (which also activates the Map lights above), the puddle lamps will tum on. While driving, it is strongly recommended that you use the overhead console buttons to activate the Map lights.
