 FREE 1 to 3-Day Delivery on Orders $149+ Details
How to install Maximum Motorsports Rear Lower Control Arms on your 2005-2012 Mustang
Installation Time
2 hours
Tools Required
- 18mm Socket & Ratchet
- Floor Jack
- 2 Jackstands
- 150+ ft-lb Torque Wrench
- Socket for Lug Nuts
- Pry bar

Shop Parts in this Guide
Installation
Read all instructions before beginning work. Following instructions in the proper sequence will ensure the best and easiest installation.
Our Adjustable Rear Lower Control Arms are rated for engine torque levels up to 585 ft-lb depending on the gear ratio. See the Engine Torque Table below.
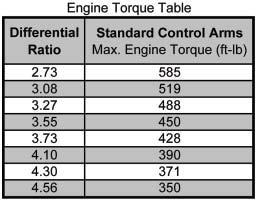
NOTE: Different rear end gear ratios generate different loads on the rear control arms. Numerically higher gear ratios put higher loads on the rear lower control arms for the same amount of engine torque.
If you need assistance selecting the proper control arms for your application, please feel free to call the MM Tech Line.
Maximum Motorsports’ Aluminum Rear Lower Control Arms improve traction and handling by eliminating bushing compliance and correcting suspension geometry. Spherical rod ends ensure precise axle control, eliminating the compliance that leads to wheel hop, while still allowing the rear suspension to articulate freely. Offset mounting bushings correct the rear suspension geometry for reduced understeer. The arms come preset to the stock length for easy installation, and offer length adjustability to square the axle to the chassis. These lightweight control arms weigh in at a scant 2.28 pounds each, nearly 9 pounds per set lighter than the OEM control arms. They are anodized gray for durability and great appearance. While acceptable to performance enthusiasts for street use, expect a mild increase in noise transmitted through these arms. Keep your tires firmly planted with Maximum Motorsports Rear Lower Control Arms!
Installation Procedure:
NOTE: Work on one side of the car at a time. Do not remove both rear lower control arms at the same time. All photos show the passenger side.
1. Safely jack up the rear of the car, and support the chassis with jackstands placed under the pinch welds.
2. Remove the rear wheels.
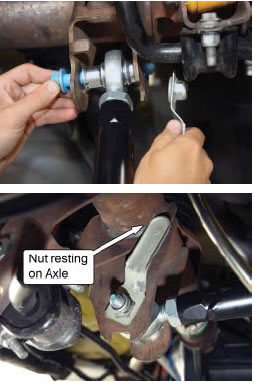
3. Disconnect the passenger side parking brake cable from the brake caliper by removing the retainer clip and slipping the end of the cable off of the caliper.
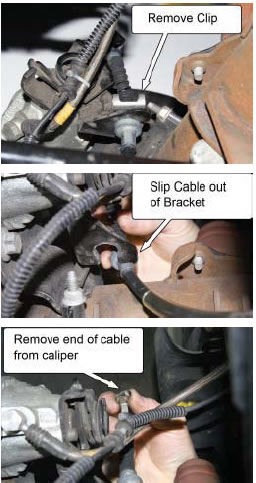
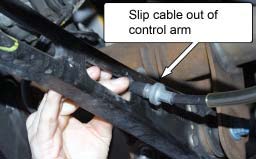
4. Slide the parking brake cable out of the slot in the OEM control arm.
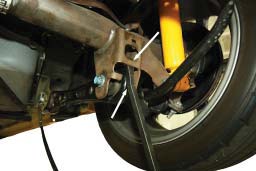
5. Remove the mounting bolts from the OEM rear lower control arm.
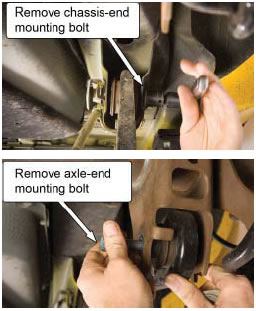
6. Remove the OEM rear lower control arm.
7. Remove the forward mounting nut.
MM Rear Lower Control Arm Installation
NOTE: The length of the MM control arm and the orientation of the aluminum bushings are preset by MM. Do not adjust them prior to installation.
Make sure the arms are being installed with the bushings in the proper orientation as detailed below:
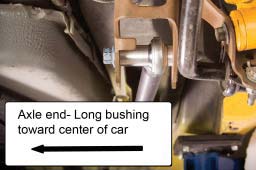
8. At the axle (rear) end of the control arm, orient the arm so that the longer bushing faces toward the center of the car. Slip the arm into place on the rear axle, and secure it loosely with one of the provided, NEW mounting bolts.
NOTE: The width of the bushings at the axle end of the control arm is about 1/2" wider than the front (chassis) end of the control arm.
9. Install the provided OEM captive nut on the rear control arm mounting bolt, and snug the bolt. Allow the metal flag on the captive nut to rotate up against the axle bracket. It is intended to act as a back wrench for bolt tightening.
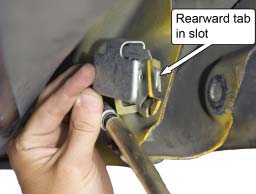
10. Install the NEW captive nut into the chassis mount location.The rearward tab slides into the slot first, then the frontward tab is lowered into a channel.
11. At the chassis (front) end of the control arm, orient the arm so that the longer bushing faces toward the outside of the car. Swing the chassis- end of the arm in place at the front chassis mount. Secure it with one of the provided, shorter mounting bolts.
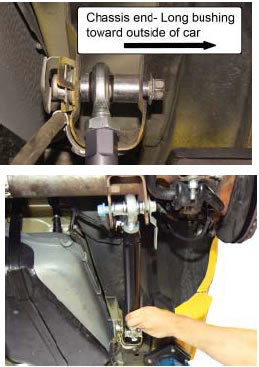
NOTE: The axle may shift slightly when the OEM control arm is removed. If necessary, you may use a pry bar to shift the axle into position to align the arm with the mounting hole. Place the end of the pry bar in the control arm mount and push the pry bar against the end of the control arm to move it.
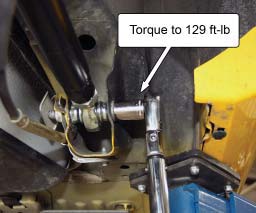
12. Torque the control arm mounting bolts to 129 ft-lb.
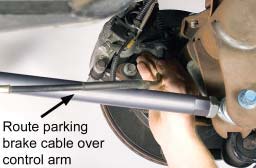
13. Route the parking brake cable over the top of the control arm as shown. Make sure the plastic wear sleeve is properly positioned between the cable and the control arm.
14. Reconnect the cable by slipping the end of the cable into place on the caliper, and re-installing the retainer clip removed in Step 3.
15. Repeat Steps 3-14 for the driver side of the car.
16. Re-install the rear wheels.
17. Lower the car safely to the ground.
18. Torque the lug nuts to the manufacturer’s specifications.
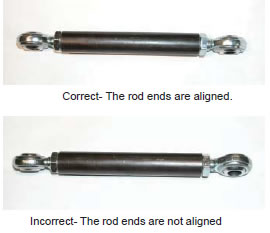
NOTE: The MM Aluminum Adjustable Rear Lower Control Arms are preset to the stock length. If you choose to adjust the length of the control arms, be sure that the rod ends are clocked in the same plane after tightening the jam nuts. If they are not, the control arm will have its ability to “twist” restricted, which could lead to binding, and possible part breakage, as the suspension moves.
This kit includes:
2 Rear Lower Control Arms, Assembled
2 Forward Mounting Bolt (short)
2 Forward Mounting Nut
2 Rearward Mounting Bolt (long)
2 Rearward Mounting Nut
