 FREE 1 to 3-Day Delivery on Orders $149+ Details
Pypes 409 Stainless Steel Catted X-pipe ('99-'04 GT) - Installation Instructions
Installation Time
2 hours
Tools Required
- 15mm Deep Socket Ratchet (1/2 preferred for torque)
- 22mm Wrench (for o2 sensor)
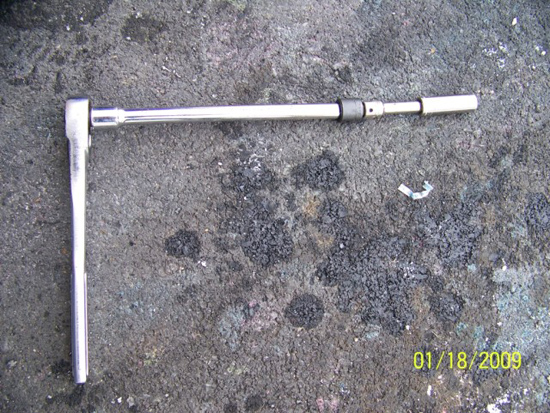
- Swivel
- 12 Extension
- 3 Extension
- Hacksaw or Reciprocating saw (sawsall)
- Jack and 2 jack Stands Or car ramps (my personal preference)
- Safety Glasses and Gloves (used primarily while cutting)
- Vice Grips (for factory bolts if you plan to re-use I did)
- Anti-Seize Compound (for O2 sensor threads)
- Sharpie Marker
- Tape Measure
- Metal File
- Optional Tools Needed:
- Impact Wrench
- PB-Blast or Other Penetrating Oil
- Long Flathead Screw Drivers (to remove O2 sensor clips- I did mine with my fingers)
- O2 Sensor Socket (available at most automotive stores)
- Headlamp (hands free light) / flashlight
Installation
Pre-Work:24 to 48 Hrs before you attempt removal, spray the 8 bolts down with PB-Blast. If you have previously replaced the Cat-back then those bolts should be fairly easy to remove and should not require any additional spray. In order to gain access to the mid-pipe bolts at the header you will need the plastic straw. Be careful not to overspray and leave residue all over the car. Place rags or scrap wood under the car to catch any drips. Doing so will eliminate the need for an impact wrench to remove the hardware.
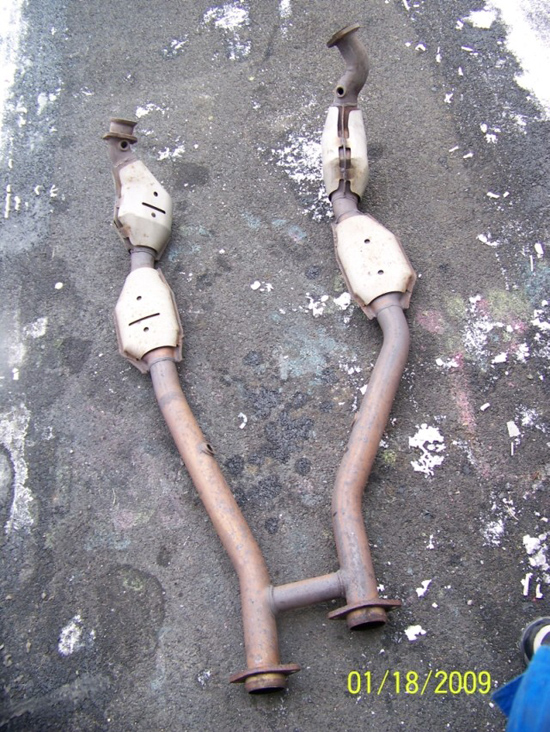
Removal of Old H-Pipe:
1. Raise the car. I preferred driving the front of the car up on ramps, not only was it faster but much easier. If you use ramps be sure to chock the rear wheels. Otherwise, use jack stands to raise the front of the car as high as you safely can.
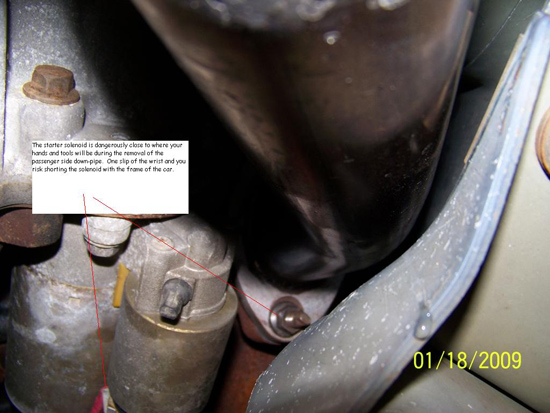
2. Disconnect the negative battery terminal. Many may say you can get away with it, but you will be dangerously close to the starter solenoid while working on the passenger side. Don’t risk it.
3. Disconnect all four O2 sensors. You must depress the clip to remove. Excessive force is not required to separate the connectors. You risk pulling the pins out if you pull too hard. If your fingers are not burly enough, try using a long flathead screwdriver. It is a long reach near the manifold O2s.
4. Proceed to “break loose” each of the 8 nuts holding the mid-pipe in place. Don’t waste time removing any of them completely until you know you can get the whole system apart.
5. Driver side requires the 12” extension into the 3” into the deep socket. Make sure the socket is square on the nut and apply force. If you are not using a ½” Ratchet, you may need to use a breaker bar for additional torque.
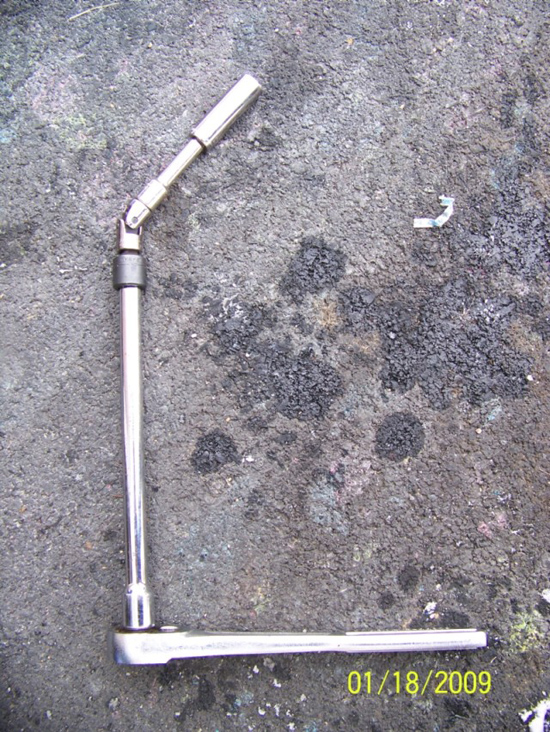
6. Passenger side will cause frustration. 12” extension into swivel into 3” extension into deep socket will do the trick. PLEASE remember that swivels can bind. Be sure to keep the socket square. You can seriously chew up the nut if it’s not.
7. Once all 8 nuts are broken loose, support the Factory H pipe with a jack near the H cross pipe. Use a short scrap piece of 2x4 to make balancing easier.
8. To reduce rotational stress on the manifold studs, remove those nuts completely first. Then proceed with the remaining nuts at the union with the cat-back.
9. Slide the old unit out and remove the O2 sensors with the 22mm wrench or O2 socket. As you remove an O2 sensor, immediately apply anti-seize to the threads and install it into the new unit so you're not confused about which one goes where. Examine all wires to ensure there is no damage, i.e. melted wires.
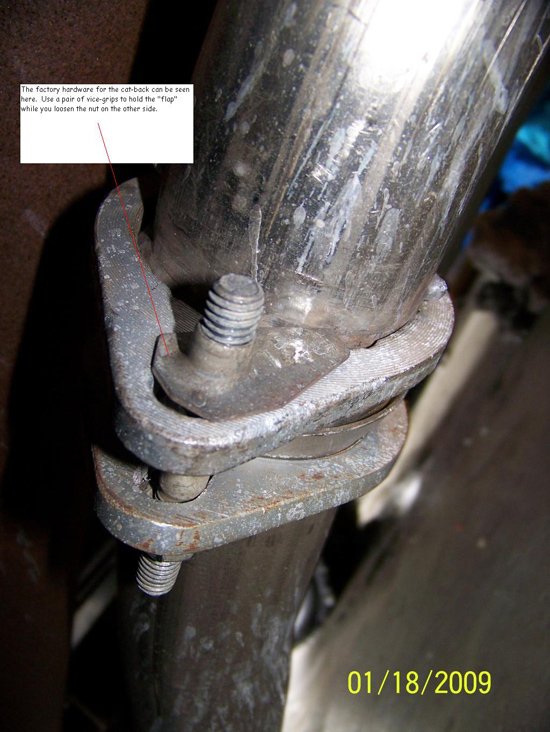
10. If re-using the factory bolts on the H-Pipe, use a set of vice-grips to hold the flap on the bolt while you back out the nut. Transfer these to the new X-Pipe.
Installation of the Pypes Hardware Procedure
1. Using the hacksaw or sawsall, cut 9.5 inches off the down-pipes. Keep the cut as square as possible and remove any sharp edges with a metal file.
2. Snug fit the driver’s side down-pipe, including the header sleeve. Don’t bother with the O2 sensor hookups until the whole system is dry fit. They are a pain to get on and off.
3. Snug fit the passenger side down-pipe using a NEW gasket – lip facing out of header.
4. Next, slide a clamp onto each down-pipe, followed by the Catalytic Converters. The bung should be closest to the rear of the car (it only fits one way). DO NOT OVER INSERT any section of pipe into the Catalytic Converter, as there is nothing to prohibit damage to the inner workings by doing so. Only insert as far as the “un-flared” section of the Catalytic Converter.
5. Now get your jack in place to support the new X-Pipe.
6. Slide a clamp onto each leg of the X-Pipe. The longer leg is on the driver side. Then slide the X into the Catback. Support the whole assembly with the Jack in the middle of the X. Do NOT jack it up yet, or you may have trouble mating it with the Cat-Back. The “droop” in the system makes mating them up easier.
7. Line up the Cat-Back with the X-Pipe and slowly jack the system up, until it is level with the bottom of the car.
8. Snug up each of the 4 clamps, starting with the clamps closest to the front of the car. Make sure all fittings that involve a slotted pipe are FULLY inserted before snugging the clamps.
9. Proceed to snug the clamps and, finally, the flanges to the Cat-Back.
10. Crawl out from under the car and examine the exhaust system from ALL angles. If it is hanging low at any point, get back under and make small adjustments.
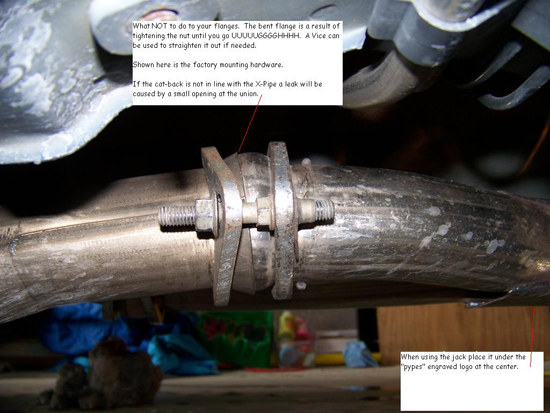
11. Take note of the ball and socket joint at the X-pipe to Cat-Back union. Be sure they are in line – see flange picture.
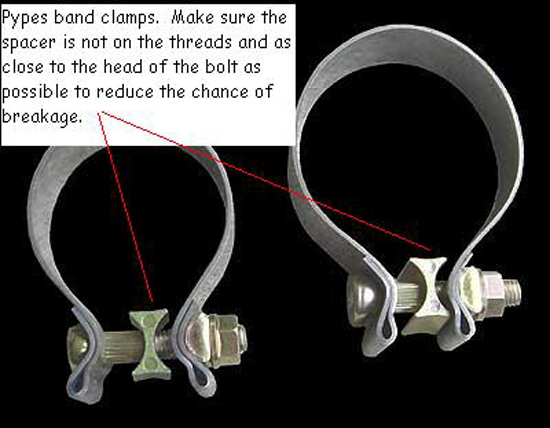
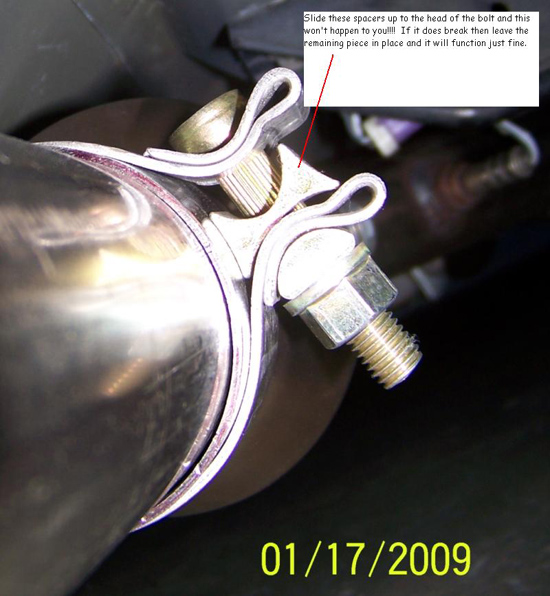
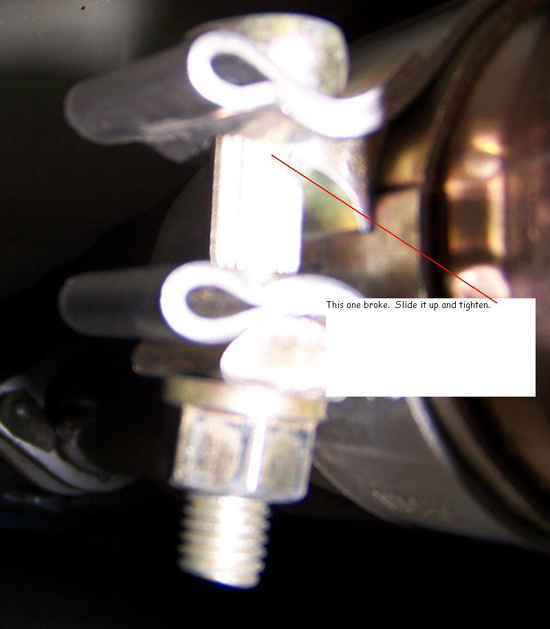
12. Tighten all band clamps. Pay attention to the placement of the spacers in the clamps. If it rests on the threads, it WILL break in half when you tighten it. This occurred on 3 out of 4 of mine before I realized what was going on.
13. Reconnect the O2 sensors – 04 GT owners can use the CAT O2 bungs and plug the rear-most x-pipe bungs instead of obtaining sensor extensions.
14. Reconnect the battery.
15. Start the car and listen for obvious leaks. Minor leaks are not detectable even when revving the motor while parked.
16. Lower the car and take it for a spin. If you hear what sounds like "ssssSSSSHHHH" around 2-3k RPM’s but not at idle or heavy load, then you have a leak. It could be one of many things. Re-check the “Trouble Points” from earlier in this write-up.
17. After putting a number of miles including multiple heat/cool sessions, be sure to climb back under to re-tighten the system, as they may have come loose.
Final Examination:
1. After your test drive, make sure the O2 sensor wires are not in contact with any pipes. Use zip-ties if necessary to tie them back.
2. Re-check all bolts/nuts, to ensure they are tight after test drive.
3. If the system is hanging too low, then loosen all the hardware and get a jack under it to make the adjustment.
Trouble Points:
- Leaky passenger side gasket – only if you didn’t buy a new one
- System hangs to low – you didn’t put a jack under the x-pipe during install to hold it tight to the chassis
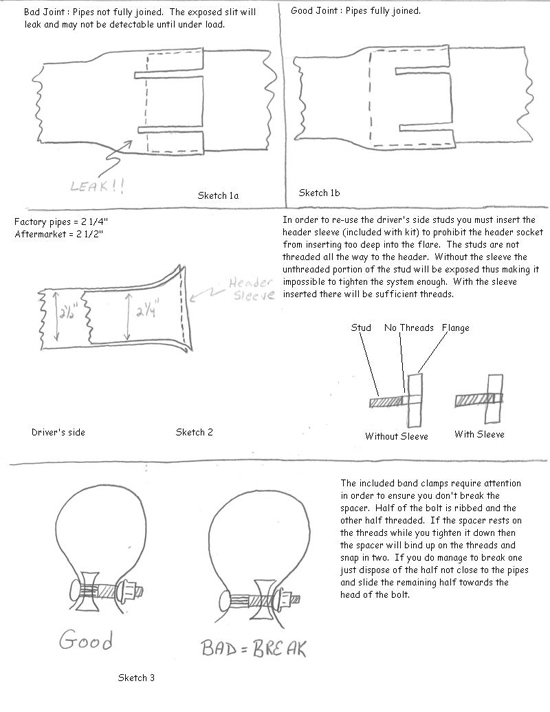
- Leaks near or around the clamps – too loose or you didn’t fully insert the pieces leaving a hole. The fittings are SLOTTED. See Sketch #1a & b.
- While tightening the clamps you hear CRACK. You failed to ensure the clamp spacer was on the ribbed section of the bolt and it bound up thus breaking it. See photo later and sketch 3.
- Flanges looks bent – you tightened until you went UUUGGGH thus generating too much torque. See photo later.
- Driver’s side leaks and you tightened it until you went UUUUGGGGHH – you failed to insert the included header sleeve. See sketch #2.
- While test fitting you noticed yellow powder on the ends of the pipes that insert into the Catalytic Converters – you shoved the pipe in to the Catalytic Converter too far and you are causing damage to the inner workings of the CAT.
- 6 months from now you attempt to remove the o2 sensors or the blanks in the Catalytic Converters but cannot as it seems to be stuck – you failed to use anti-seize compound
Installation instructions provided by AmericanMuscle customer Mike Ames 1.21.09
