 FREE 1 to 3-Day Delivery on Orders $149+ Details
Raxiom LED Footwell Lighting Kit - White (15-17 All)
Installation Time
30 minutes
Tools Required
- Ratchet & Socket set OR
- Adjustable Wrench
- Pliers

Shop Parts in this Guide
| Parts List: | Quantity: |
|---|---|
| LED lamps & wiring harness | 1 |
| 3M Adhesion Promotor Pad | 1 |
| Alcohol Prep Pads | 1 |
| 3M Red wire tap | 1 |
Zip ties | 5 |
Please familiarize yourself with the parts included as well as the instructions before attempting installation. Failure to read and follow the instructions below may result in personal injury or damage to property.
Mounting the LED lamps:
Before beginning the steps below, turn off the vehicle, remove key, and engage the emergency brake. Open both doors and move your seats as far back as possible. Familiarize yourself with the wiring harness/ lamps. The end of the wiring harness with the red connector ( 12v power) and ring terminal (- ground) will be connected behind the passenger side kick panel. On the other end of the wiring harness is the driver side lamp. The lamp in the middle is the passenger side lamp.
1. Locate the lamp intended for the driver side. Starting at the passenger side, pass the lamp assembly through the space behind the center console toward the driver side footwell. See picture 1. If you are having trouble getting the lamp to pass through, taping it to a bent clothes hanger may help.
2. Take a look under the dash on both the driver side and passenger side to determine where you would like to mount your LED lamps. We recommend you center the lamps on each side, but the length of wiring allows multiple possibilities. The lamps can be mounted to virtually any surface using the included 3M adhesion promotor. Be sure to keep the lamps out of the way of your pedals or feet to prevent an accident. See picture 2.

In the following steps we will prep the surface and apply an adhesion promotor to ensure a strong bond. Once the c-channel (the black piece each lamp sits inside) is installed, it will be difficult to move so you want to be sure of the placement.
3. Put on a set of protective gloves.
4. Use the included alcohol prep pads to wipe the surface down where the lamps will be mounted.
3M™ Adhesion Promoter 06396 is supplied in an easy-to-use sponge applicator packet. Hold packet upright and avoid squeezing an opened packet to prevent spillage of liquid contents. The packet can be opened by tearing across the top of the packet at the notches. This will expose the sponge applicator. Do not remove the sponge or squeeze a freshly opened packet. Handling the bottom section of the packet should enable application of adhesion promotor with no mess.
5. Apply a thin, uniform coating to the general area where the LED lamp will be mounted. It can be used on metal or plastic surfaces. Wait 30-90 seconds for the coating to dry completely.
6. Peel off the tape backing and carefully place the first lamp onto the surface under the dash. Be sure to press down firmly to make sure it adheres properly. REMEMBER – once you place the lamp, it cannot be easily removed.
7. Repeat the process on the other LED lamp.
Connecting the Wiring:
Locate the interior fuse box. It is located behind the passenger side kick panel directly in front of the door. If you have trouble finding it, refer to your vehicles user manual for the specific location.
1. Pull the end of the passenger side door sill plate closest to the front of the car - up slightly. You will hear it unsnap. You do not need to remove it completely, but you may do so if desired. Note: Be careful, this panel has sharp edges that can cut you. See picture 3 above.
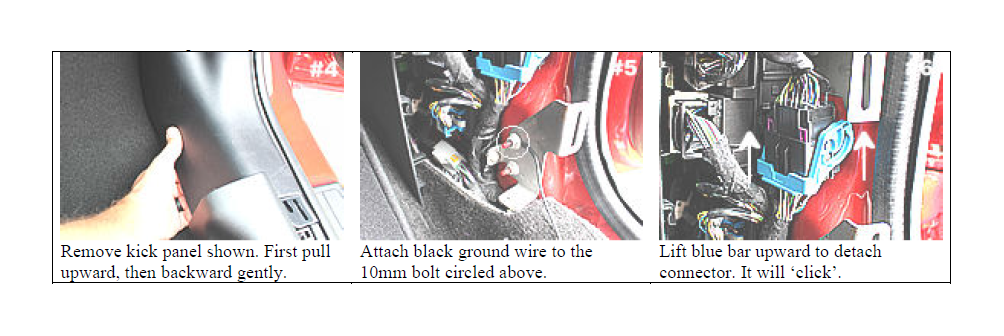
2. Remove the kick panel. It can be removed by first pulling upward, then gently backward. You will hear ‘popping’ noises when the clips come loose - this is normal. See picture 4.
3. Use a 10mm socket or wrench to attach the black ground wire to the bolt circled in picture 5. Re-attach the nut and tighten.
4. Locate the large black connector shown in picture 6. It has a blue bar running across it. The connector sits directly above the ground wire you just attached.
5. Lift the blue bar upward to disconnect the bottom connector. It will ‘click’. See picture 6.
6. Unplug the bottom connector from the top and gently pull it out to gain better access to the wiring.
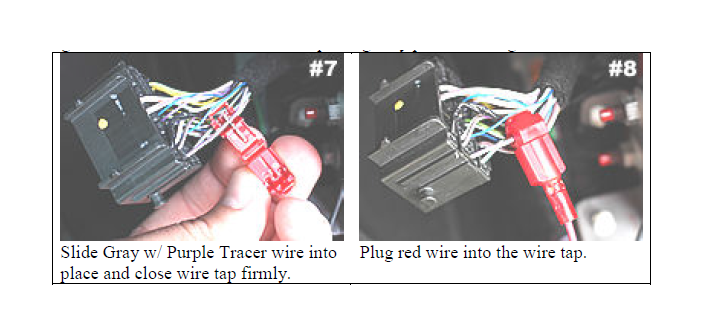
7. Using the supplied red wire tap, slide the Gray wire with Purple stripe (Pin # 20) onto the wire tap. See picture 7 above. The wire should sit in the middle of the two teeth. Squeeze down on the wire tap making sure it snaps closed. Do not cut Wire!
8. Plug the red wire from the wiring into the back of the wire tap. See picture 8.
9. Re-connect the large black connector. Be certain to pull the blue bar down to insure the connector snaps back into place.
Final Installation:
1. Double check everything to make sure it was connected properly. Test the lights by opening your door or using the key FOB to unlock doors. If the lights do not come on, visit the trouble shooting guide below.
2. Use the supplied zip ties to secure all wiring. Pay special attention to the wiring near the driver side pedals.
3. Replace passenger side kick panel cover. Take your time to make sure everything lines up. Note: the top edge of the kick panel located in the door jamb gets tucked under the existing trim panel in that area.
4. Re-install door sill panel making sure it snaps into place.
5. Enjoy your new foot well lighting kit! The lights will activate when you open your car door. Lights will dim automatically when you start your car or lock the doors.
Trouble shooting guide:
Lamp(s) won’t turn on –
• Check to make sure you connected red wire tap to the correct factory wire outlined in the ‘Connecting the wiring’ section above. This is the MOST common mistake made.
• Check the ground cable you connected under the ‘Connecting the wiring’ section. Make sure that it is making proper metal-to-metal contact and that the bolt is tightened. If there is paint on the bolt or surface, you may need to scrape some of the paint off under the bolt/ nut. Some interior lights or door locks aren’t functioning –
• The large connector was not re-connected properly or completely. Plugging it back in will restore function. Be sure to pull the blue bar back down until it snaps into place.
If you are still having trouble with your product, please contact us for technical assistance.

