 FREE 1 to 3-Day Delivery on Orders $149+ Details
How to Install Raxiom Mustang Puddle Lamp Kit on your Mustang
Installation Time
1 hours
Tools Required
- Flathead screwdriver
- Ratchet
- Socket
- Adjustable Wrench
- Small knife

Shop Parts in this Guide
2013-2014 Ford Mustang Puddle Lamp Kit
Please familiarize yourself with the parts included, as well as the instructions, before attempting installation. Failure to read and follow the instructions below may result in personal injury or damage to property.
This guide is also applicable to part numbers: 384356 / 384357 / 384358 / 384359
Removing the Side View Mirrors
Removing the interior door panels is NOT necessary. Before beginning the steps below, turn off the engine, remove the key, and engage the emergency brake.
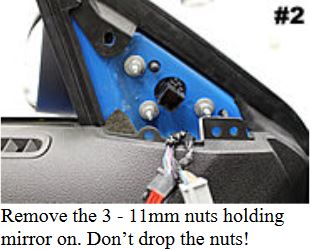
1. Using a flat head screwdriver wrapped in a rag, carefully pry up on the access cover seen in picture 1 to loosen it. It is held on by clips that will easily pop off.
2. There are three 11mm nuts holding each mirror on. Carefully remove them. Be sure you have a hand on the mirror so it doesn't slip off, and also keep a tight grip on each nut so you don't drop it inside the door panel.
3. After removing the first side view mirror, reapte the process on the other side of the car.

Removing the Mirror Glass
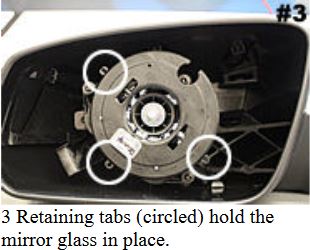
See picture 3 to get an idea of what the mirror looks like once the glass has been removed. There are three retaining tabs that hold the mirror glass in place (circled above). Take your time during this to prevent damage to the mirror or glass. Use gloves or a shop towel to protect your hands and to keep from scratching the glass.
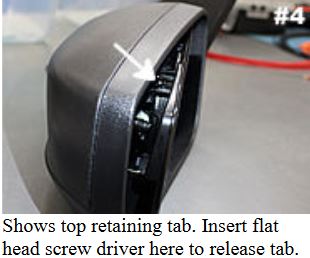
1. Each tab needs to be disengaged one at a time. We will disengage the top retaining tab first. Position the mirror glass facing down and toward the car (as if it were attached). Moving the glass manually will not damage the motor or the mirror.
2. Use a flat head screwdriver to 'pop' off the first retaining tab. See picture 4 below.
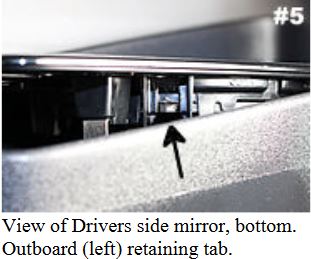
3. Now, position the mirrow carefully so you can see the two retaining tabs on the mirror. Be careful when adjusting the mirror so you don't clip the top retaining tab back into place.
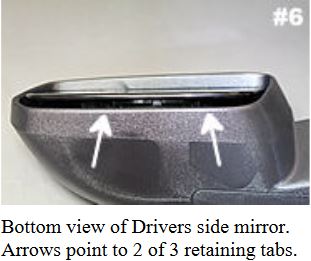
See picture 5 for a view of the bottom of the drivers side mirror, outboard side. See picture 6 for another view.
4. Repeat the glass removal on the opposite side-view mirror.
Drilling & Mounting Puddle Lamps
Next, we will need to drill an 11/16" hole in each mirror to mount the lamps properly. Take your time during this part of the installation. A drilling template has been included with the kit. We strongly suggest using this template to insure the mirror continues to have full range movement. If you decide to mount the lamp in another location, be sure it will not interfere with the movement of the mirror.
1. Locate the template placard included in the kit. The two rectangular boxes will need to be carefully cut out with scissors. EAch one is marked for "Driver Side" or "Passenger Side."
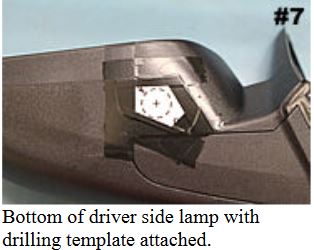
2. Tape each template onto the underside of the mirror. Painters tape is usually best. You will see a similarly shaped indentation in the plastic. You can see this shape on the bottom right hand corner of picture 6. This is the area that factory Ford puddle lamps are mounted, and the area we will mount out puddle lamps.
3. Using an 11/16" drill bit, drill a hole where indicated on the template. Take your time to insure accuracy. If the template is not taped down well enough, it will move. See picture 7. Repeat the process on the other mirror.
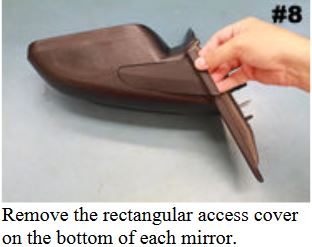
4. Remove the long rectangular access cover on the bottom side of each mirror. This can be carefully pulled up from the inside edge. See picture 8.
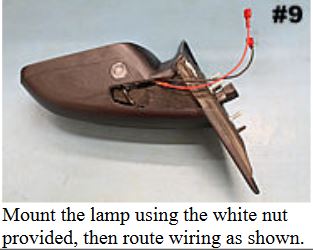
5. Run the wiring from one of the puddle lamps up through the bottom of the mirror and secure it with the supplied white nut. Then route the wiring as shown in picture 9.
6. Reinstall the long rectangular access cover on the bottom side of each mirror.
Connecting the Wiring
Now that we have installed the puddle lamps in each mirror, it is time to reinstall the mirror and connect the wiring. Do not reinstall mirror glass until we have tested the puddle lamps for proper function.
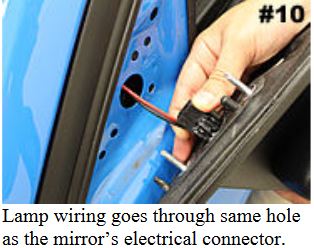
1. Route puddle lamp wiring into the passenger compartment through the large round hole located at the bottom of the A-Pillar where the mirror attaches. This is the same hole the large square electrical connectors goes through. See picture 10.
2. Re-attach the side view mirrors with the three nuts for each side.
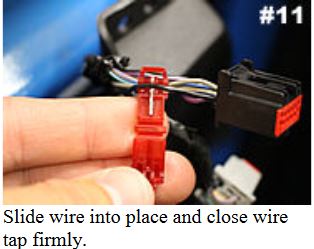
3. Using one of the supplied red wire taps, slide the purple wire (pin #5) onto the wire tap. See picture 11 below. The wire should sit in the middle of the two teeth. Squeeze down on the wire tap making sure it snaps closed. Do not cut the wire!
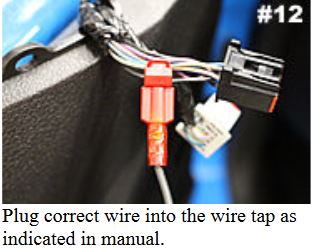
4. Plug the red wire from the puddle lamp wiring into the back of the wire tap connected to the purple wire. See picture 12 below.
5. Using the second red wire tap, repeat the process by sliding the black wire (pin #7) onto the wire tap and closing the wire tap. Please note: on the drivers side, the wire is solid black. On the passenger side, the wire is black with a yellow stripe. Also, you'll find that there are two black (or black/yellow on the passengers side) wires for each mirror. You can tap into either wire as they both ground wires.
6. Plug the black wire form the puddle lamp wiring into the back of the wire tap connected to the black wire.
7. Reconnect the factory connector.
8. Repeat the process on the other side of the vehicle.
Final Installation
1. Double check everything to make sure it was connected properly. Test the puddle lamps to make sure they both come on and off properly. This can be done by unlocking/locking the doors with your key fob. If the lights do not come on, visit the trouble shooting guide.
2. Be sure that the 11mm bolts have been re-tightened adequately.
3. Reinstall interior access covers on each side. Remember to reconnect the wiring for the side view mirror control switch on the driver's side.
4. Reinstall the mirror glass. To re-attach the glass, position it inside the mirror housing and firmly but carefully press down on the center of the glass. Then, manually rotate the mirror in all directions while pressing down to insure all the clips lock back into place.
5. Enjoy your new puddle lamps. The puddle lamps will activate any time the doors are locked or unlocked. The puddle lamps will also come on when gettign in and out of your Mustang. They will dim automatically with the factory vehicle lighting.
Trouble Shooting Guide
Lamps won't turn on:
- Check to make sure you connected the wire taps to the correct wires, outlined in the "connecting the wiring" section above. This is the most common mistake during installation. There are many similar color wires, so be sure you tapped into the proper ones.
- Lamps will not come on when the car is running and the door is closed. Make sure the vehicle is off and your door is open.
Side view miror motors no longer operate with the switch:
- Check ot make sure you plugged all factory connectors back into each mirror and back into the switch located on the access cover we removed from the driver's side earlier on.
