FREE 1 to 3-Day Delivery on Orders $149+ Details
How to install a SHR Honeycomb Deck Lid Panel on your 2005-2009 Mustang

Shop Parts in this Guide
Installation
1. Start with a clean, freshly washed car for best results. Remove any wax or sealants on the area where the panel is to be mounted. Temperature of the vehicle surface and honeycomb panel must be between 60-80 degrees F for maximum adhesion of the 3M tape to occur, preferably on a day when good weather is predicted. It is important that these recommendations be followed to maximize adhesion of the tape to the vehicle. SilverHorse Racing will NOT be responsible for panels lost due to bonding failure between the tape and vehicle.
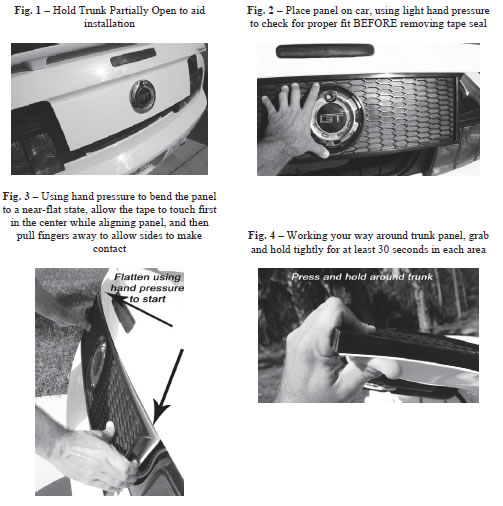
2. Begin by having an assistant hold the trunk partially open (See Fig 1)so that you can look directly at the trunk door and get your hands around the trunk on both sides and on the bottom. Align the panel using the center emblem as a guide, and check for proper fit on the emblem, bottom, and sides of the trunk. On some vehicles, minor trimming of the center hole of the panel may be required to achieve a proper fit. A snug fit will not hurt the panel or emblem, but hard pressure should not be required to fit around the emblem. The panel may have a bit of a “spring” to the arc that it follows on the trunk. This is normal, and will not affect installation. Applying slight pressure to flatten the panel to the curvature of the trunk will not harm it.(See fig. 2)
3. Place the panel somewhere safe for a moment, and use the included alcohol wipe to do a final cleaning and preparation of the surface where the tape will adhere to the trunk.
4. Remove the backing from the tape on the panel, being careful not to touch the tape any more than absolutely required, as oil from your hands may affect adhesion. Once again, align panel, but do it slightly off the surface of the trunk, as once the tape starts to touch the vehicle, it will be difficult, if not impossible, to adjust the panel’s position. It is recommended that by grasping both ends of the panel you apply slight pressure to cause the center of the panel to touch first, and then allow the panel to lay down towards both sides of the trunk. Once applied, use firm hand pressure only to push the panel / tape down onto the trunk for a minimum of 4-5 minutes, working your way around the panel as required to achieve uniform adhesion. (see fig. 3-4)
5. After installation, vehicle should be allowed to remain at 60-80 F for at least one hour to aid in adhesion of tape. Do not wash vehicle or allow it to get wet for a minimum of 24 hours after installation for best adhesion.
6. After the minimum required adhesion setup time, panel can be washed by hand whenever washing your car. A soft long-bristle brush may aid in cleaning.
7. If you wish to remove your panel in the future for any reason, we recommend that you take it to a qualified auto body shop that has experience in removing OEM applied body appliqué panels.
With care, the panel can be removed without damaging it or the car in question, and new 3M tape can be used to re-install it when you are ready, again using the above directions as a guide.