 FREE 1 to 3-Day Delivery on Orders $149+ Details
2010-2011 SHR Mustang Flush-Mount Quarter Window Louvers - Installation Instructions
Installation Time
4 hours
Tools Required
- 3/8 Ratchet
- 14mm Socket
- 1/4 Ratchet
- T20 Torx bit
- Windshield removal tool kit or equivalent
- 3M Adhesion Promoter, Urethane Sealer / Adhesive or equivalent and caulk gun.
- Masking Tape
- Razor or cleaning scraper and plastic trimming equipment (fine tooth hacksaw, cutoff tool, etc)
- Safety glasses (please wear at all times)
- Small prying / pick tool
- Trim removal tool
- Rubbing alcohol / degreaser and paper towels

Shop Parts in this Guide
Installation
1. With the key in the on position, lower the front windows to the down position. Turn key to the off position and remove from ignition, making sure vehicle is in park / neutral and the parking brake is set. This step is important to insure the new seal dries properly at the end of the installation. Move front seats forward for room to work in back.
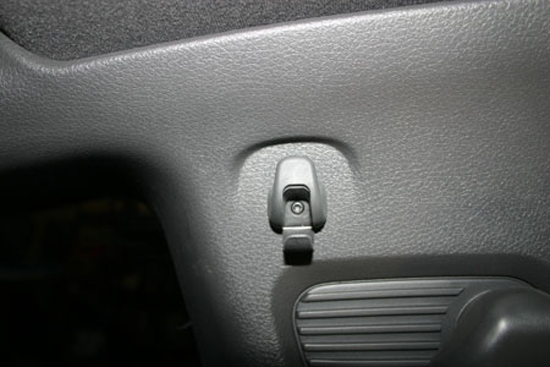
2. Using a small pick tool, open the coat hook cover and remove it using the T-20 Torx bit.
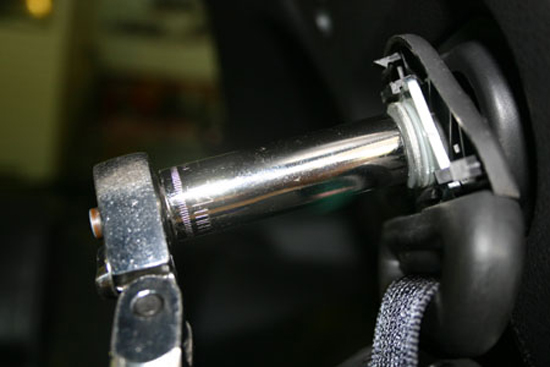
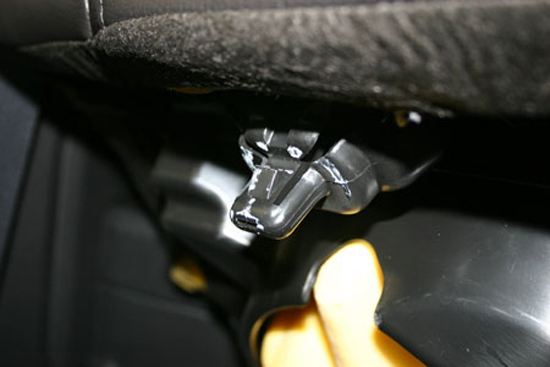
3. The top seat belt bolt is next. Remove the cover cap first.
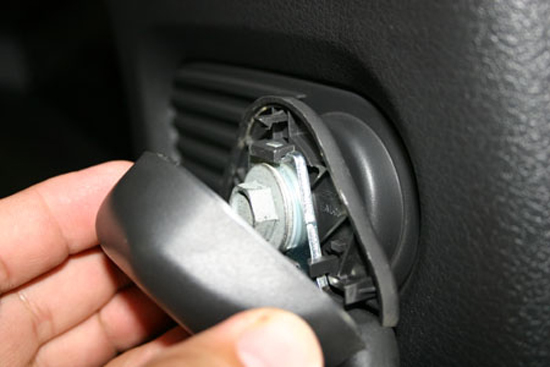
4. After removing the cover cap, the bolt can be removed with a 14mm socket.
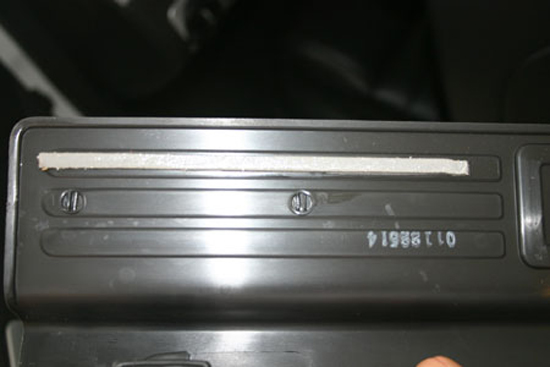
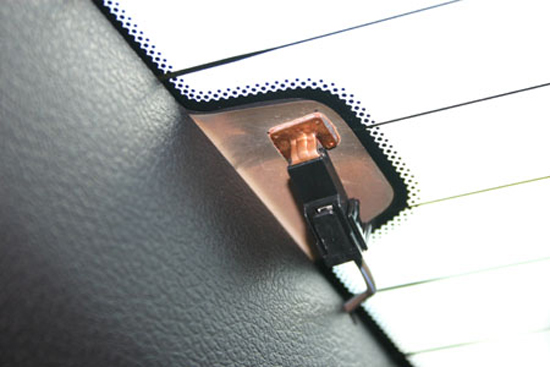
5. Remove the door sill plate on at least the back edge of the door jamb. This is held in with retaining clips and small strips of double-sided adhesive. Care in pulling this cleanly will insure that the tape will be able to be re-used. If it is damaged in this step, or if you would like, new tape can be purchased at most auto parts stores. We recommend 3M VHB tape for this.
6. A close-up of one of the VHB tape strips:
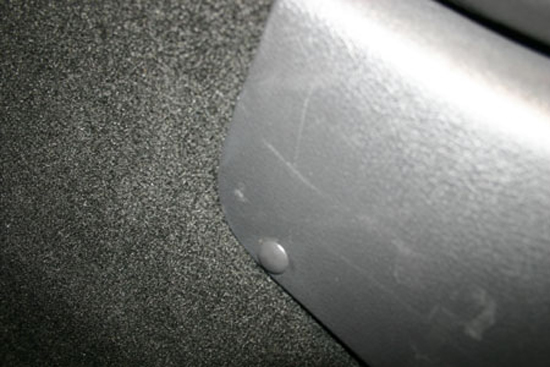
7. Remove the lower rear seat cushion. This is held in place by two push clips. To remove, push slightly down and back on the front of the rear seat lower cushion at the same time. As you push back, start to lift the cushion. When it is pushed back sufficiently, it will lift up rather easily. Remove from the vehicle.

Rear seat lower cushion push-clip close-up.
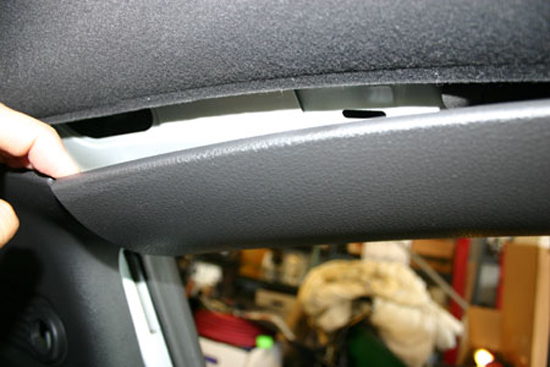
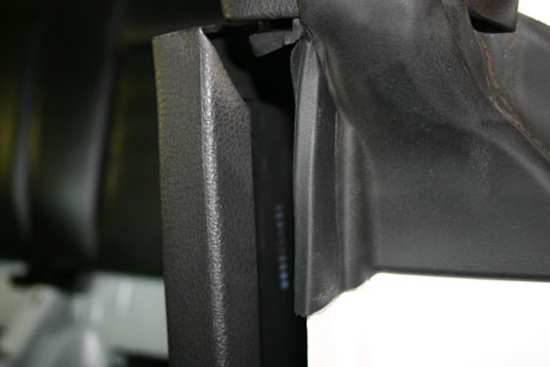
8. The roof pillar / A-pillar cover needs to be moved for clearance or removed entirely so that the rear quarter panel trim panel can be removed. It is retained by push-clips on the backside.
9. Fold down the top section of the rear seats to expose the push-pin clips holding the interior quarter panels in place (lower). Remove these clips with a trim removal tool. After removing push-pins, the remainder of the panel will “snap”out. The seat belt must be routed through the panel as it is removed, and the panel must be “walked” off of the quarter panel weld seam at the door jamb.
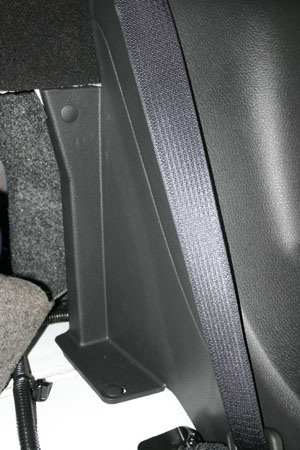
10. Note two of the slots for the retaining clips visible in this photo of the upper quarter panel trim piece after it is removed. Be careful of defroster wire on the upper panel.

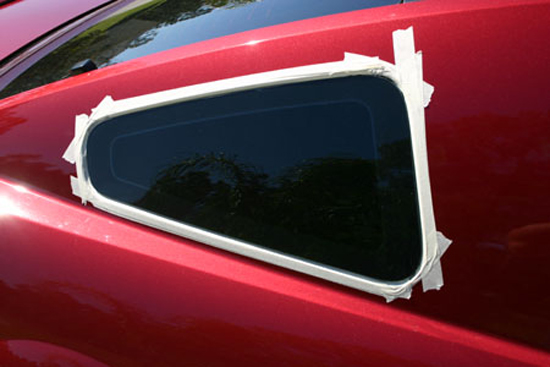
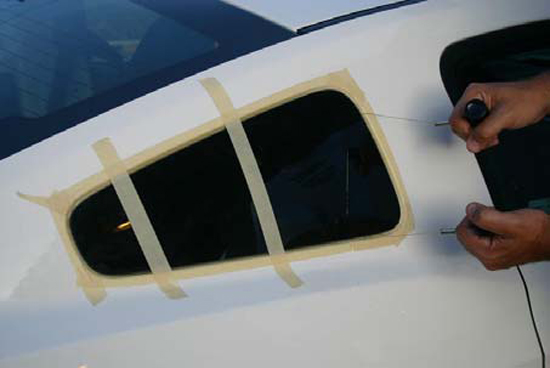
11. On the outside of the vehicle, a protective tape mask needs to be placed around the edge of the quarter window being removed. Use a good quality masking tape, and put down at least two layers, rolling around the body seam leading into the window pocket. This tape is to protect the paint from accidental rubbing of the cutting wire in the following steps, but will not protect against careless use of the cutting wire so avoid contact with painted surfaces as much as possible.
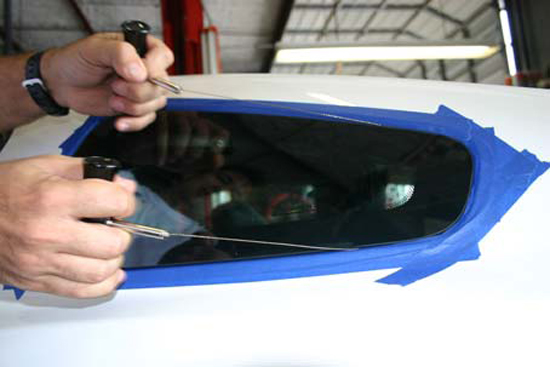
12. The window is retained by urethane adhesive sealant and two locating pins used at the factory to hold the window in place as it dries. The locating pins are not included on OEM replacement glass or in the replacement louver kit. These pins are cut and discarded in this step. Start the removal process by assembling the cutting tool T-handles to the wire (follow included instructions) and carefully feeding the cutting wire around the back of the seal near back edge of the existing window. A length of about 18-24” works well to give enough room to “saw” the seal with the wire. Start a back and forth motion, and work around the glass. The pins are difficult to cut and will take a minute or so, but the rest of the urethane will cut rather quickly. When cutting and you are close to the front edge, adding some tape strips to the glass will keep it in place so that a second set of hands is not required. Under no circumstances should you pry on the glass – while glass is strong, it is brittle, and will shatter if mishandled. It is possible with care to remove the factory glass without damage so it can be re-used at a later time if desired. After you are sure that all of the adhesive has been cut, peel back the tape strips along with the glass. If any excess force required, stop, and re-check that the seal has been completely cut. Beware that the glass may “fall out”, so be prepared to catch the glass to avoid any damage.
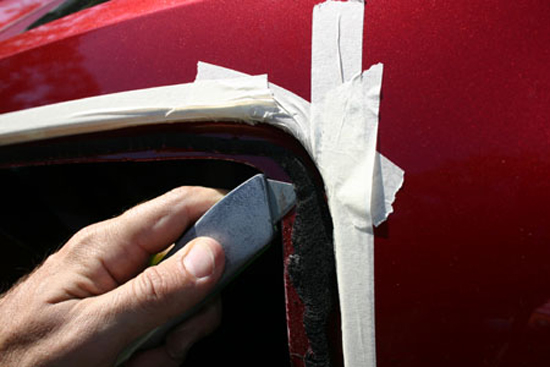
13. With the window safely removed, clean up the seal area where the new louver will be installed using a razor to trim the urethane smooth. It is not necessary to completely remove the original seal; it is actually recommended that a small amount(.005-.025”) of the seal be left for the new seal to help adhere to. With that in mind, all loose dust, dirt, and seal cuttings need to be removed and cleaned from the surface. Also, pay close attention to the way in which the seal is laid out which helps to insure that no water can be trapped above the seal at the point where the two ends connect in the front area near one of the guide pin holes. After the area has been cleaned, wipe down with rubbing alcohol and clean any smudges made by the cutting of the seal. The tape can now be removed, and the window frame area cleaned up.
14. Clean and lightly scuff the application surface of the louver, and follow sealer’s directions for proper preparation of louver surface with the correct adhesion promoter – this is critical in achieving a satisfactory bond. When using 3MFast Weld Urethane, the proper adhesion promoter is 3M Single step, P/N 08682, available separately – this can also be used to touch-up scratches on the pinch-weld if required.
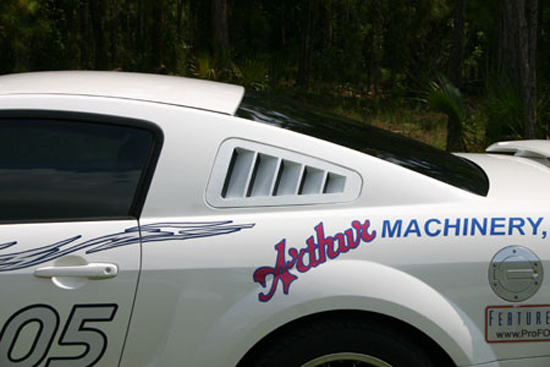
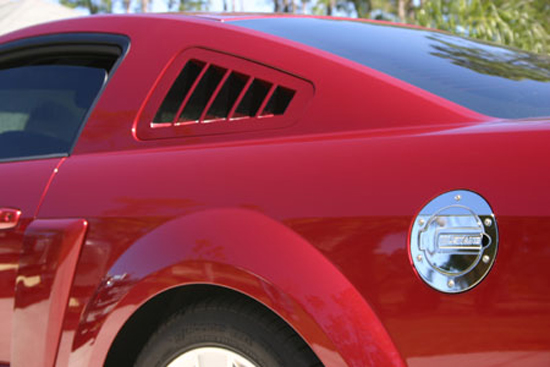
15. Apply the urethane sealer to the prepared and cleaned area where the original seal was on the car’s body, not the louver. Cutting an inverted “V” rather than straight across into the applicator tip may assist in producing a thin, tall bead with an even height. Apply enough so that the louver will sit flush to slightly recessed when installed. A small excess is acceptable as the louver can be pressed in slightly more, while too little adhesive will cause the piece to sit too far below the surface of the body. One tube is enough to do both louvers. The louvers are different, and are side specific, so be sure to install them in the correct orientation. The louvers point into the interior of the car (hence flush-mount). Follow the instructions of the seal supplier as to set-up times, and install the louvers. There should be approximately a.110” gap between the bottom of the louver and the body line when installed. A small soft shim or some tape may be required to help hold the louver in place as the seal dries depending upon weather conditions. Do NOT close doors with the windows in the up position or drive car until the seal has had time to cure. Failure to follow all instructions of seal manufacturer may result in seal failure or loss of louver!
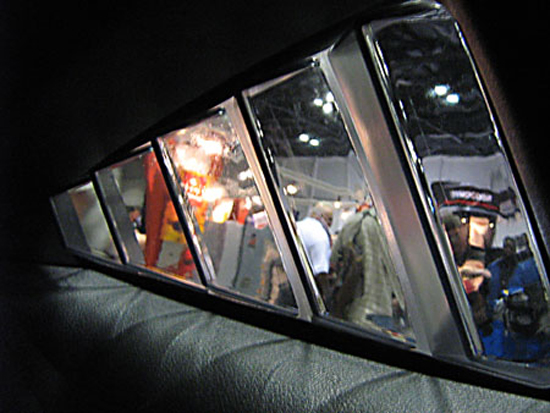
16. After sufficient time has passed for drying (6-8 hours normally), a final check should be made for water sealing and no wind noise. Any abnormal amount of wind noise should be considered as a possible source of water entry, and should be checked to insure water cannot enter the inside of the vehicle. If water does leak into the vehicle, the louver should be removed, and re-installed to insure a proper seal. A properly installed louver will not leak, and has the exact same contours as OEM glass on both the sealing edge and the outer edge (frame) surfaces.
17. The interior panels will now need to be trimmed to clear the part of the louver that goes into the vehicle interior prior to re-installation. To accomplish this, mark the 4 pieces as shown in the accompanying photos using marker or tape, and using a fine-tooth hacksaw or other cutting tool, trim the edges back flush to their respective surfaces so that the vents will clear the interior opening. After trimming, clean up any rough or sharp edges and test for proper fit. Louvers will just barely contact interior trim pieces, if the interior pieces are trying to “push” the louver out, additional trimming may be required. See images and captions below.
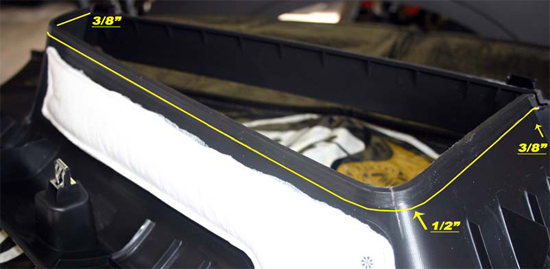

Upper Panel – Approx 3/8” at the ends, tapering to ½” at the forward top corner will need to be trimmed off. This coincides at the ends with the corners which easily identifies the area to be removed and is the correct length.
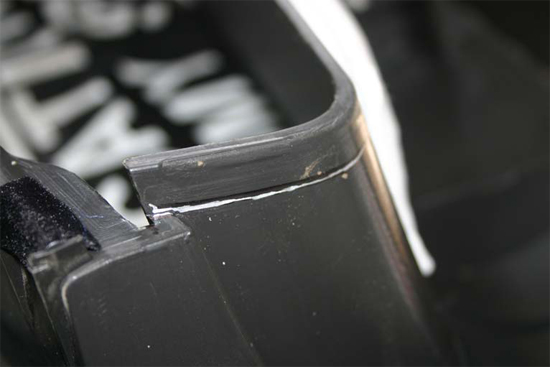
Upper panel back lower corner shown above – line indicates where cut should occur.
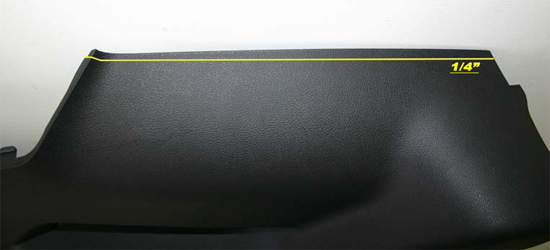
Lower panel shown above – approx. ¼” coinciding with step in forward corner will need to be removed. If desired, cut can be tapered to zero removal going towards rear of vehicle.
18. Re-install the interior of the vehicle. The entire interior can be reinstalled once both windows have been replaced with the louvers and it is known that no leaks exist. Installation is the reverse of the disassembly / removal steps. Replace any damaged pins or push clips at this time to avoid new “noises” while driving down the road. Torque and install seat belt bolts and coat hooks according to factory service manual directions.
19. After installation and sufficient drying time has elapsed, the louvers may be cleaned with a soft sponge and regular car wash soap. Over time, if scratches become a nuisance in the visibility areas, they may be polished out using a plastic headlight polish, or toothpaste for minor scratches. Do not use abrasive cleaners for normal everyday cleaning of the parts, as they are susceptible to scratching by the abrasives.
2010 Flush Mount Louvers Suggested Painting Tips
While we offer our louvers pre-painted, we realize a number of our customers either want to tackle painting on their own, or give these directions to their local paint shop to assist them in getting the job done right on the first try. Please understand that this is a basic outline of how our painters at SilverHorse Racing have successfully painted over 1,000 sets, and is not meant as a detailed how-to guide for proper painting and safety techniques. It is YOUR RESPONSIBILITY if you are painting these louvers or are having them painted to understand basic automotive painting techniques and safety precautions prior to starting this project.
- Start by thoroughly washing the louvers in a soap and water solution to remove any stray oils left by handling or the actual molding process. Allow to dry.
- Use Dupont Plastic Cleaner 2319S or equivalent on pieces.
- Sand injection “gate” at top of part smooth to surface, and sand edges as needed.
- Install provided masks on exterior of part, floating masks into position with normal window tint “wet” installation techniques. Mask underside of part to protect from overspray – paint should be able to be on “edge” of lip, but not on bottom side where it will be urethane-glued to the vehicle. All paint will be applied to the exterior only, none to the inside of the parts.
- Scuff / sand all surfaces to be painted with fine sanding paper.
- Again clean part and allow to dry using Dupont plastic cleaner 2319S, or its equivalent.
- Apply Pas-Stick 2322S Adhesion promoter or equivalent.
- Apply a black primer of your choice to the exterior of the part – we use Dupont EP-789 or A-4260S Primers.
- If spraying a very light color, a light sealer coat may be added to help “bring up” the color. (helpful on yellows and whites)
- Sand if needed.
- Spray color coats – we use Diamont R-M color or Martin Sr. Matrix color both with excellent results.
- Spray clear coats – a low-solid clear will not build film too thick for the corners of the parts, BASF Limco LM4000 Low Solid or RSC-220 will work well here.
- Allow to dry thoroughly (we let pieces dry for two days) then using an X-Acto razor carefully trim around the masks prior to removing them.
- 3M finesse-it compound or equivalent can be used to polish parts, clear areas, and in general any issues that may crop up during the painting process, by hand. It is not recommended that power buffers be used, as it is very easy to burn through the paint and burnish the part.
NO HEAVY COATS !! – Heavy coats (what you would use for most refinishing of body components) can cause paint solvents to penetrate the primer and crack color coats / underlying primer coats (it will have the appearance of cracked plastic although this is not the case). This is NOT a failure of the part, but a failure to keep Lexan from reacting and possibly rejecting the solvents in the paints. Water-based automotive paints may not have this limitation. Use of a detail gun rather than a full-size gun may aid in proper coverage.
Installation instructions provided by SilverHorse Racing 10.5.09
Related Guides
-
Installation
-
Installation
-
Installation

