FREE 1 to 3-Day Delivery on Orders $149+ Details
How to install Superior 8.8 Axles - 28 Spline 5 Lug on your 1994-1998 Mustang
Installation Time
1 days
Tools Required
- Eye protection
- Front Wheel Chocks
- Jackstands
- Grinder (electric or air)
- Torque Wrench
- Lint-Free Rags
- DeBurring Tool
- Appropriate Wrenches, Screwdrivers, Socket Set.
- Axle Grease
- Replacement Gear Oil
- Oil catch basin
Installation
Please take the time to read this guide completely before beginning this installation. A shop manual is also recommended. Please follow ALL saftey precautions when working on your vehicle. The use of jack stands, eye protection and proper tools is strongly recommended.
Also please confirm that you have the correct Axle System for your application before installlation begins.
Starting:
1. Secure your vehicle’s front tires.
2. Lift and then support the rear of the vehicle under the rear axle housing using appropriate jackstands.
3. Remove tires.
4. Drain gear oil from rear differential.
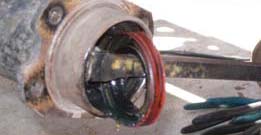
5. Remove differential cover.
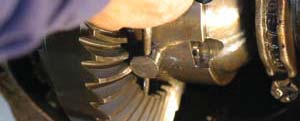
6. Remove cross pin bolt.
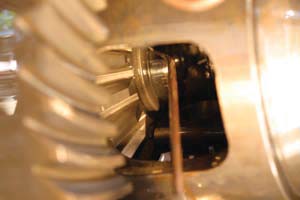
7. Remove cross pin
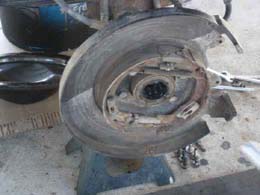
8. Remove brake calipers (both sides)
9. Remove Rotors (both sides)
10. Push in on axles to remove end play.
11. Go to the differential and slide out the c-clips.
12. Remove the axles and place a lint-free rag in the tube ends to prevent fluid from leaking on the ground as well as reducing the chance of any debri getting into the differential.
13. Remove caliper bracket.
14. Remove the seal.
15. Remove bearing cage by lifting one side with a small screwdriver and pulling out with needle nose pliers. This will allow the roller bearings to be removed. You can discard the roller bearings at this time. It is important that none of the rollers remain in the tubes. This can damage your differential. Insert optional bearing puller and remove bearing.
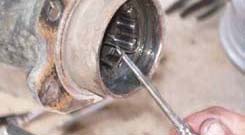
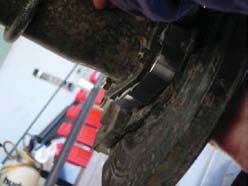
16. Remove all rust, dirt, and/or corrosion from the housing end using a wire brush.
17. Cut off lip as shown in the picture. The rag that is in the housing will help prevent steel shavings from entering the housing. Be careful as not to cut off the caliper bracket centering shoulder. The cut must be flush with the shoulder.
18. Grind down and file any burrs flush with the caliper bracket centering soulder.
THIS IS ABSOLUTELY CRITICAL, THE SHOULDER MUST BE KEPT INTACT WITH THE TUBE GROUND DOWN FLUSH, NO MORE, NO LESS.
19. De-Burr the inner lip with sand paper, emery cloth or a de-burring tool.
20. Remove the lint-free rag from the housing. Clean out all debris thoroughly.
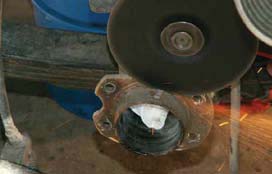
21. Ensure dust shield has clearance for the bearing. A file might be needed to make it flush with the cast caliper bracket. Attach to the dust shield.
Dust shields are not held to a tight tolerance so this step is on a case-by-case basis. Not some caliper brackets are held to the dust shield with rivets and some are not. If there are no rivets, you will need to use your bolts to center the shield to check bearing and seal clearance. The hole in the cast bracket is the correct size. It will not needed to be modified... but the dust shield varies.
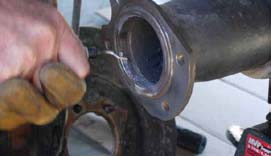
22. Insert supplied bolts through the holes in the stock housing flange from the backside.
23. Silicone the recess on the backside of the c-clip eliminator.
24. Slide c-clip eliminator on the 4 bolts ensuring the pilot ring is started into the original bearing bore.
25. Slide on the oversized 7/16” nuts (They will NOT engage the threads on the bolts. They are there ONLY as spacers to clear the shoulder on the bolts. These nuts will be discarded when the installation is complete.)
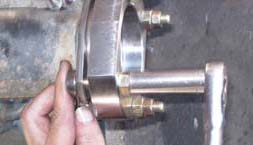
26. Thread on four 3/8” non-locking nuts. Tighten in a cross pattern to ensure the c-clip eliminator is pulled in evenly and seated properly on the housing end. 27. After the CCE is mounted on the housing end, remove the set up nuts discussed in step 25. Now use them on the other housing end.
27. Insert caliper bracket and dust shield on four bolts.
28. Time to install the axle shafts. (See sidebar for installation instructions for bearings and seals on the actual axles)
29. Long shaft is installed on the driver’s side. Short shaft is installed on the passenger side.
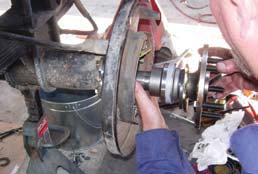
30. Apply a thin coat of silicone to the seal area.
31. Slide in the axle. Make sure you line up the retainer plates with the four bolts.
32. Take Grade C Lock Nuts and thread onto the bolts using the cross pattern. Note: Lock Nuts are NOT to be reused.
They are designed to tighten only one time.
33. Torque nuts to 40 ft. lbs.
34. Slide on rotor.
35. Re-attach calipers and torque bolts to factory recommended specifications.
36. Torque lugnuts to the factory specs after mounting wheels and tires.
37. Re-install differential cover.
38. Fill Differential with appropriate gear oil to the appropriate level.
39. Congratulations. You now have one of the strongest 8.8 differentials in the world.
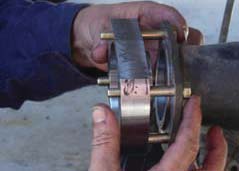
AXLE INSTALLATION
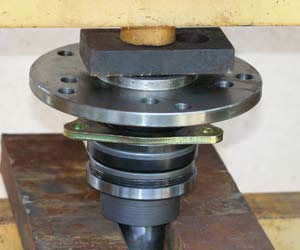
1. Slide on the retainer.
2. Slide on the spacer ring.
3. Slide on seal with lip on flange side (pre-greased lid).
4. Press bearing on with the groove toward the lip seal.
5. Press on the retainer.
6. Screw or press in the studs into the proper bolt pattern for your wheels.