 FREE 1 to 3-Day Delivery on Orders $149+ Details
Pypes V6 True Dual Exhaust Kit ('98-'04 V6) - Installation Instructions
Installation Time
3 hours
Tools Required
- jack stands
- box wrenches
- deep sockets w/ ratchet and extension
- reciprocating saw or hack saw
- penetrating lubricant.
- For a quicker and tighter installation, air tools are recommended.Technical assistance is available

Shop Parts in this Guide
Installation
1. Begin by removing the negative from the battery as you will be disconnecting electrical components. Place the vehicle on a lift or four jack stands at maximum height to aid in an easier installation. Note: Removal of the rear tires will allow the tailpipes to go over the rear axle much easier.
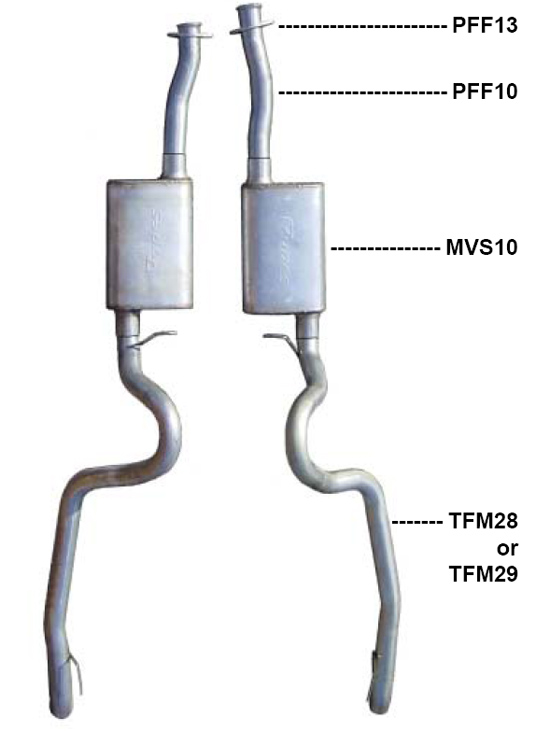
2. Unbolt the factory y-pipe and cat-back from the vehicle. Soaking your factory mounting points will allow for easier removal. If you still have a factory system on the car, you will need to cut the mufflers out of the system using a hack saw or a sawsall. Finish by removing the tailpipes from the rubber hangers. Remove all the factory hangers as the new kit is supplied with factory correct replacements. Pypes Performance Exhaust has supplied a new HFH30 hanger kit. The two hangers with diamond shaped rubbers get mounted in the factory locations near the rear axle. The two rectangular blocks get mounted under the rear bumper. The vehicle should have stamped holes to accept the supplied clip nuts and hardware. If your vehicle is not stamped with the correct holes, you will need to drill holes to mount the supplied hangers.
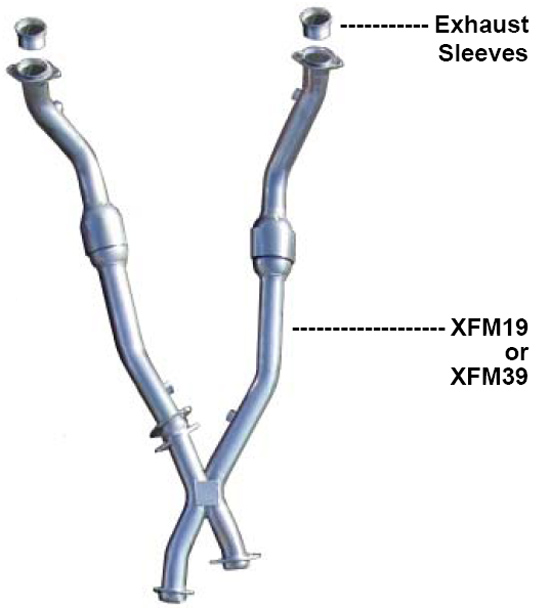
3. Now it’s time to install your new x-pipe. Begin by installing the passenger side of the x-pipe first supporting the rear portion. Now install the driver side short leg on the header and making the connection to the passenger side of the x-pipe with the supplied 3/8” bolt. Leave all the connection points snug, do not tighten, as you will need to adjust the system later.
4. With the x-pipe in place, you can now start on the cat-back. Tailpipes first, sliding them over the rear axle, placing the wire forms through the new hanger you have installed. If you purchased a kit with 3” add-on tips, slide the tips on tithe tails, then slide the additional hanger through the boss on the top of the tip. Make sure to leave the set screw and clamp bolt loose for adjustment. Now install the hangers into the rubber mounts. A small amount of grease or liquid soap will allow the hanger to slide through easier.
5. Next install the mufflers on to tailpipes. Your new Street Pro Muffler is bi-directional. Again, a small amount of grease in the muffler inlet and outlet will allow for easy rotation when adjusting for the best fit.
6. Next, install the flow tube flanges on to the flow tubes and slide them into the inlets of each muffler. The shorter flow tube belongs on the driver side of the vehicle. Once the flow tubes are in place, you can install the bolts to connect them to your new x-pipe. Snug the hardware just enough to allow rotation for adjustment. Now install the four clamps on the muffler necks, snug the nuts, but DON’T TIGHTEN. Once these clamps are tightened you will not be able to adjust any of the components.
7. Push upward on the “X” and hold in position as you perform step 7 for maximum ground clearance. Last, make all your final adjustments for fit. Adjust all the x-pipes legs for correct fitment, tightening all connection points. Install you02 sensors, some vehicles may require the wires to be lengthened or 24” extensions to be purchased. Next, make sure the mufflers are flat and parallel to the ground. Rotate the flow tubes for the best fit. Also make sure the tailpipes are positioned in the correct location under the rear bumper. Tighten all the connecting points. Now it’s time to fire up your Mustang. Remember to listen and check for exhaust leaks. Also, periodically check all connections points as they may come loose. Black residue at any of the connections indicate an exhaust leak.
Installation instructions provided by Pypes

