 FREE 1 to 3-Day Delivery on Orders $149+ Details
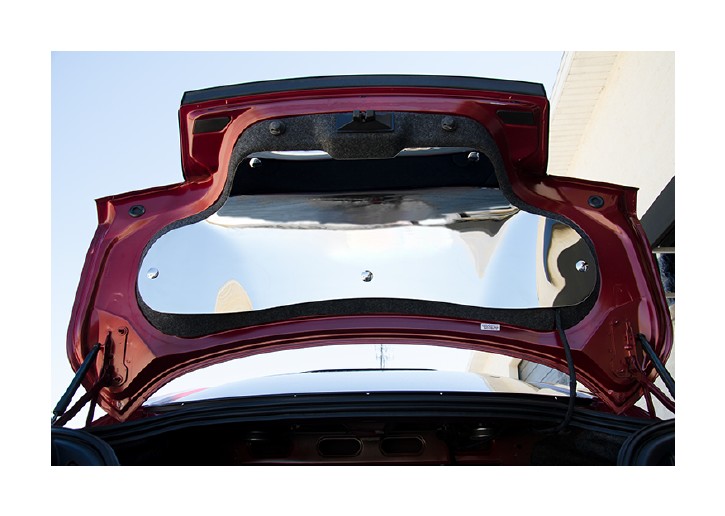
How to Install ACC Polished Trunk Lid Panel on your Mustang

Shop Parts in this Guide
PART INCLUDES:
1-24 Gauge Stainless Steel Trunk Panel
2-3/4” Self-Tapping Washer Head Style Screws
3-Trunk Sized Push-In Retainers
5-Decorative Chrome Screw Covers with Butyl Putty Attached
LINER INFO:
Your new accessories will come to you with a protective surface liner. Leave this liner in place until the installation is complete to prevent finger prints and or possible scratches during installation. This liner is required to remain on the part until you are instructed to remove it.
This new stainless steel trunk panel is a great looking accessory which is easy to install in just a few steps.
1. The first step will be to remove the factory black plastic trunk lid liner fasteners. This can be easily done with a common removal separator tool which can be found in most auto parts stores at a very economical price. These retainers can be removed without this cool tool however, you may damage the factory lid liner!
2. Once you have removed the retainers, you can then move to install the new stainless steel panel. Also, the new panel will have a little extra weight to it so the factory retainers may not be able to hold the panel in place long term. We have supplied you with three new retainers that are slightly larger than the factory retainers to give them a little extra holding power. Because of this, the new retainers may be a little harder to install, so you will most likely need to tap them into the lids sub frame with a small hammer being careful not to accidently miss the new retainers and possibly dent the hood!
3. Before you move to install the new panel, and although your new panel will come to you pre-shaped, it will be necessary to further shape the panel by hand to create a perfect contour. This will also show you just how the new panel is intended fit. Once you have shaped the panel to a nice contour, start with the lower middle hole and firmly push in the new retainer. You may use one of the factory retainers at this location because this spot will not bare too much wait and it will be easier to get started.
4. Once you have set the center retainer you can move to set the two outer retainers. These will be a little tough to push in and it is this very toughness that will insure that the panel stays attached when closing the lid and or possibly slamming it closed, not recommended.
5. Now that you have successfully installed all three lower retainers you can move to the to upper holes. You will notice that these holes are smaller. This is because you will be using self-tapping screws at these locations. With the help of a friend, force the new panel into the lids factory liner so that there will be no gaps as it rolls towards the top. This should place the hold in the new panel just below the factory hole in the lids sub frame and it is at this point that you will self-tap the screws provided. Try not to over tighten these screws as this will tend to damage the new panel. Once these two screws are installed, remove the protective liner. Then, simply set the chrome decorative screw covers over each of the attachment points to finish the installation.

