FREE 1 to 3-Day Delivery on Orders $149+ Details
How to Install a AFCO Double Pass Heat Exchanger on your 2003-2004 Mustang Cobra

Shop Parts in this Guide
Installation
Installation Instructions for AFCO Radiator 80281 FNU 2005 - 06 Mustang
WARNING:
1. Radiator fluid must be handled properly. Please observe local ordinances wh regards to handling and disposal.
2. Allow vehicle and components to cool a minimum of 1 hour before handling.
3. Never attempt to open the radiator cap when hot.
4. Do not allow any tools or limbs to contact fans - SERIOUS INJURY MAY RESULT.
5. Always follow directions and disconnect the battery before attempting installation.
6. AFCO is not responsible for personal injury or damage to vehicle resuing from improper installation of this product.
7. Due to vehicle variations I tolerances is ultimately up to the installer to detenmine proper installation.
Disconnecting and removing the radiator
- Allow the vehicle to cool completely.
- Disconnect the battery ground cable.
- Remove the top and bottom splash guards.
- Remove the radiator cap from the vent tank. Disconnect the vent tube from the radiator. Never attempt to open the cap when hot.
- Drain the coolant by opening the drain cock.
- Remove the vent tank and power steering reservoir from the fan shroud assembly. and set aside. Do not remove from the car.
- Disconnect the air cleaner outlet tube and set aside. Do not remove from the car.
- Remove the upper radiator hose.
- Disconnect the fan motor electrical connector.
- Remove the fan and shroud assembly.
- Remove the upper radiator mounting brackets.
- Remove the nuts from the lower condenser studs and remove the power steering line brackets.
- Remove the lower condenser studs (5.5mm socket)
- Remove the upper condenser mounting brackets to disconnect the condenser from the radiator.
- Disconnect the (2) transmission cooler lines from the car.
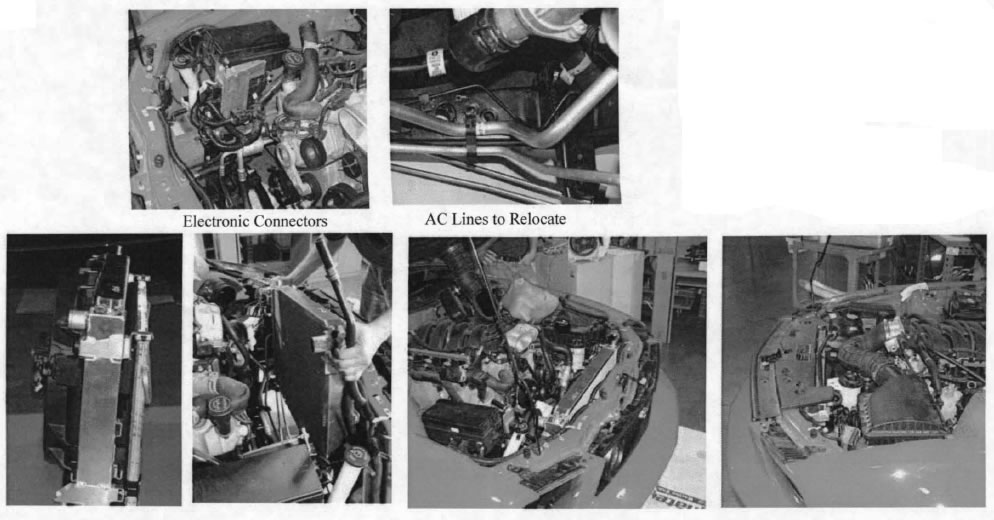
- Label and disconnect the (3) electronic cable connectors.
- Remove the OEM radiator from the car.
Installing the AFCO radiator
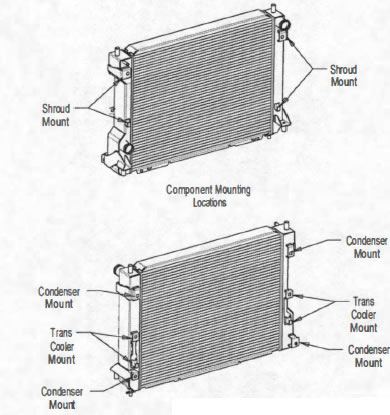
- Remove the (8) "U" nuts from the OEM radiator and install them on the AFCO radiator.
- Remove the transmission cooler and attach it to the AFCO radiator using the M6 X 16mm hardware provided.
- Loosely attach the top condenser mount to the radiator using the M6 X 16mm hardware provided.
- Carefully place the radiator in the mounting location. This is a very close fit. check for any interference on the car.
- Re-install the lower condenser studs on the radiator with the condenser placed on the studs. The flange on the stud is between the radiator mounting flange and the condenser flange.
- Tighten the lower studs (5.5mm socket) and the top condenser mounts. Make certain the condenser is properly located in the top mounts.
- Re-install the power steering line brackets and nuts on the lower studs.
- Re-install the lower radiator hose.
- Re-install the (2) transmission cooler lines on the car.
- Re-install the fan and shroud assembly using the M6 X16mm hardware provided. Check for interference on the car. The AC lines may need to be relocated if they touch the installed shroud. If necessary relocate the lines with a self-tapping screw in the frame and bent the hard lines to clear the shroud. (see photo)
- Re-attach the vent tank and power steering reservoir to the shroud.
- Re-attach the air cleaner tube.
- Fill the system with manufacturer's recommended coolant through the vent tank.
- Run the car until hot and check the fluid level.
- DO NOT OPEN THE RADIATOR CAP WHILE THE ENGINE IS HOT.
- Carefully check the system for leaks.
- Fill to the proper coolant level
- Replace the top and bottom splash guards.