FREE 1 to 3-Day Delivery on Orders $149+ Details
How to Install BBK Caster Camber Plates (94-04 All) on your Ford Mustang
Installation Time
4 hours
Tools Required
- Lug Wrench/Wheel Lock
- Torx (r) Sockets
- Metric and American Sockets
- Assorted Screw Drivers
- Bench or Hand Held Grinder (Optional)
- Impact Tools (Optional)
- Floor Jack
- Jack Stands
- Wheel Blocks
- Chisel or File

Shop Parts in this Guide
! IMPORTANT !
Please read complete Instructions before starting Caster/Camber Kit installation.
Make sure you have all the tools for the job!
BBK recommends having your car aligned upon completion of this installation.
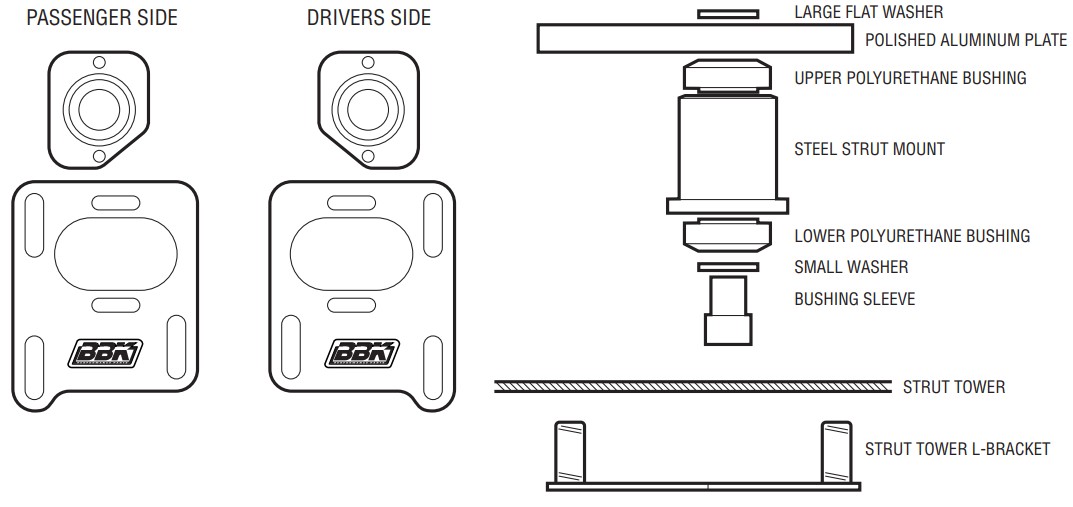
PARTS INCLUDED IN THIS KIT
❏ 2 – Polished Aluminum Plates ❏ 2 – 5/8 Flat Washers
❏ 2 – Steel Strut Mounts ❏ 2 – 5/16 Allen Head Bolts
❏ 4 – Polyurethane Bushings ❏ 4 – 5/16 Washers
❏ 2 – Stud Plates ❏ 6 – M/10 Flat Washers
❏ 2 – Bushings Sleeves ❏ 6 – M/10 Nylock Nuts
TOOLS REQUIRED
❏ Lug Wrench/Wheel Lock ❏ *Impact Tools
❏ Torx (r) Sockets ❏ Floor Jack
❏ Metric and American Sockets ❏ Jack Stands
❏ Assorted Screw Drivers ❏ Wheel Blocks
❏ *Bench or Hand Held Grinder ❏ Chisel or File
*Optional
INSTALLATION INSTRUCTIONS
Step 1
With the rear wheels securely blocked, raise the front of the vehicle and support chassis securely with jack stands. Using masking or duct tape place one piece on each axis of the Strut Tower/Fender well. Use felt tip pen to mark the location of the strut on the Strut Tower/Fender well. This will enable you to return the strut to
approximately the same location.
Step 2
Remove the front wheels, disconnect one sway bar end link, remove brake caliper and disconnect ABS line from supports. Place floor jack under the front control arm. Lift arm up until the weight has been taken off the upper strut mount.
Step 3
Remove the nut at the top of the strut with an impact wrench or screw driver and open end wrenches. Lower the control arm down slowly, stopping the jack before the coil spring comes out. Then compress the strut and pull it towards you into the fender well.
! CAUTION !
If strut is not easily compressed,
remove it from the spindle
Step 4
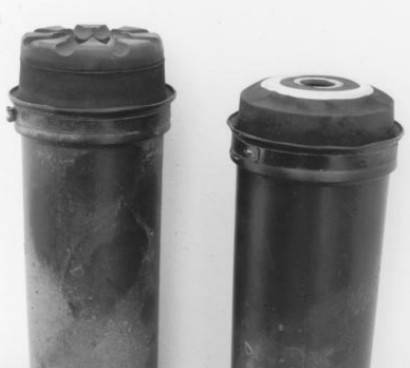
Remove stock dust boot and modify using a grinder or delete (See Photo). If strut was removed, re-attach to spindle now.
Step 5
Remove stock upper strut mount and stud plate from car. If
the mount is held in place with a rivet it must be drilled out.
Using a chisel and hammer or flat file, remove any debris
from top strut tower spot welds. This will allow the polished
aluminum plate to move freely.
Step 6
Install bushings and bushings sleeve into steel strut mount.
Using 5/16" Allen head bolts, and two 5/16" washer per side,
attach assembled strut mount to aluminum plate and attach
with washers and nylock nuts. Keep all hardware loose
enough for adjustment.
Step 7
Make sure factory bump stop and modified dust boot are
reinstalled if (applicable). Raise control arm while carefully
guiding the strut through the strut mount and end link through sway bar hole. Install top urethane bushing, 5/8"
flat washer and stock nut and tighten to factory specifications, reconnect sway bar.
Step 8
Slide strut to approximate original alignment setting using pen markings as a guide. Tighten all hardware securely
and check hood clearance by placing clay on strut mount and closing hood slowly.
! CAUTION !
Do not close hood before checking clearance
Step 9
Lower the jack and repeat for the other side. When complete double check that anything that was previously
disassembled is tight. Reinstall wheels and torque to factory specs.
Step 10
Test drive car and check all hardware for tightness.