 FREE 1 to 3-Day Delivery on Orders $149+ Details
Mustang V6 BBK Cold Air Intake Installation Guide (1994-1998)
Installation Time
60 minutes
Tools Required
- Philips Head Screw Driver
- Flat Head Screw Driver
- Adjustable Wrench
- Vice Grips
- Socket Wrench
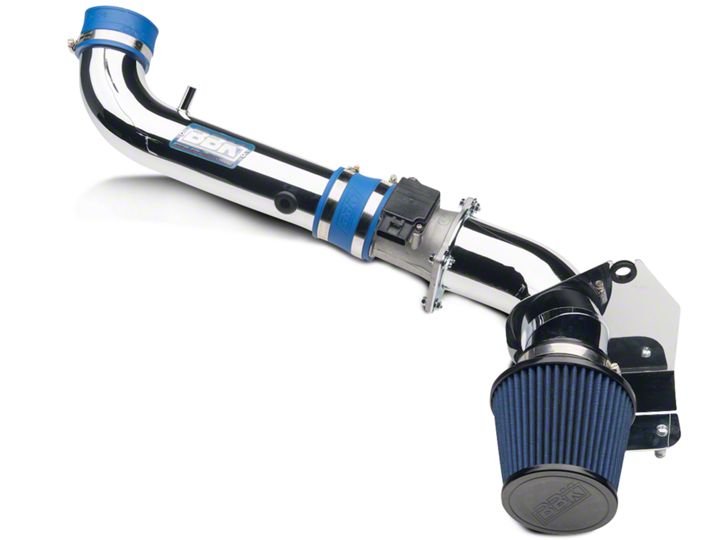
Shop Parts in this Guide
Installation
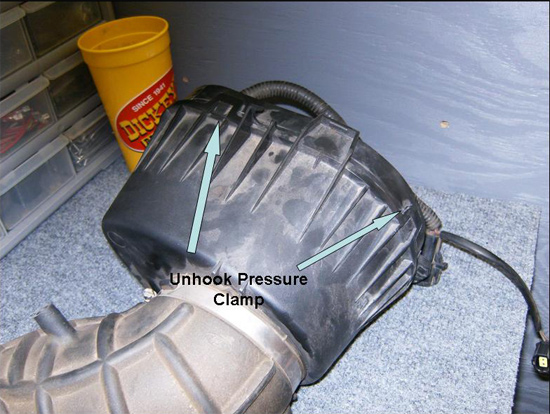
1. Removal of the Stock Intake
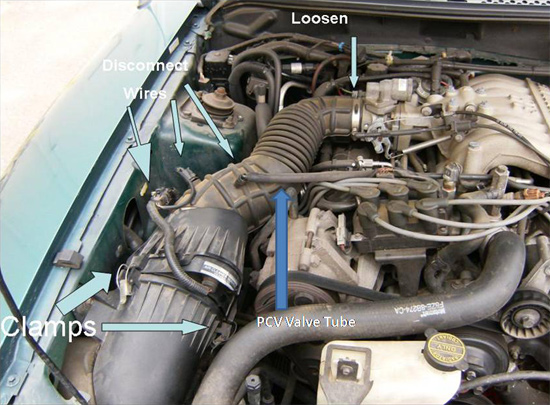
- First locate and unclip the 2 clips connecting the intake to the Air Filter
- Remove the wires and rubber tubing connected to intake.
- Each connection has a small clip. Use a small flat head screw driver to remove the connector
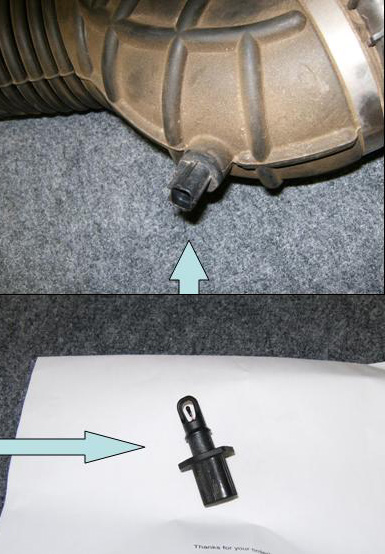
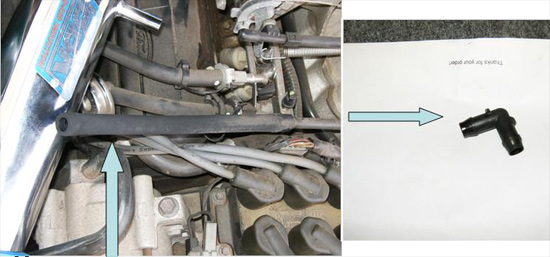
- Remove the plastic tube that connects to the PCV valve to the intake.
- My PCV Valve tube was deteriorating. It was great opportunity for me to replace it
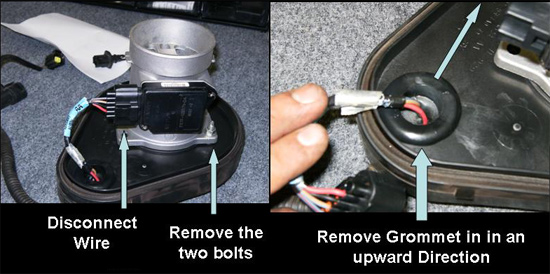
2. Removal of the Sensor
- After the wire has been disconnected it will just wiggle out. Be gentle when pulling it out.
3. Use a flat Head screw driver to loosen and remove the metal clamps attaching the intake to the throttle body.
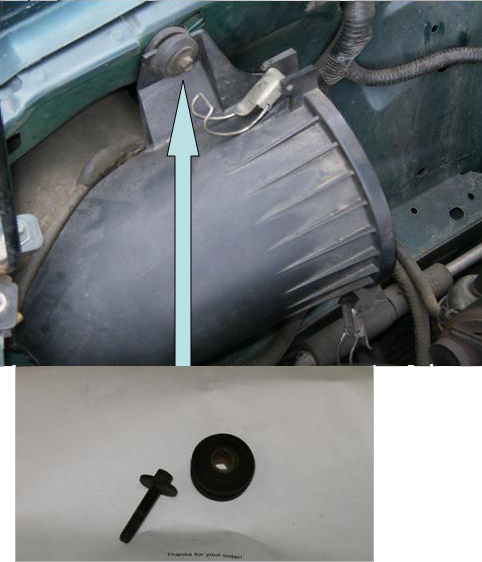
4. Removal of the Stock Air Filter
- Remove the screw holding the top of the old intake. Save the grommet and the screw.
- Lift up and out on the lower tubing of the intake.
- Mine came right out but some may require a little tugging.
5. Removal of the MAF housing
- Take the upper intake tube and release the second hose clamp
- Remove the hose and discard
- The MAF is located inside this chamber. There are 4 pressure clamps that need to be released. You can use your fingers or flat head screw driver whichever is easiest
- Disconnect wires using a flat head screwdriver. Remove the grommet holding the wires.
- Remove it in the direction of the air flow or you will not be able to get the wires out.
6. Removal of the MAF sensor
- Mine only had 2 Screw holding the MAF in place but it can have up to four.
- I used an adjustable wrench to remove the bolts holding it in place. Set the MAF and the Screen aside to be put together later.
7. Preparing the New Intake for installation
- Take the large circular grommet and attach it to the metal shield
- Install the studs facing downward onto the metal shield using the screws provided and a Phillips head screw driver.
- Insert the metal pipe with the square bracket into the hole on the shield
- This part took a little caressing. I used a little dish soap to lube it on. Make sure there is about an inch of pipe showing on the other end
8. Reinstalling the MAF
- When positioning the MAF make sure the black electrical cap is facing upward and the electrical connection is face the left side of the car
- Position the screen and the MAF on the square bracket
- Insert all 4 screw provided in the kit screws and hand tighten all bolts
- Tighten all four screws.
- Place the larger of the two silicone seals on the MAF.
9. Installing the Lower Arm of the Intake
- Remove the grommets from the bottom of the stock Air filter housing.
- Put the Grommets on the studs.
- The studs and the grommets will be placed into the holes shown below.
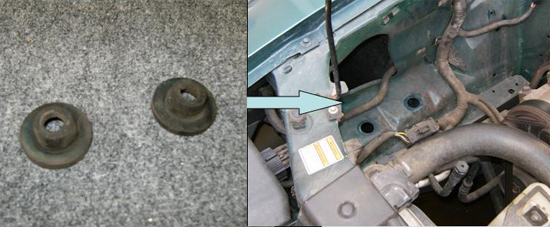
- Place the grommets in the holes and place the filter end of the pipe into the wheel well.
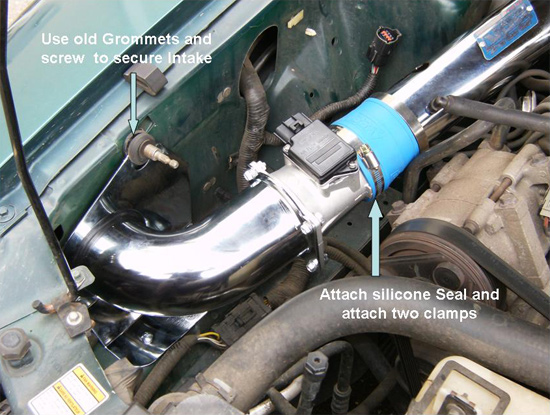
- Use the old grommet and screw that were original attached to the top of the intake to secure the new intake in place.
10. Installing the Upper Tube of the Intake
- Place the silicon seal on the throttle body and one of the hose clamps over it
- Position the seal carefully and hold it in place until the hose clamp can be tightened.
- Tighten the clamp just enough so that the silicone seal does not move off the throttle body.
- Place a second hose clamp on the seal.
- Install the upper air intake tubing into the throttle body with the silicon seal
- Place two hose clamps on the lower end of the upper air intake.
- Maneuver the upper and lower intake tubes so that they connect.
- Pull the clamps over the silicone seal
- The clamp going over the MAF will have to be really Loose in order for it to fit over the MAF
- Tighten all the clamps just tight enough to keep everything together and double check all the seals and connections are in the correct places.
- With this done you can tighten all the clamps
- Install larger grommet into the hole on the air intake
- Insert sensor hole in Grommet.
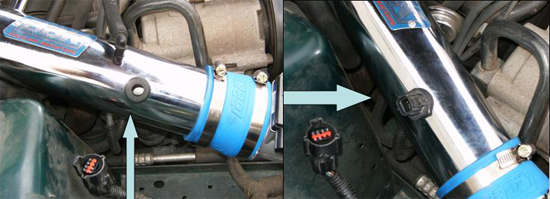
- Remove Plastic tip from PCV valve tube
- Reconnect all wires and PCV Valve tube
11. Installing the new Filter
- The Filter has to be installed from underneath the car. This can be difficult but it can be done.
- Put the filter inside the wheel well and attach to the air intake
- Make sure it is completely on the exposed tube end and that it is straight.
- Tighten the clamp that came with the filter.
TIP: To make this step easier you may want to lift the securely car on jack stands and remove the front wheel to give yourself more room to work with.
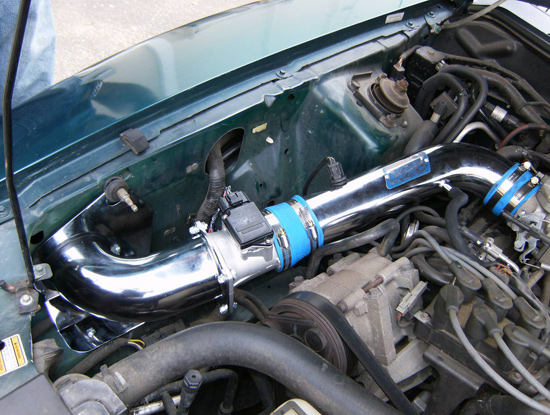
Finished Installation
Installation instructions provided by AmericanMuscle customer by Daniel Figueredo
Related Guides
-
Installation
-
Installation
-
Installation
