FREE 1 to 3-Day Delivery on Orders $149+ Details
How to Install BMR Lower Control Arms, DOM, Double Adjustable, Rod Ends - Red on your Mustang

Shop Parts in this Guide
1. Lift vehicle and support by the axle. Remove both rear wheels.
2. Using a small screwdriver, unhook the brake cable were it attaches on the caliper. Slide the brake cable out of the control arm.
3. Remove both control arm bolts using an 18mm wrench or socket. Remove the control arm. Do not remove both lower control arms at one time or the axle may rotate creating additional difficulty during re-installation.
4. Adjust the BMR control arm until it is the same length as the factory arm. With the narrow end forward, install the control arm using the factory bolts. The offset bushing at the rear of the control arm faces inward. If using part number TCA021, it is recommended to lift the rear-end until the car is supported before tightening the mounting bolts. This prevents the polyurethane bushings from being pre-loaded. Failure to do so may result in premature bushing wear and/or irregular ride height. Tighten all mounting bolts to 130 ft/lbs. While the suspension is loaded, lube the grease fittings. Do not exceed 3-4 pumps per fitting.
5. Repeat steps 2-5 on the other side.
6. Re-install the brake cables. This may be done by using a pry-bar to rotate the brake lever while re-inserting the cable end into the slot. Zip tie the brake cable to the new control arms.
7. If you do not want to set a custom pinion angle, tighten all jam-nuts, re-install the wheels, and lower vehicle. If adjustment is required, use the procedure below:
Adjusting Pinion Angle
1. Make sure the rear end is loaded by either setting the car on the ground or letting the car rest on jack stands positioned under the rear axle. In both cases, the car needs to be as level as possible and the suspension loaded.
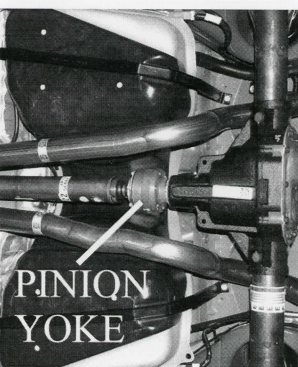
2. Place an angle finder on the rear portion of the two piece drivesbaft and record the angle. Now place the angle finder on the pinion yoke and record the angle.
3. Subtracting one angle from the other results in your pinion angle (Example: -2 rear end angle subtracted from O drivesbaft angle = -2 degrees) Adjust the control arm to achieve the desired angle.
4. As a starting point, most cars seem to like the following initial settings: Automatics: 1-2 degrees negative, Manuals: 2-3 degrees negative
5. Once pinion angle bas been set, tighten all jam nuts.