FREE 1 to 3-Day Delivery on Orders $149+ Details
How to Install Cervini's B2 Body Kit - Unpainted (05-09 GT Coupe, V6 Coupe) on your Ford Mustang
Installation Time
5 hours
Tools Required
- Template
- Masking Tape
- Center Punch
- 1/8” Pilot Drill Bit
- 1” Hole Saw
- Drill Motor
- Saw with metal blade (for cutting hood)
- Utility Knife (for cutting hood blanket)
- Razor Blade
- Eye Protection
- Rivet Gun
- 120 grit sand paper
- 10mm Socket ¼” Drive
- 8mm Socket ¼” Drive
- ¼” Drive 6” extension
- ¼” Drive Ratchet
- ⅛” Pilot Drill
- 2 ¾” Hole Saw
- Thread locker
- Half Round File
- 3mm Allen Wrench
Notice: Prefi t Before Painting!
Painted or Altered Parts are Non-Refundable
STEP 1: Remove the striker bar from the factory hood and install it with Locktite® to your new hood
STEP 2: Adjust hood until proper alignment with matching panels is achieved.
STEP 3: Adjust primary latch until the striker bar fi ts into the latch. Make sure when the hood is closed you can hear the striker bar “click” into the latch.
STEP 4: After you here it click, test it to be sure it’s working properly by grabbing the front edge of the hood and slowly pulling upward with a steady even pressure. If the hood opens it’s not adjusted properly; repeat STEP 3 until hood cannot be pulled open after it’s closed.
WARNING: MAKE SURE THE SAFETY CATCH IS WORKING PROPERLY!
STEP 5: To ensure the safety catch is working properly, close the hood, pull the hood release from inside the car and the hood will partially open. Slowly pull upward on the hood and jiggle it at the same time. If it opens without pulling the safety catch lever then the latch needs to be readjusted. The safety catch prevents the hood from opening in the event the primary latch fails.
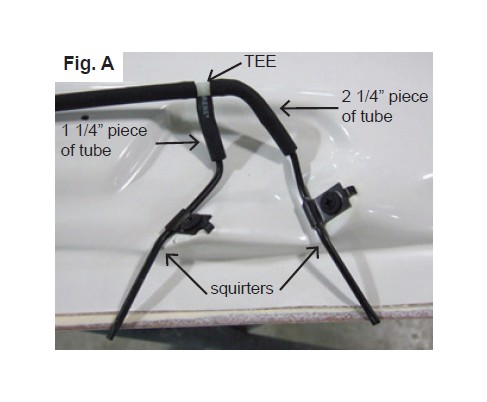
STEP 6: Locate the hood stoppers located on the radiator support. Adjust upward until they apply a small amount of pressure to the underside of the hood when it is closed. This will prevent the hood from shaking or rocking. Install squirters as shown in Fig. A. (You may need to bend the squirters into position.)
STEP 7: After all adjustments have been made, apply loctite to the bolts that secure the latch bar to the hood. Reinstall the weather striping on the rear of the hood. You will need to cut it so that it does not cross over top of the squirters. Then run the squierter hose thorough the weather striping.
Notice: Prefi t Before Painting. Install new, unpainted parts according to these instructions. Then remove parts, paint them and re-install.
Painted or Altered Parts are Non-Refundable
The surface that is in contact with the 3M 2-sided tape must be cleaned with isopropyl alcohol & the temperature must be a minimum of 75 degrees F, before applying . Allow the 2-sided tape to dry 24 hours before driving.
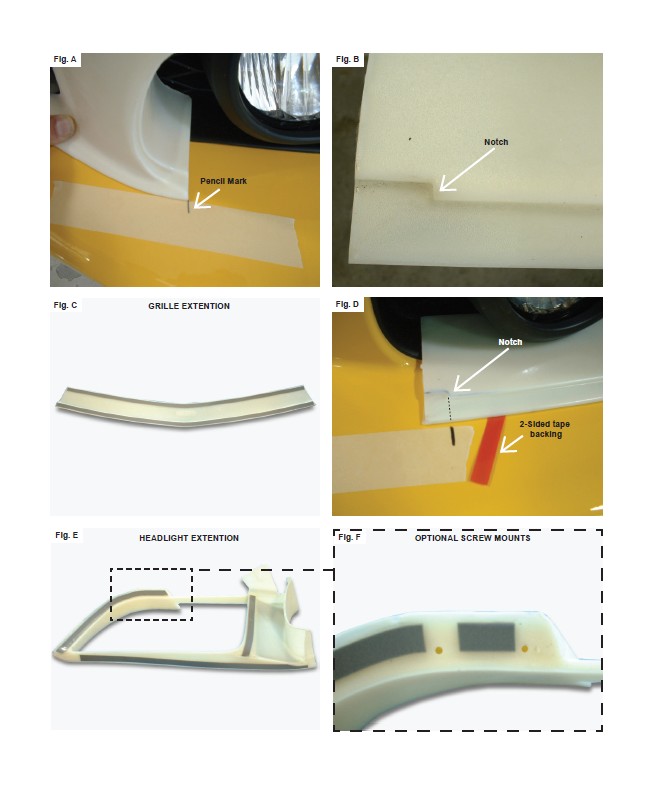
Pre-fi tting the grille and the headlight extension: If you have a GT use the template provided with these instructions to trim away the material needed for clearance around the fog lights. If you have a V-6 no trimming is required. Place the grille extention against the honeycomb of the factory grille and center it left to right. Open the hood and remove the top bolt that secures the front bumper to the radiator support along the inside of each headlight. Hold each head light extension in place and reinstall that top bolt. Place a piece of masking tape on the bumper, even with the front edge of the headlight extension and using a pencil, mark the tape in each front corner as shown in fi g. A. This pencil mark is used as a reference for aligning the grille extension notch (notch is shown in fi g. B). DO NOT REMOVE THIS TAPE.
Optional screw mounts for the headlight extensions: These headlight extensions have an optional screw mounting point. Follow the instructions on the template for mounting these screws.
Step 1, installing the painted grille extension: Included in the hardware packet is a roll of 3M, 2-sided tape. After the grille extension has been painted, install the 3M, 2-sided tape along the guideline 1/8” away from the outer edge as shown in fi g. C. Then completely remove the red backing on the 2-sided tape that overlays the factory grille. Peel and fold about 2” of the red backing from the other piece of tape. Place the grille extension overtop of and touching the honeycomb portion of the factory grille and align the pencil mark even with the notch as shown in fi g. D. This will allow you to get the best alignment of the part. While holding the extension in place pull the backing slowly, after all the backing is removed, fi rmly press the edges of the grille extension to securely adhere the tape.
Step 2, installing the painted headlight extensions: Included in the hardware packet is a roll of 3M, 2-sided tape. After the headlight extensions have been painted, install the 3m, 2-sided tape along the guidelines 1/8” away from the outer edge as shown in fi g. E.
Installing optional screw mounts for headlight extensions: (If you are using the optional screws for mounting points then trim away some of the 2- sided tape as shown in fi g. F. and refer to the instructions on the template page to fi nish this installation.)
Step 2 continued: Peel the red backing from each piece of tape, then attaching it to the fender aligning the extension with the hood edge fi rst, then down the fender, across the bumper, and up along the inside of the headlight. Press the edges down fi rmly and install the factory bolt on top.
PAINTING INSTRUCTIONS
VERY IMPORTANT: The following painting procedures MUST be followed EXACTLY for PROPER ADHESION and to prevent fi sh eyes.
1. To remove any mold release contaminants, clean the back of the part fi rst. Using 2 new clean rags, saturate the fi rst rag with plastic prep cleaner* and begin cleaning. Then use the second rag to remove the prep cleaner. Continuously fold both rags to their clean sides during the process. Use 3 sets of new rags throughout the process. This prevents mold release contaminants from transferring to the painted surface.
2. Repeat step one on the front of the part.
3. Rinse the part with water. Apply a generous amount of Ajax® or sand fi x* to a red scuff pad* (3M Scotch Brite Brand) and scrub the surface to be painted THOROUGHLY (especially where the 2-sided tape is installed, on the back side of the part, and all the hard to reach areas). Then rinse with water and dry. The scrubbed surface should be dull. If any shiny spots show, repeat the process on those areas.
4. Using another set of clean new rags, again clean the surface to be painted with plastic prep cleaner.
5. Spray the surface to be painted with adhesion promoter* including the areas where the 2-sided tape is installed (follow the instructions on the can for application and drying time).
6. Apply 3 to 4 coats of urethane primer* with fl ex additive* (follow the instructions on the can for application and drying time).
7. Wet sand primer with 600 grit sandpaper. Be careful not to sand through the primer. If you do, you MUST clean those areas with plastic prep cleaner, apply adhesion promoter and prime. Once the primer has dried, wet sand the areas that were touched up. Your surface is now ready for paint.
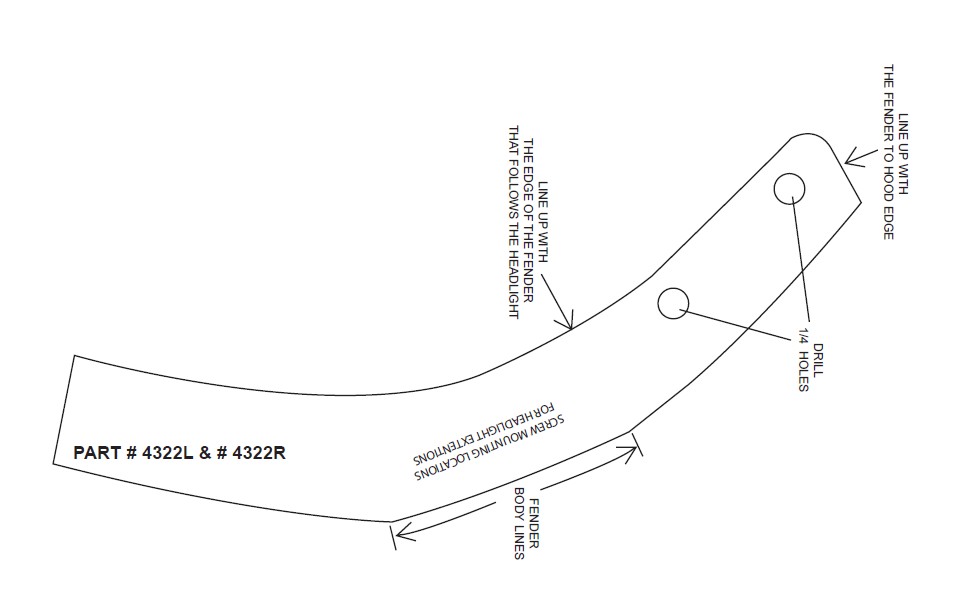
05-06 MUSTANG OPTIONAL SCREW MOUNTING TEMPLATE FOR HEADLIGHT EXTENSIONS
Optional screw mounts: These headlight extensions have an optional screw mounting point. Use the template provided on this page to drill the two ¼” holes in each fender. Flip the template over for the other side. After the extensions have been painted, install the 3m, 2-sided tape along the guidelines 1/8” from the outer edge as shown in fi g. E&F. Only peel the red backing from the 3M 2-sided tape that follows the fender. Then install the headlight extension by aligning it with the hood in the corner fi rst, then down the fender. At this point the fender will need to be removed in order to install the screws (be very careful not to bump the headlight extension causing it to loose its alignment). Once the screws have been installed then reinstall the fender and remove all of the red backing. Finish installing the tape across the bumper, and up along side the headlight. Press the edges down fi rmly and reinstall the factory bolt.
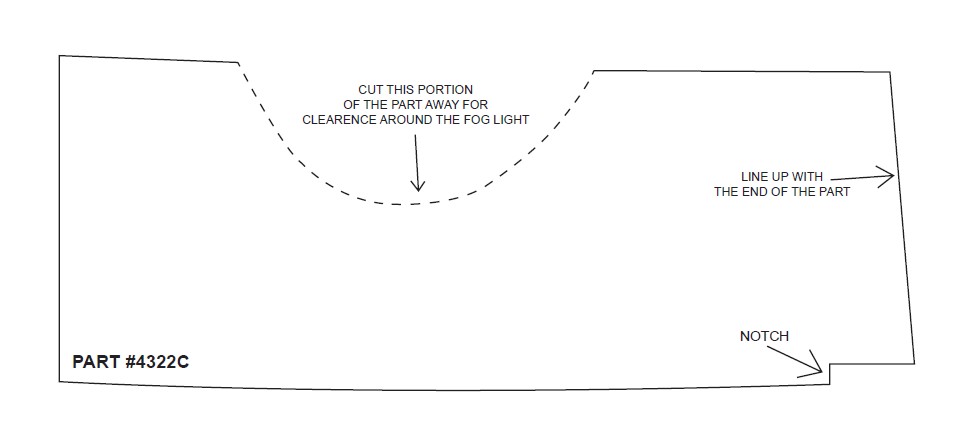
05-06 MUSTANG GRILLE EXTENSION CUTOUT FOR GT MODELS
Notice: Pre-fit before painting. Install new, unpainted parts according to these instructions. Then remove parts, paint them and re-install. Painted or Altered Parts are Non-Refundable.
DO NOT fill in vent holes on the underside of the wing.
DO NOT blow air into vent holes, it will damage the part.
The flat washers MUST be used in conjunction with the bolts when attaching the
wing. This pedestal wing can be installed by itself as a factory replacement
wing or along with part # 4325 rear extensions.
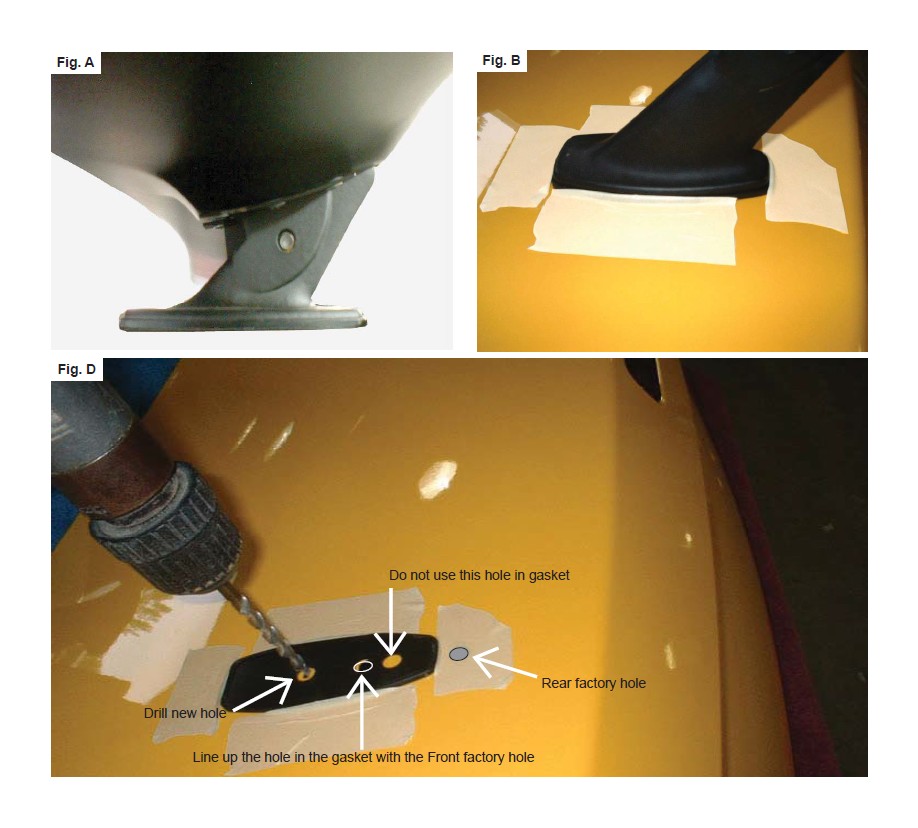
Installation as a factory replacement wing: Remove the factory wing. Assemble the pedestals onto the wing as shown in fi g. A. Mount the wing along with the pedestal gaskets to the trunk with one bolt in each side. (thread the bolt through the rear hole of the trunk and into the rear thread of the pedestal). Tape the gasket to the trunk as shown in fi g. B, then remove the bolts and the wing from the trunk. This gasket is now your template for drilling the other hole for mounting the wing as shown in fi g. C. Once the hole has been drilled install the wing with the bolts and washers to the trunk.

Installation along with part # 4325 rear extensions: Remove the factory wing. Assemble the pedestals onto the wing as shown in fi g. A. Mount the wing along with the pedestal gaskets to the trunk with one bolt in each side. (thread the bolt through the front hole of the trunk and into the rear thread of the pedestal).Tape the gasket to the trunk as shown in fi g. B, then remove the bolts and the wing from the trunk. This gasket is now your template for drilling the other hole for mounting the wing as shown in fi g. D. Use the long studs to mount the wing in the new drilled holes.
Notice: Prefi t Before Painting. Install new, unpainted parts according to these instructions. Then remove parts, paint them and re-install.
Painted or Altered Parts are Non-Refundable
The surface that is in contact with the 3M 2-sided tape must be cleaned
with isopropyl alcohol & the temperature must be a minimum of 75
degrees F, before applying . Allow the 2-sided tape to dry
24 hours before driving.
Pre-fi tting the trunk and quarter extensions: If you have a factory trunk wing, it will need to be removed. This trunk extension will cover the holes that are closest to the back of the trunk. If part # 2230 pedestal wing is being installed along with these extensions then mount it according to its instructions in place before proceeding. Hold the trunk extension in place and check the alignment from the left to the right. Remove the trunk extension and hold in place the quarter extensions, check the alignment with the quarter panel and the rear bumper.
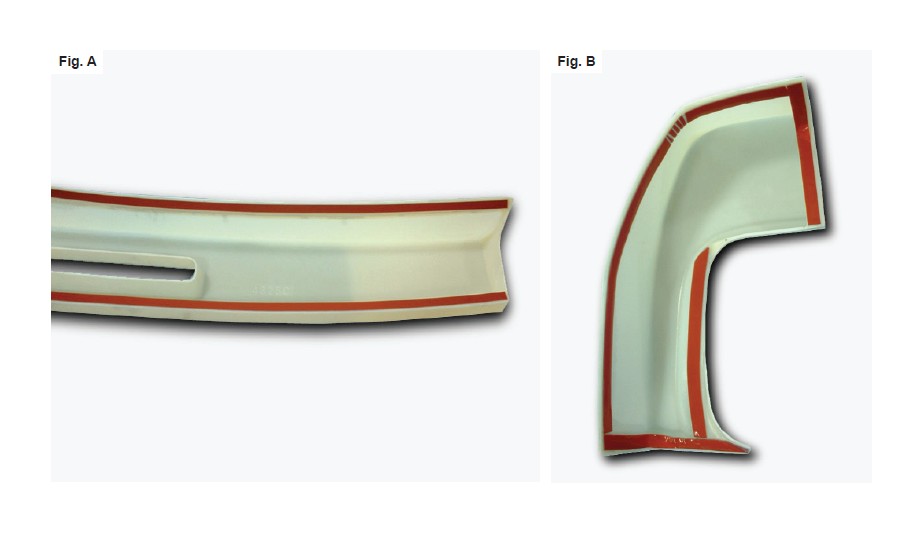
Step 1, installing the trunk extension: Included in the hardware packet is a roll of 3M 2-sided tape. After the trunk extension has been painted, install the 3m 2sided tape along the guidelines 1/8” away from the outer edge as shown in fi g. A. Peel and fold about 2” of the red backing from the ends of each piece of tape, then place the trunk extension on the trunk so that the red backing is exposed and can be pulled (this will allow you to get the best alignment of the part). Pull the backing slowly. After all the backing is removed, firmly press the edges of the extension to securely adhere the tape.
Step 2, installing the quarter extensions: Included in the hardware packet is a roll of 3M 2-sided tape. After the quarter extensions have been painted, install the 3m 2sided tape along the guidelines 1/8” away from the outer edge as shown in fi g. B. Peel and fold about 2” of the red backing from each piece of tape, then place the quarter extension on the quarter panel so that the red backing is exposed and can be pulled (this will allow you to get the best alignment of the part). Pull the backing slowly. After all the backing is removed, fi rmly press the edges of the extension to securely adhere the tape.
PAINTING INSTRUCTIONS
VERY IMPORTANT: The following painting procedures MUST be followed EXACTLY for PROPER ADHESION and to prevent fi sh eyes.
1. To remove any mold release contaminants, clean the back of the part fi rst. Using 2 new clean rags, saturate the fi rst rag with plastic prep cleaner* and begin cleaning. Then use the second rag to remove the prep cleaner. Continuously fold both rags to their clean sides during the process. Use 3 sets of new rags throughout the process. This prevents mold release contaminants from transferring to the painted surface.
2. Repeat step one on the front of the part.
3. Rinse the part with water. Apply a generous amount of Ajax® or sand fi x* to a red scuff pad* (3M Scotch Brite Brand) and scrub the surface to be painted THOROUGHLY (especially where the 2-sided tape is installed, on the back side of the part, and all the hard to reach areas). Then rinse with water and dry. The scrubbed surface should be dull. If any shiny spots show, repeat the process on those areas.
4. Using another set of clean new rags, again clean the surface to be painted with plastic prep cleaner.
5. Spray the surface to be painted with adhesion promoter* including the areas where the 2-sided tape is installed (follow the instructions on the can for application and drying time).
6. Apply 3 to 4 coats of urethane primer* with fl ex additive* (follow the instructions on the can for application and drying time).
7. Wet sand primer with 600 grit sandpaper. Be careful not to sand through the primer. If you do, you MUST clean those areas with plastic prep cleaner, apply adhesion promoter and prime. Once the primer has dried, wet sand the areas that were touched up. Your surface is now ready for paint.
* These items can be purchased at any auto body supply store.
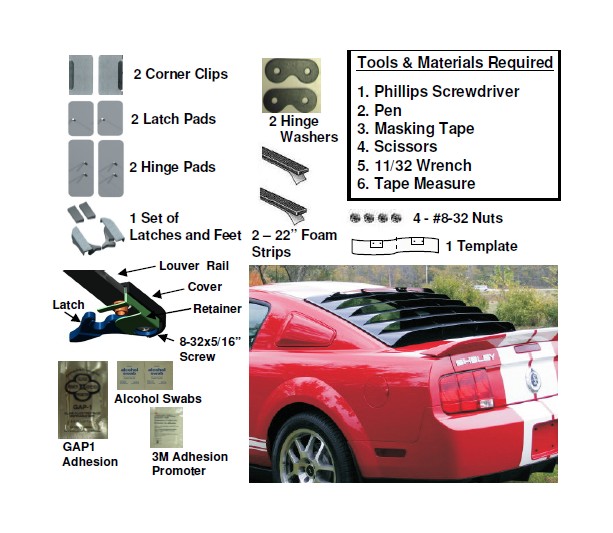
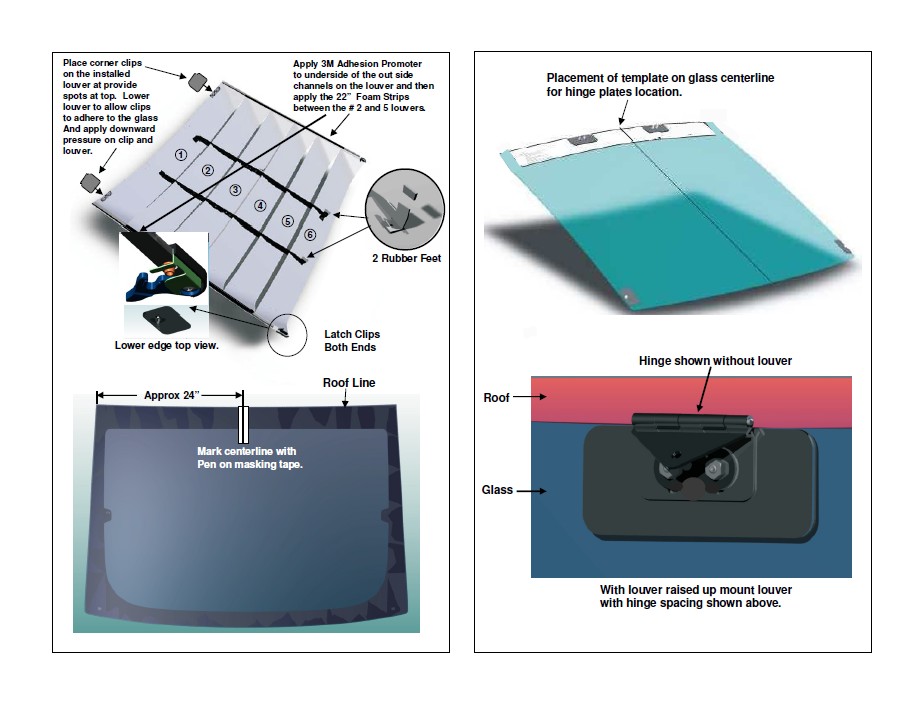
Louver Install
1. Clean Window with Isopropyl Alcohol, place a 5” piece of masking tape on center top edge of glass mark center of glass on tape with a pen
2. Cut Out Template. Center and tape it on upper part of glass.
3. Apply Gap1 Adhesion promoter in upper pad areas close the packet to slow evaporation.
4. Peel the tape from the hinge pads and mount in place
5. Burnish with the back end of a screw driver
6. Attach the Hinges to the Louver at the top about 9/16” from the bottom of the hinge pads. Put washer plates over hinges and apply the nuts loosely then align the louvers so they fit aligned to the glass at the top and centered in the window.
7. Tighten the hinge nuts with 11/32” wrench.
8. Secure the latch pads on the lower latch clips lower the louver to check pads locations while pressing on the lower center to hold the feet down then use Masking tape to frame the area and apply Gap1 promoter to the area, and stick in place.
9. Slip Corner Clips beneath the louver’s top corners touch to glass to secure when in position.
Note: Read installation instructions before starting and test fit component before painting. The Shaker Hood Trim Ring is molded UV Stable ABS Plastic and does not require paint. If you chose to paint the Shaker Hood Trim Ring, have your Trim Ring painted by a professional automotive painting facility to ensure the quality of your vehicle and the product. We recommend that paint-curing temperature not exceed 180F.
Installing Hood Trim Ring:
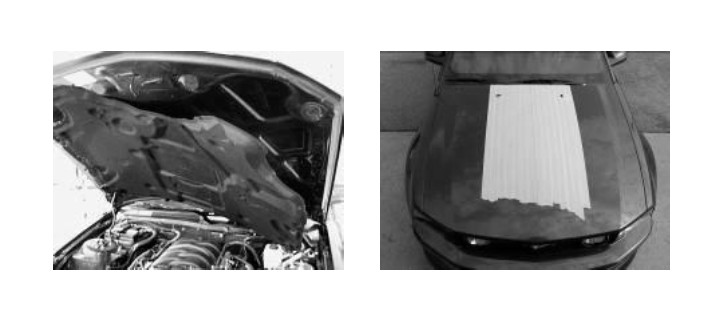
A) Raise Hood and remove under hood blanket. Use a fork tool to remove pushpin fasteners. Set hood blanket aside. Close hood and mask off entire area where Shaker opening will be cut out to help prevent paint damage during the cutting process.
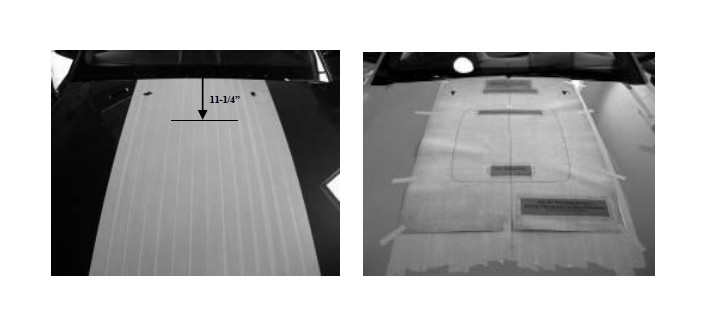
B) Measure and mark centerline on the hood. Measure and mark 11-1/4” from rear of the hood on the centerline. This will line up with the rear line on the shaker cutout template.
C) Align template with rear of hood and centerline as noted on template. Tape template securely to top of hood.
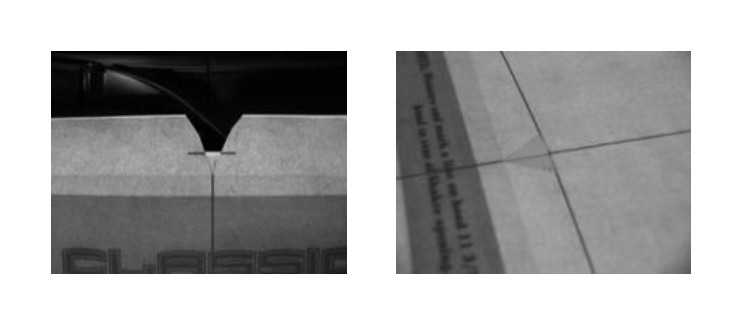
Note: It is very important that the centerline of hood is measured accurately. Make sure to line up centerline of template to centerline on hood. The best way to achieve this is to cut out two triangles along the centerline. One at the rear of the template and one at the rear of the shaker hole outline. (As Shown Below)
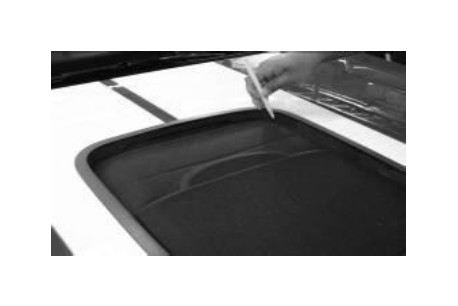
D) With a sharp razor blade or x-acto knife cut through template, through the tape, and into the paint of your hood. Cutting/scoring the paint on the hood will reduce the chance of paint flake during the cutting process.
E) Remove template from hood and discard. Peel tape from center of Shaker opening, leaving an outline of Shaker opening.
Caution: Add a second layer of tape around opening to reduce the risk of shavings scratching the hood.
Note: During the drilling and cutting process, elevate the hood far enough to ensure no damage will occur to engine components. Place a blanket over engine to catch metal shavings.
F) Center punch and drill a starter hole for Shaker opening with a 1” hole saw. Cut Shaker opening, following the outline. Hint: Stop cutting half way around opening and place masking tape over cut line for support; this will help prevent some vibration while you finish the cutting process.
G) Remove tape from hood. Clean area of hood around the cut opening with Isopropyl (rubbing) Alcohol where Upper Trim Ring will be placed. It is imperative that any wax be removed from the vehicle at the tape contact area for proper adhesion of Trim Ring.
H) Raise and prop hood.
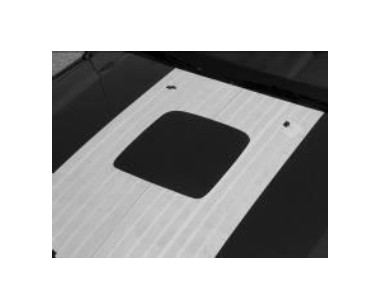
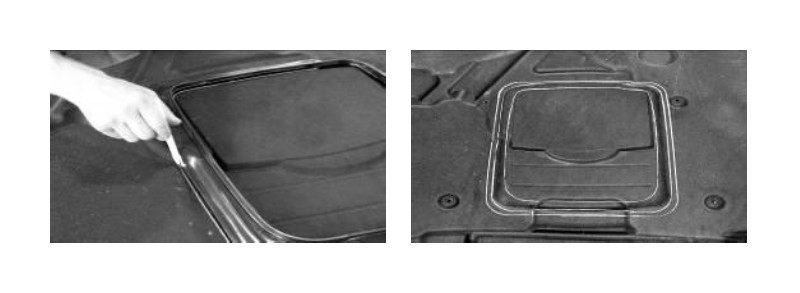
I) Temporarily reinstall hood blanket to bottom of hood using original fasteners. Temporarily place (DO NOT TAPE) Upper Hood Trim Ring onto hood and trace inside of Upper Trim Ring on to the hood blanket. Remove Trim Ring and hood blanket. Set Trim Ring aside until later and set hood blanket on bench. (A white grease pencil works best.)
J) With the hood blanket on the bench, line up the Lower Trim Ring (part # 115050) with the line traced from the upper. Now trace the outside of the Lower Trim Ring onto the hood blanket. Note: Trim Ring will follow contour of the hood blanket when properly positioned, the hump is toward the rear. Remove Lower Trim Ring and measure ½” from the outer line toward the center of the hood blanket and mark one more line, this is the line you will cut using a sharp blade.
K) Cut opening in Hood Blanket.
L) Reinstall hood blanket with factory retainers.
Installing Shaker:
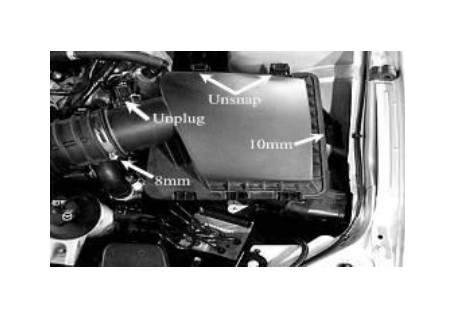
A) Remove filter housing from vehicle. Unplug Mass Airflow Sensor at this time.
B) Slightly bend the oil dipstick tube toward the driver side wheel to create clearance for the engine cover.
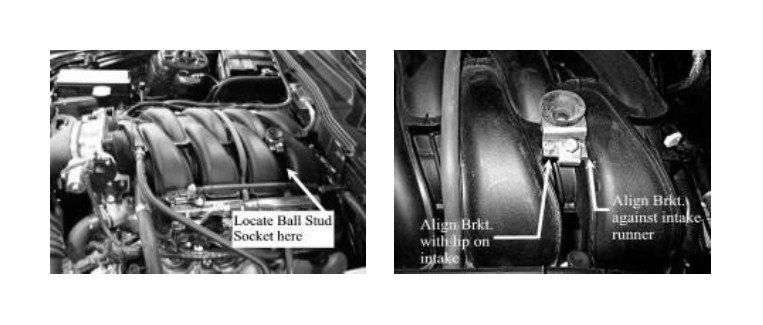
C) Mount the Ball Stud Socket Bracket with Socket (part # 116055) to the intake manifold with the U-Clamp (part # 116054). Use Thread Locker on the setscrew. Align the edges of the Socket Bracket as show in Figures below.
Note: For optimal fitment of “U” clamp, depending on the build date of your vehicle, some cars require trimming of the lip from the bottom side of the intake manifold with a razor blade, this will allow the clamp to fit flat against the manifold.
D) Relocate the screw location of the factory air inlet clamp at the throttle body. Loosen the clamp screw and cut off the rubber knobs on the air inlet tube (top and bottom of tube), allowing the clamp to rotate counter clockwise. Rotating this clamp allows clearance needed for the engine cover.
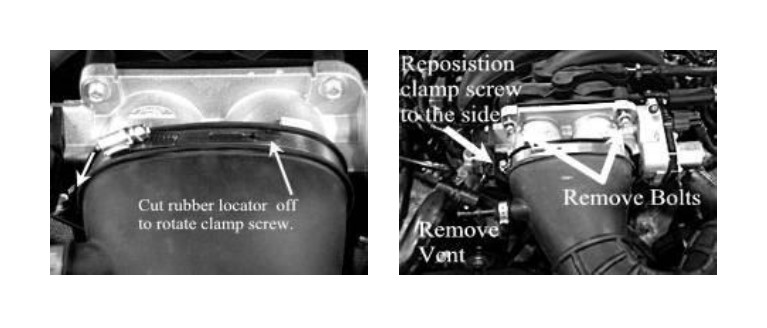
E) Remove the two upper bolts securing the throttle body to the intake manifold and unplug vent tube from the air inlet.
F) Attach the 4 Drain tubes (part# 183027) to the engine cover and secure them with the supplied Zip Ties (Part# 116053).
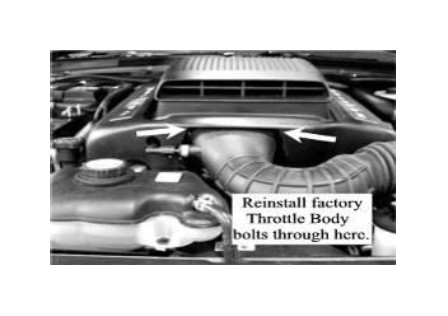
G) Install the Engine Cover Assembly onto the intake manifold. IMPORTANT: Route drain tubes away from moving parts and hot surfaces! Place the Ball Stud mounted to bottom of the Engine Cover, into the Ball Stud Socket. Run the factory throttle body bolts through the front Engine Cover Bracket, through throttle body and into their factory locations; torque to 89 lb-in. Route the vent tube through passenger side hole on the front of Engine Cover and plug into its factory position on the air inlet tube. Route the Mass Air Flow Sensor connector through the hole on driver side cover.
Cut hole in air box:
A) Using the Air Box Template, mark and cut the hole in the lower air box.
B) Snap Lower Air Tube (part #115053) into air box.
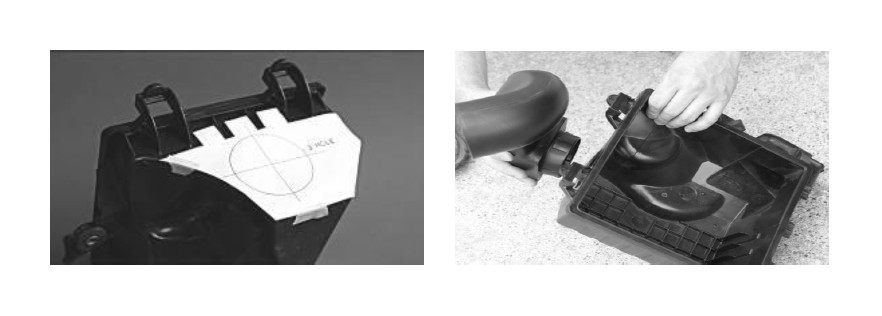
Caution: It is very important that the hole in the air box is precisely cut to 3”. We recommend using a 2 ¾” hole saw, then file by hand to achieve proper diameter.
C) Re-install Factory Air Filter into factory air box.
D) Reinstall air filter housing top onto factory air box and snap locking tabs into place.
E) Reinstall air filter housing into vehicle.
F) Reconnect Mass Air Flow connector to sensor and factory air inlet to air filter housing.
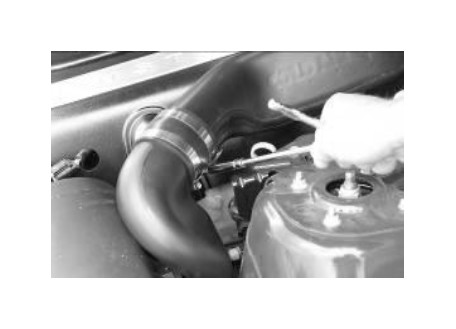
G) Place the 3” Coupler with clamps (part #115056) onto Upper Air Tube (part #115054).
NOTE: Remove the inner spacer from the 3” Coupler BEFORE installation; it is not needed in this application.
H) Slide Coupler half way over Lower Air Tube (part #115053), and tighten clamps.
I) Verify Drain Tubes (part #115058) are routed and away from moving parts and hot surfaces.
Installing the trim ring:
A) Apply 3m Acrylic Bonding tape (part #950011) to bottom side of Upper Trim Ring. Sand area with 80- 120 grit sand paper, clean with supplied Alcohol pack and allow time to dry, apply supplied Adhesion Promoter and allow time to dry, apply 3m tape. Press on tape with fingertips to set tape.
B) Peel 3”-4” of the red backing from the Upper Trim Ring (part # 115051) and place in hood opening. Make sure to have the trim ring facing the correct way, the notches in the part face the rear of the hood on both upper and lower Trim Rings.

C) Line up trim ring with the shaker hood scoop. When proper placement is achieved, finish peeling the red backing from acrylic bonding tape and press on trim ring to set tape to hood.
D) Install the Lower Trim Ring onto the Upper Ring flange, squeeze until trim rings snap together. The Lower Trim Ring will hold the hood blanket in place around the opening.
E) There are two 3/32” holes that are predrilled in the front and rear of the Upper and Lower Trim Rings (4 total). Use #183011 rivets to secure the Upper and Lower Trim Rings together.
Congratulations your installation is complete!