 FREE 1 to 3-Day Delivery on Orders $149+ Details
How to Install Cervini's Stalker Body Kit - Unpainted (05-09 GT, V6) on your Ford Mustang
Notice: Pre fi t Before Painting. Install new, unpainted parts according to these instructions. Then remove parts, paint them and re-install.
Painted or Altered Parts are Non-Refundable!
The surface that is in contact with the 3M 2-sided tape must be cleaned with isopropyl alcohol & the temperature must be a minimum of 75 degrees F, before applying . Allow the 2-sided tape to dry 24 hours before driving.
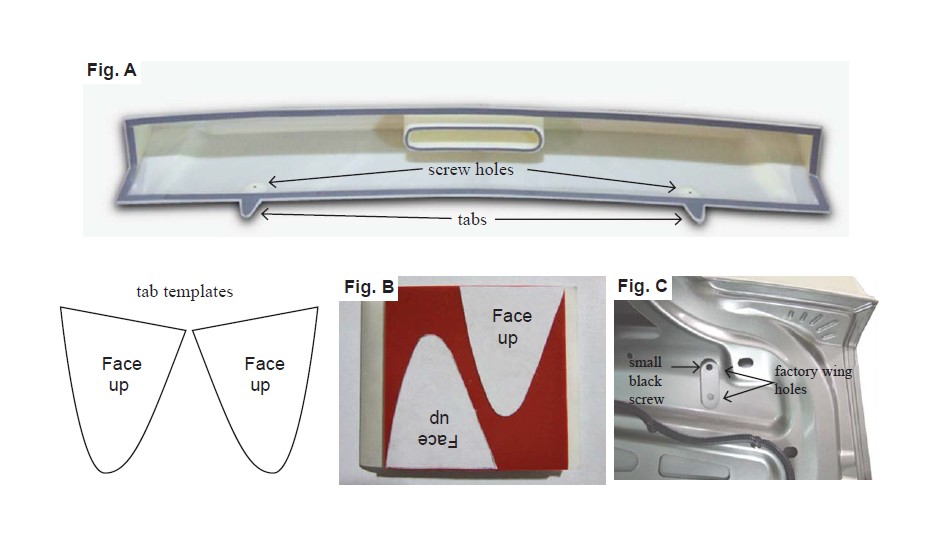
Pre-fi tting the headlights: Remove the front bumper and headlights from the car. The headlights are relocated to fi t in the stalker bumper and some cutting is involved. Cut out templates A and tape them to the corner of the impact bar as shown in fi g.A. Then, trace the out side edge of the template and cut it out with a saw-zaw as shown in fi g.B. This will allow the corner of the headlight to clear the impact bar. Cut out templates B and tape them to the top mounting point of each headlight as shown in fi g.C. Use a razor knife to score the plastic mounting tab along the edge of the template and snap off the excess peice as shown in fi g.D. This will allow the top mounting bracket to clear the radiator support.


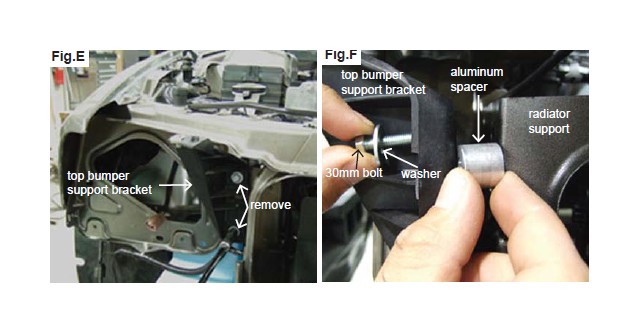
Relocating the headlights: Remove the left and right top bumper support brackets as shown in fi g.E. Then, use the supplied 30mm bolts , washers, and aluminum spacers to secure the top bumper support brackets to the opposite side of the car that they came off of as shown in fi g.F. (Put the left bracket on the right side of the radiator support and the right bracket on the left side of the radiator support.)
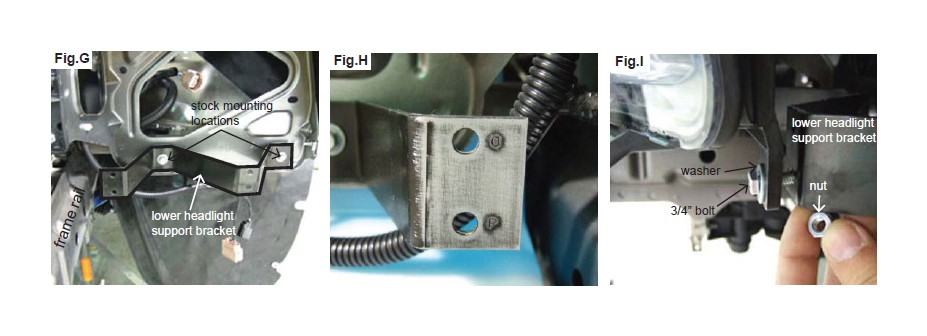
Use the factory headlight bolts to install the supplied lower headlight brackets to the factory lower headlight mounting points as shown in fi g.G. The two holes where the bottom of the headlight mounts to the bracket are stamped “D” for driver and “P” for passenger as shown in fi g.H. Use the supplied 3/4” bolts, washers, and nuts to secure the bottom of the headlight to the lower holes in the headlight bracket as shown in fi g.I. The stamping should match the side you are working on.
With the bottom of the headlight bolted to the bracket, use the supplied 10mm bolts and washers to secure the top of the headlight to the upper headlight mounting bracket. Push the bracket to the radiator support and mark the mounting holes with a marker as shown in fi g.J. (With the bottom of the headlight bolted to the bottom bracket, the top of the light will aline itself to the proper location on the radiator support.) Drill the marked holes out with a 1/8” drill bit as shown in fi g. K. To aviod drilling into the headlight remove it before drilling. After the holes have been drilled, use the supplied small black rivets to secure the upper mounting bracket to the radiator support.

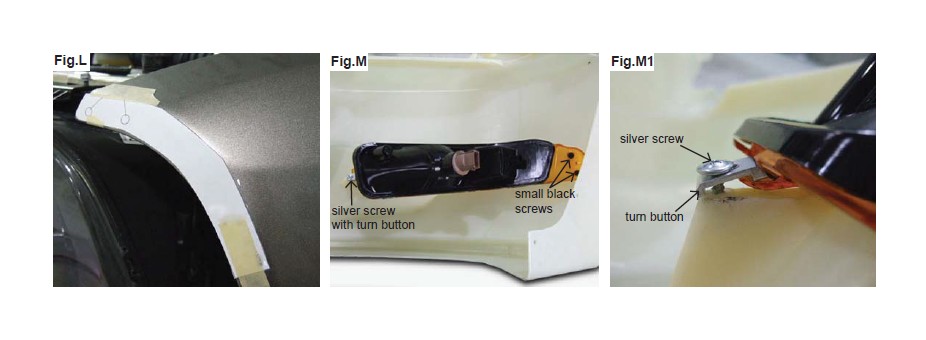
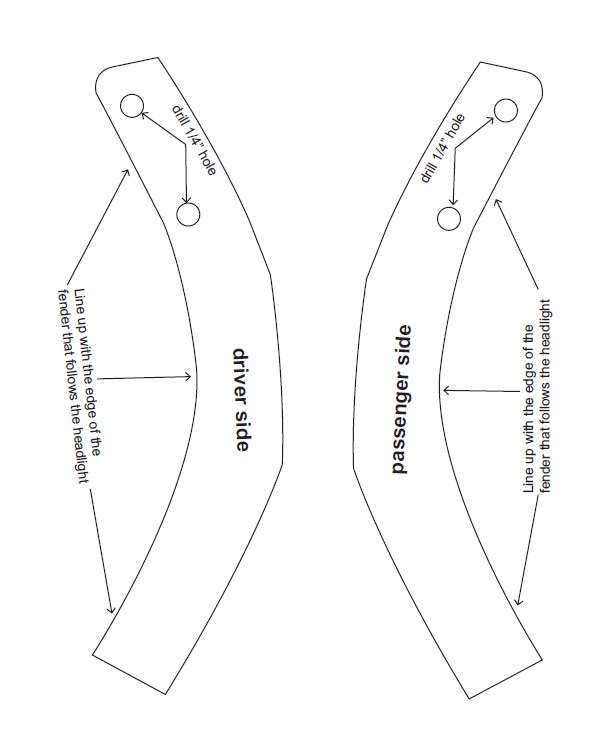
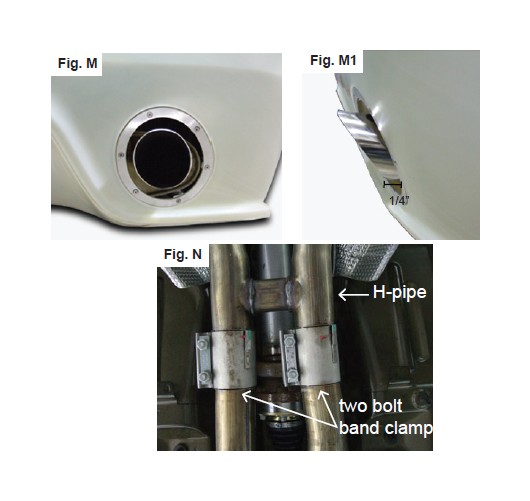
Pre-fi tting the front bumper: Cut out template C and tape it to the front of the fender as shown in fi g.L. Drill a 1/4” hole in the marked locations. Repeat the procces for the other fender. Next, install the marker lights from the factory bumper into the stalker bumper. Use two small black screws on the outside edge of the marker light and a silver screw with a turn button on the inside edge of the light as shown in fi g.M and fi g.M1.
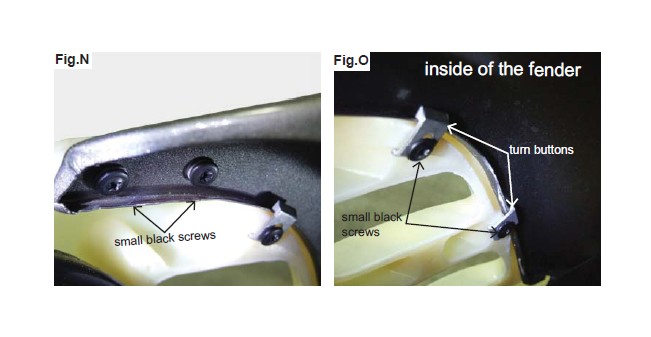
Reuse the factory hardware to install the bumper to the car. Use two small black screws to secure the top of the bumper to the fender throught the pre-drilled 1/4” holes in the fender as shown in fi g.N. Then, use two small black screws with two turn buttons to secure the outer edge of the bumper to the fender as shown in fi g.O.
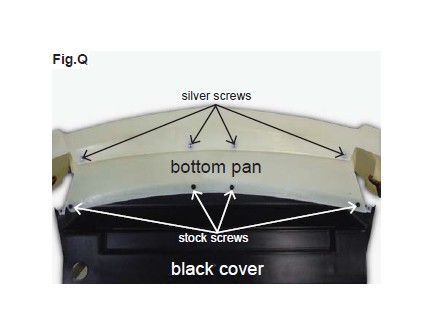
Install four speed nuts to the to the bottom pan as shown in fi g. P. Use four silver screws to install the bottom pan to the bumper. Screw the stock black cover to the bottom pan with the factory hardware as shown in fi g.Q. (The two end screw locations on the bottom pan do not match up with the stock screw holes in the black cover. Install the two middel screws fi rst. Then drill a 1/4” hole in the black cover through the pre-drilled holes in the bottom pan. Install two speed nuts to the black cover and secure it to the bottom pan.) Remove the bumper and paint it. Paint the bottom pan fl at black or semi gloss black.

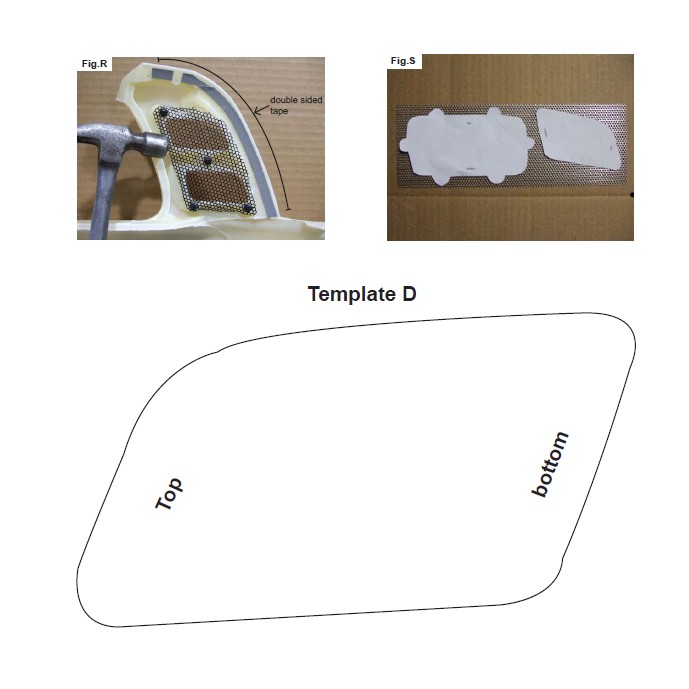
Final installation of the bumper: After the bumper has been painted, install the provided 3M double sided tape along the guidlines an 1/8” away from the outer edge of the bumper as shown in fi g.R. Do this to both sides of the bumper. Cut out template D and the template for the hood screens and tape it to the preferated screen as shown in fi g.S. Trace the out side edge of the template with a marker and cut it out of the screen with a pair of tin snips. Do this to both screens. After both screens are cut out, paint them fl at black or semi gloss black. Use the provided small black screws to install the screen to the bumper as shown in fi g.R. With a hammer, gently tap the the edges of the screen around the opening. Follow the same procedure as test fi tting the bumper to install the bumper to the car. Peel and fold about 2” of the red backing from each piece of tape, then place the bumper on the car so that the red backing is exposed and can be pulled. (This will allow you to get the best possible alignment of the part.) Pull the backing slowly. After all the backing is removed, fi rmly press the edges of the bumper to securly adhere the tape.
Template C
URETHANE PAINTING INSTRUCTIONS
VERY IMPORTANT: The following painting procedures MUST be followed EXACTLY for PROPER ADHESION and to prevent fi sh eyes.
1. To remove any mold release contaminants, clean the back of the part fi rst. Using 2 new clean rags, saturate the fi rst rag with plastic prep cleaner* and begin cleaning. Then use the second rag to remove the prep cleaner. Continuously fold both rags to their clean sides during the process. Use 3 sets of new rags throughout the process. This prevents mold release contaminants from transferring to the painted surface.
2. Repeat step one on the front of the part.
3. Rinse the part with water. Apply a generous amount of Ajax® or sand fi x* to a red scuff pad* (3M Scotch Brite Brand) and scrub the surface to be painted THOROUGHLY (especially where the 2-sided tape is installed, on the back side of the part, and all the hard to reach areas). Then rinse with water and dry. The scrubbed surface should be dull. If any shiny spots show, repeat the process on those areas.
4. Using another set of clean new rags, again clean the surface to be painted with plastic prep cleaner.
5. Spray the surface to be painted with adhesion promoter* including the areas where the 2-sided tape is installed (follow the instructions on the can for application and drying time).
6. Apply 3 to 4 coats of urethane primer* with fl ex additive* (follow the instructions on the can for application and drying time).
7. Wet sand primer with 600 grit sandpaper. Be careful not to sand through the primer. If you do, you MUST clean those areas with plastic prep cleaner, apply adhesion promoter and prime. Once the primer has dried, wet sand the areas that were touched up. Your surface is now ready for paint.
* These items can be purchased at any auto body supply store.
Note: Make sure you PRIME and PAINT the areas where the 2-sided tape is used as you would if it was the outside of the part. The tape has its best adehsion when it is applyed to a painted surface.
Notice: Prefi t Before Painting! Install new, unpainted parts according to these instructions! Then remove parts, paint them and re-install.
Painted or Altered Parts are Non-Refundable!
The surface that is in contact with the 3M 2-sided tape must be cleaned with isopropyl alcohol & the temperature must be a minimum of 75 degrees F, before applying! Allow the 2-sided tape to dry 24 hours before driving.
Pre-fi tting the trunk and quarter extensions: If you have a factory trunk wing, it will need to be removed. This wing is designed to cover the holes in the trunk. (If you do not like the tabs on the wing you can cut them off. But, you will have fi ll in the front two wing holes and paint the trunk.) Hold the trunk extension in place and check the alignment from the left to the right. Hold the quarter extensions in place and check the alignment with the quarter panel, rear bumper and trunk extension gap.
Step 1, Installing the trunk wing: After the trunk extension has been painted, install the 1/2” 3m double sided tape along the guidelines an 1/8” away from the outer edge of the part and use the 1/4” double sided tape along the brake light opening as shown in fi g A. Use the supplied template to cut out two tab pieces, on one of the 2x2 blocks of double sided tape as shown in fi g B. Peel and fold about 2” of the red backing from the ends of each piece of tape. Place the trunk extension on the trunk so that the backing is exposed and can be pulled. (This will allow you to get the best alignment of the part.) Pull the backing slowly. After all the backing is removed, fi rmly press the edges of the extension to securely adhere the tape. Open the trunk and install the small black screws through the factory wing holes into the pre drilled holes in the trunk extensions as shown in fi g C.
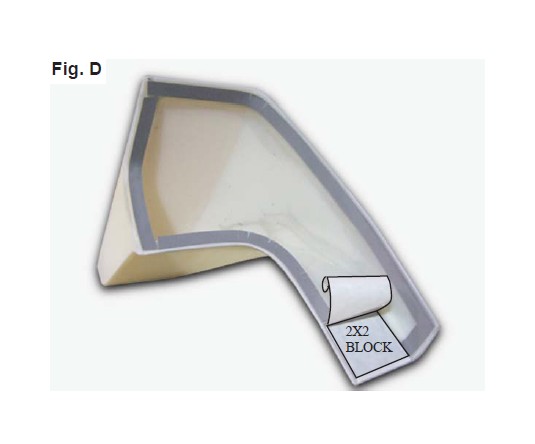
Step 2, installing the quarter extensions: After the quarter extensions have been painted, install the 3M double sided tape along the guidelines an 1/8” away from the outer edge of the part. Use the 2x2 block of double sided tape on the bottom of the quarter extension as shown in fi g D. Peel and fold about 2” of the red backing from each piece of tape, also fold the backing from each square of the tape. Then, place the trunk extension on the quarter panel so that the backing is exposed and can be pulled. (This will allow you to get the best alignment of the part.) Pull the backing slowly. After all the backing is removed, fi rmly press the edges of the extension to securely adhere the tape.
URETHANE PAINTING INSTRUCTIONS
VERY IMPORTANT: The following painting procedures MUST be followed EXACTLY for PROPER ADHESION and to prevent fi sh eyes.
1. To remove any mold release contaminants, clean the back of the part fi rst. Using 2 new clean rags, saturate the fi rst rag with plastic prep cleaner* and begin cleaning. Then use the second rag to remove the prep cleaner. Continuously fold both rags to their clean sides during the process. Use 3 sets of new rags throughout the process. This prevents mold release contaminants from transferring to the painted surface.
2. Repeat step one on the front of the part.
3. Rinse the part with water. Apply a generous amount of Ajax® or sand fi x* to a red scuff pad* (3M Scotch Brite Brand) and scrub the surface to be painted THOROUGHLY (especially where the 2-sided tape is installed, on the back side of the part, and all the hard to reach areas). Then rinse with water and dry. The scrubbed surface should be dull. If any shiny spots show, repeat the process on those areas.
4. Using another set of clean new rags, again clean the surface to be painted with plastic prep cleaner.
5. Spray the surface to be painted with adhesion promoter* including the areas where the 2-sided tape is installed (follow the instructions on the can for application and drying time).
6. Apply 3 to 4 coats of urethane primer* with fl ex additive* (follow the instructions on the can for application and drying time).
7. Wet sand primer with 600 grit sandpaper. Be careful not to sand through the primer. If you do, you MUST clean those areas with plastic prep cleaner, apply adhesion promoter and prime. Once the primer has dried, wet sand the areas that were touched up. Your surface is now ready for paint.
* These items can be purchased at any auto body supply store.
Note: Make sure you PRIME and PAINT the areas where the 2-sided tape is used as you would if it was the outside of the part. The tape has its best adehsion when it is applyed to a painted surface.
Notice: Prefi t Before Painting. Install new, unpainted parts according to these instructions. Then remove parts, paint them and re-install.
Painted or Altered Parts are Non-Refundable
The surface that is in contact with the 3M 2-sided tape must be cleaned with isopropyl alcohol & the temperature must be a minimum of 75 degrees F, before applying . Allow the 2-sided tape to dry 24 hours before driving.
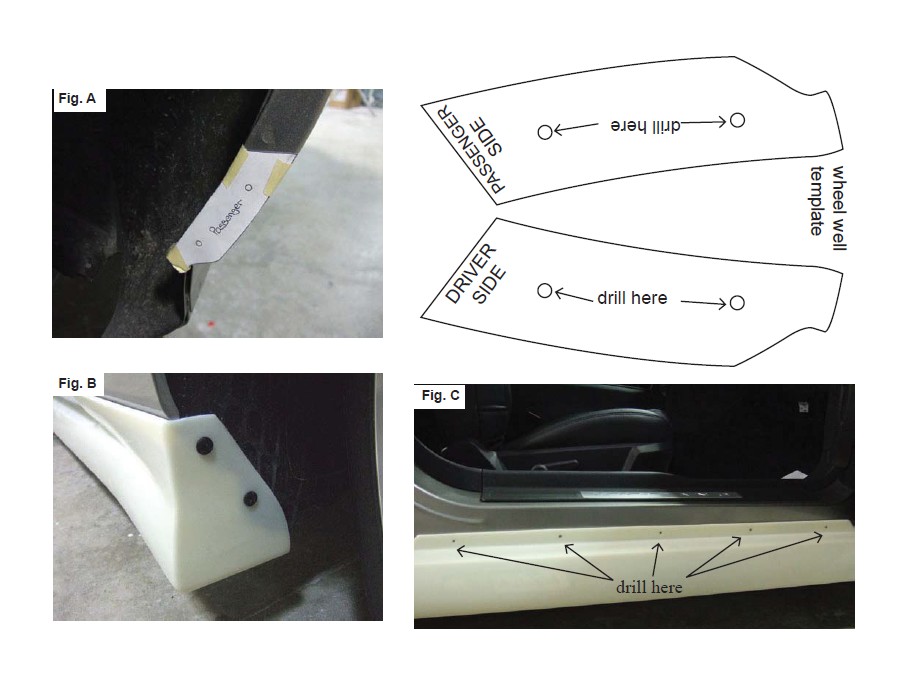
Pre-fi tting the side skirts: Remove the factory side skirts and the plastic clips that hold them in place. Tape the supplied template to the inside of the rear wheel well, in front of the rear tire and drill an 1/8” hole in the marked locations as shown in fi g. A. Hold the new side skirt in place and install the factory plastic retaners in the front wheel well as shown in fi g. B. Use the provided small black screws to secure the back end of the side skirt to the pre-drilled holes in the rear wheel well. ( Do not tighten the screws at this time.) With the inside mounting fl ange touching the rocker there should be a 1/4” gap from the bottom of the door to the side skirt. While holding the side skirt in place open the door and drill a 1/8” hole through the existing holes in the mounting fl ange as shown in fi g. C. After the holes have been drilled install the small black screws provided in the hardware packet. ( Do not tighten the screws at this time.)
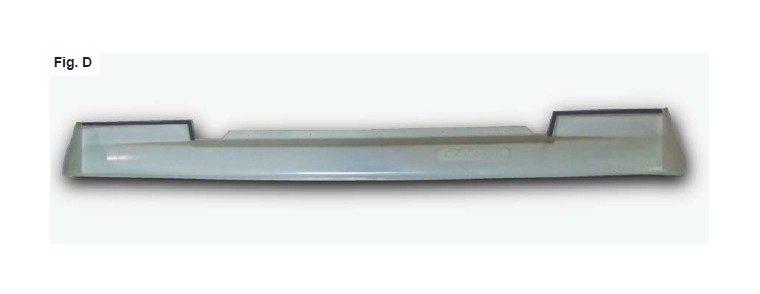
Installing the side skirts: Included in the hardware packet is a roll of 3M 2-sided tape. After the side skirts have been painted, install the 3m 2-sided tape along the guidelines an 1/8” away from the outer edge of the part as shown in fi g D. Peel and fold about 2” of the red backing from each end of each piece of tape, then place the side skirt on the car so that the red backing is exposed and can be pulled. Next, follow the same procedure as you did when you where test fi tting the side skirts.Pull the backing slowly. After all the backing is removed, fi rmly press the edges of the side skirt to securely adhere the tape. Tighten all screws at this time.
PAINTING INSTRUCTIONS
VERY IMPORTANT: The following painting procedures MUST be followed EXACTLY for PROPER ADHESION and to prevent fi sh eyes.
1. To remove any mold release contaminants, clean the back of the part fi rst. Using 2 new clean rags, saturate the fi rst rag with plastic prep cleaner* and begin cleaning. Then use the second rag to remove the prep cleaner. Continuously fold both rags to their clean sides during the process. Use 3 sets of new rags throughout the process. This prevents mold release contaminants from transferring to the painted surface.
2. Repeat step one on the front of the part.
3. Rinse the part with water. Apply a generous amount of Ajax® or sand fi x* to a red scuff pad* (3M Scotch Brite Brand) and scrub the surface to be painted THOROUGHLY (especially where the 2-sided tape is installed, on the back side of the part, and all the hard to reach areas). Then rinse with water and dry. The scrubbed surface should be dull. If any shiny spots show, repeat the process on those areas.
4. Using another set of clean new rags, again clean the surface to be painted with plastic prep cleaner.
5. Spray the surface to be painted with adhesion promoter* including the areas where the 2-sided tape is installed (follow the instructions on the can for application and drying time).
6. Apply 3 to 4 coats of urethane primer* with fl ex additive* (follow the instructions on the can for application and drying time).
7. Wet sand primer with 600 grit sandpaper. Be careful not to sand through the primer. If you do, you MUST clean those areas with plastic prep cleaner, apply adhesion promoter and prime. Once the primer has dried, wet sand the areas that were touched up. Your surface is now ready for paint.
* These items can be purchased at any auto body supply store.
Notice: Pre fi t Before Painting! Then remove parts, paint them and re-install.
Painted or Altered Parts are Non-Refundable!
The surface that is in contact with the 3M 2-sided tape must be cleaned with isopropyl alcohol & the temperature must be a minimum of 75 degrees F, before applying . Allow the 2-sided tape to dry 24 hours before driving.
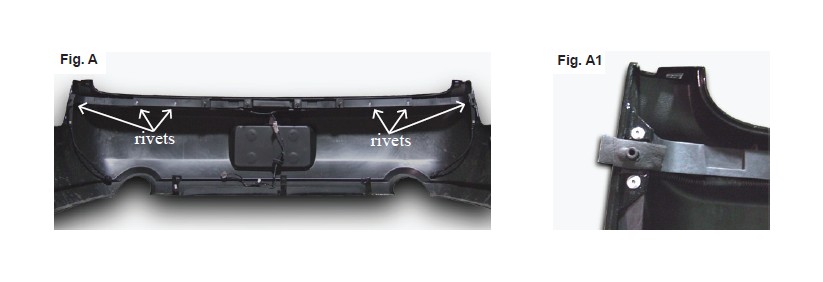
Pre-fi tting the rear bumper: Remove the rear bumper from the car. Next, remove the parking lights and the tag light with the wire harness. (The tag light and wire harness do not get reused.) Remove the stud mounting bracket from the bumper, use a 3/16” drill bit to drill out the four visible rivets and the two rivets under the foam gaskets as shown in fi g.A and fi g.A1.
Reinstall the marker lights and stud mounting bracket to the Stalker rear bumper. Use the supplied silver rivets to install the stud mounting bracket as shown in fi g.B. Remove the muffl er hanger bracket that holds the rear end of the muffl ers to the car. Cut out the supplied template and tape it to the hanger as shown in fi g.C. Drill a 11/32” hole in the marked location. Remove the excess rubber from the drilled area and install the supplied threaded U-clip, H-plate, and 1” bolt as shown in fi g. D. Use low or medium strength Loctite to keep the bolt from loosening do to vibration. (Do this to both sides.) This will allow the exhaust tip to move up and help center it in the exhaust opening. Reinstall the muffl er hangers on the car.
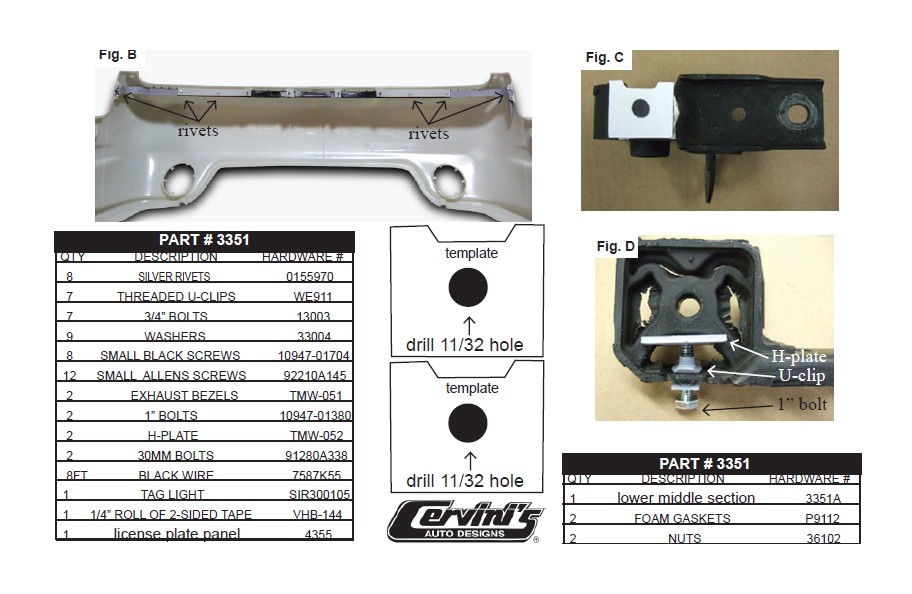
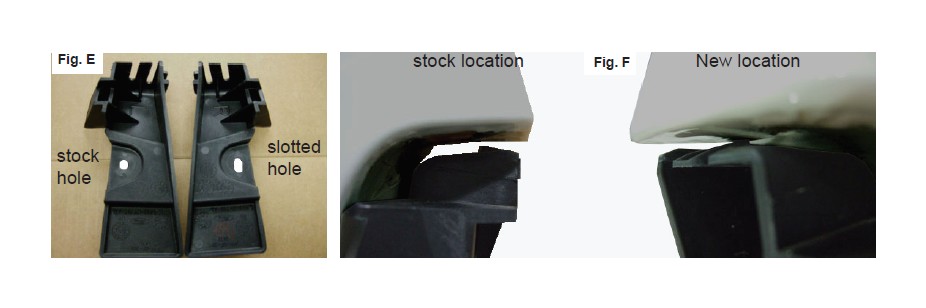
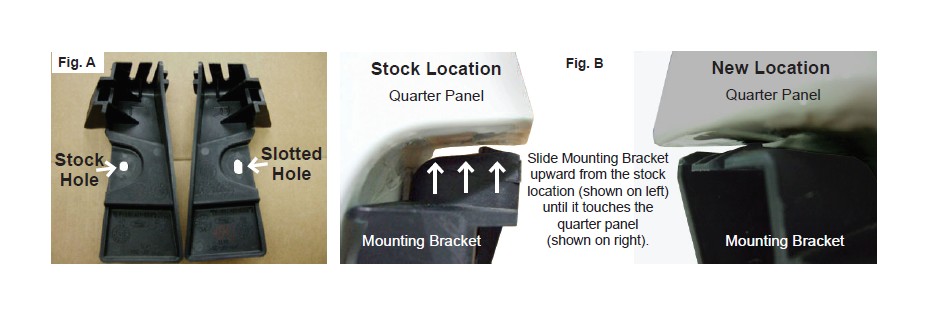
Modifying the bumper brackets: Remove the two bumper brackets that hold the top corners of the bumper to the car. Use a bur tool to slot the mounting hole on each bracket about an 1/8” down as shown in fi g.E. (The hole has to be slotted enough to slide the bracket up and touch the quarter panel.) Reinstall the mounting brackets to the car so that the bracket touches the quarter panel as shown in fi g.F.
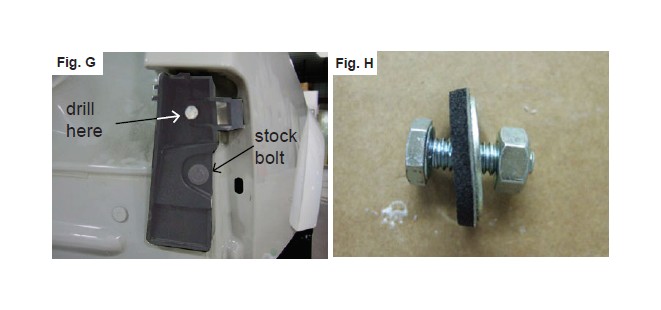
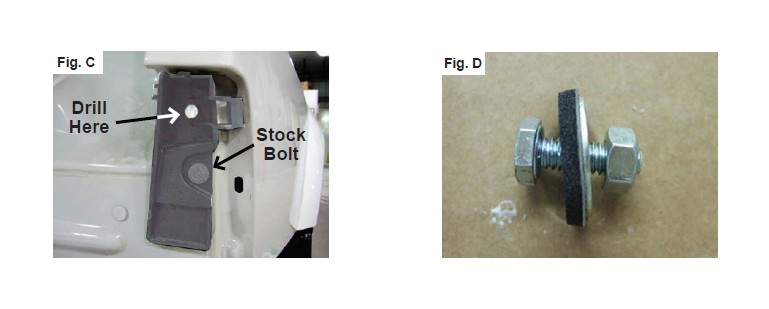
To keep the top of the bracket from pulling away from the car use a 1/4” drill bit to drill through the top of the bracket into the car as shown in fi g.G. Center the hole between the support ribs and sides. It should go through the L or R depending on what side you are on. Install the supplied bolt, washer, foam gasket, and nut, as shown in fi g.H. (The foam gasket and washer go on the inside of the trunk.) Then, reinstall the bumper.
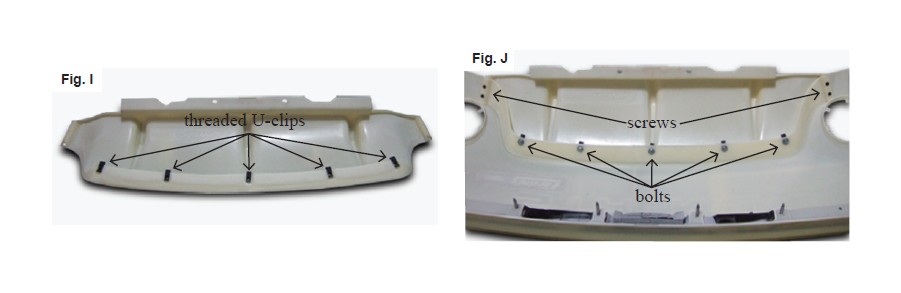
Assembling the rear bumper: Install the fi ve threaded U-clips on the lower middle section of the bumper as shown in fi g.I. Place the lower middle section in the bottom of the bumper. Use the suppled 3/4” bolts and washers to bolt the middle section to the bumper. Then, install the small black screws to the ends of the middle section through the pre drilled holes in the bumper as shown in fi g.J.
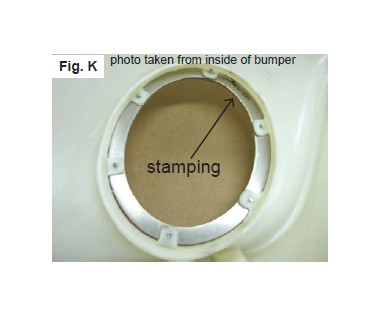
Use the small allen head screws to install the exhaust trim rings. The stamping in the back of the trim ring goes towards the top of the bumper as shown in fi g.K. (The trim ring is designed to be used with an exhaust tip 2-1/2” in diameter or smaller. If you have an exhaust tip that is bigger than 2-1/2” in diameter it is necessary to cut the taps off the bumper and sand the area smooth. To cut the tabs off, score it with a razor knife and bend the tab back. This will give you proper clearance around the exhaust tip.) With the bumper assembled, test fi t it to the car and center the exhaust tips in the exhaust openings. Refer to the adjusting the exhaust tip section. (Use the provided 10mm bolts, and washers to bolt the lower bumper to the canister assembly as shown in fi g.L.) After the bumper is test fi t and the exhaust tips alined, disassemble the bumper and paint it. (Paint the lower middle section of the bumper either semi-gloss black or fl at black.) Leave the stud mounting bracket in the bumper while painting.

Adjusting the exhaust tips: Align the exhaust tips in the bumper so that the tip is centerd in the exhaust opening and the bottom of the tip protrudes a 1/4” past the bumper as shown in fi g.M and fi g.M1. To adjust how far the tip protrudes past the bumper, loosen the two bolt band clamp that holds the exhaust pipe to the H-pipe as shown in fi g. N. Pull the pipe out until you get the proper alignment. Also, you can rotate the pipe left or right to help center the exhaust tip.
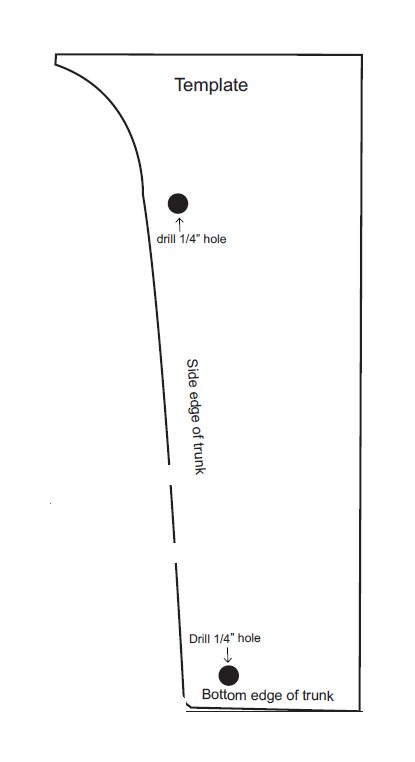
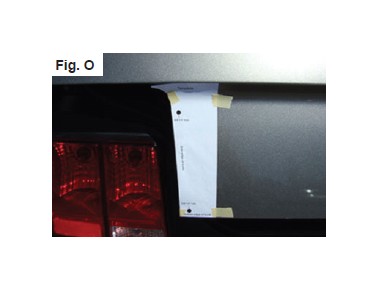
Pre-fi tting the licence plate panel: Remove the trunk interior panels, latch cover, and the mustang badge from the trunk lid. Cut out the supplied template and aline it with the bottom and side edges of the trunk as shown in fi g.O. Drill a 1/4” hole in the marked locations. Then, fl ip the template over and repeat the procedure for the other side of the trunk. Install the supplied tag light to the license plate panel with the provided hardware that comes with the tag light. (You do not have to drill these holes. The provided screws will tap themselves into the plastic.) Test fi t the license plate panel to the trunk lid. Remove the tag light and paint the panel either semi-gloss black or fl at black.
Final installation of the rear bumper: After the bumper has been painted, paint the exhaust openings from the bezel back with black spray paint as shown in fi g.P. This area can be seen when the bumper is on the car. Reassemble the bumper and install it on the car with the factory hardware.

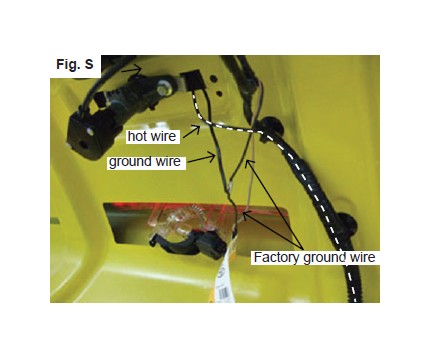
Installing the license plate panel: Included in the hardware packet is a roll of 3M double-sided tape. After the license plate panel has been painted, install the 3M double-sided tape along the guidelines an 1/8” away from the outer edge of the part and two strips down the middle of the part as shown in fi g. Q. (Before you go any further disconect the negative battery terminal.) In the hardware pack there is an eight foot role of wire, cut a ten inch piece off this wire. The smaller ten inch piece will be your ground wire and longer piece will be your hot wire. Reinstall the tag light and solder the two pieces of wire to the two wire leads from the tag light. (It does not matter witch wire is solderd to witch lead from the tag light.) Run the two wires through the right mustang badge hole in the trunk lid as shown in fi g.R.
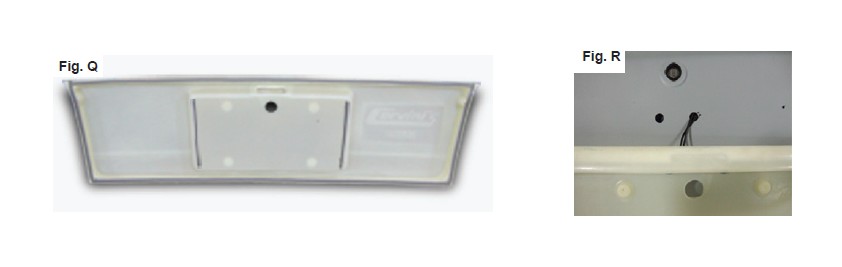
Pull the wires out the square hole on the under side of the trunk lid and connect the short wire (ground), to the black ground wire in the third brake light as shown in fi g.S. Push the long wire (hot), in the black wire loom and run it with the third brake light wire harness as shown in fi g.T. Run the rest of the wire underneath the back panel and drop it down towards the back seat as shown in fi g.U. Cut the light green wire with the dark green stripe in the wire harness that runs on the trunk fl oor and solder the new tag light wire to the factory tag light wire as shown in fi g.V. (This is the hot wire for the factory tag light.)

After the wires are soldered together and wraped with elctrical tape, peel and fold about 2” of the red backing from each end of each piece of tape. Then, center the license plate panel on the trunk so that the red backing is exposed and can be pulled. (This will allow you to get the best possible alignment of the part). Pull the tape backing slowly. After all the backing is removed, fi rmly press the edges of the license plate panel to securely adhere the tape. Screw the license plate panel to the trunk with four black screws.
URETHANE PAINTING INSTRUCTIONS
VERY IMPORTANT: The following painting procedures MUST be followed EXACTLY for PROPER ADHESION and to prevent fi sh eyes.
1. To remove any mold release contaminants, clean the back of the part fi rst. Using 2 new clean rags, saturate the fi rst rag with plastic prep cleaner* and begin cleaning. Then use the second rag to remove the prep cleaner. Continuously fold both rags to their clean sides during the process. Use 3 sets of new rags throughout the process. This prevents mold release contaminants from transferring to the painted surface.
2. Repeat step one on the front of the part.
3. Rinse the part with water. Apply a generous amount of Ajax® or sand fi x* to a red scuff pad* (3M Scotch Brite Brand) and scrub the surface to be painted THOROUGHLY (especially where the 2-sided tape is installed, on the back side of the part, and all the hard to reach areas). Then rinse with water and dry. The scrubbed surface should be dull. If any shiny spots show, repeat the process on those areas.
4. Using another set of clean new rags, again clean the surface to be painted with plastic prep cleaner.
5. Spray the surface to be painted with adhesion promoter* including the areas where the 2-sided tape is installed (follow the instructions on the can for application and drying time).
6. Apply 3 to 4 coats of urethane primer* with fl ex additive* (follow the instructions on the can for application and drying time).
7. Wet sand primer with 600 grit sandpaper. Be careful not to sand through the primer. If you do, you MUST clean those areas with plastic prep cleaner, apply adhesion promoter and prime. Once the primer has dried, wet sand the areas that were touched up. Your surface is now ready for paint.
* These items can be purchased at any auto body supply store.
Note: Make sure you PRIME and PAINT the areas where the 2-sided tape is used as you would if it was the outside of the part. The tape has its best adehsion when it is applyed to a painted surface.
Notice: Over time, the Ford Factory Brackets holding the bumper in place will not suffi ciently support the bumper. The stock supports need to be modifi ed to hold the bumper in the proper location.
Step 1: Remove the rear bumper and the interior trunk panel to access the area needed to be drilled.
Step 2: Remove the two bumper brackets that hold the top corners of the bumper to the car. Use a bur tool to slot the mounting hole on each bracket about an 1/8” down as shown in fig.A. (The hole has to be slotted enough to slide the bracket up to touch the quarter panel.)
Step 3: Reinstall the mounting brackets to the car so that the bracket touches the quarter panel as shown in fig.B.
Step 4: To keep the top of the bracket properly supported, use a 1/4” drill bit to drill through the bracket into the car as shown in fi g.C. Center the hole between the support ribs and sides. It should go through the L (Driver Side) or R (Passenger Side) depending on what side you are on. Install the supplied bolt, washer, foam gasket and nut, as shown in fi g.D. (The foam gasket and washer go on the inside of the trunk.) Reinstall the bumper.
Notice: Prefit Before Painting. Install new, unpainted parts according to these instructions. Then remove parts, paint them and re-install. Painted or Altered Parts are Non-Refundable
The surface that is in contact with the 3M 2-sided tape must be cleaned with isopropyl alcohol & the temperature must be a minimum of 75 degrees F, before applying . Allow the 2-sided tape to dry 24 hours before driving.
Installing the side scoops: Included in the hardware packet is a roll of 2-sided tape. After the side scoops have been painted, install the 3M 2-sided tape along the guideline 1/8” away from the outer edge as shown in fig A. Mask off the red backing and the front edge with 2” masking tape, leaving the center inside portion of the scoop exposed. Scuff the inside surface with a gray scuff pad and paint it with fl at black paint. Remove tape backing and press onto the car.

PAINTING INSTRUCTIONS
VERY IMPORTANT: The following painting procedures MUST be followed EXACTLY for PROPER ADHESION and to prevent fi sh eyes.
1. To remove any mold release contaminants, clean the back of the part fi rst. Using 2 new clean rags, saturate the fi rst rag with plastic prep cleaner* and begin cleaning. Then use the second rag to remove the prep cleaner. Continuously fold both rags to their clean sides during the process. Use 3 sets of new rags throughout the process. This prevents mold release contaminants from transferring to the painted surface.
2. Repeat step one on the front of the part.
3. Rinse the part with water. Apply a generous amount of Ajax® or sand fi x* to a red scuff pad* (3M Scotch Brite Brand) and scrub the surface to be painted THOROUGHLY (especially where the 2-sided tape is installed, on the back side of the part, and all the hard to reach areas). Then rinse with water and dry. The scrubbed surface should be dull. If any shiny spots show, repeat the process on those areas.
4. Using another set of clean new rags, again clean the surface to be painted with plastic prep cleaner.
5. Spray the surface to be painted with adhesion promoter* including the areas where the 2-sided tape is installed (follow the instructions on the can for application and drying time).
6. Apply 3 to 4 coats of urethane primer* with fl ex additive* (follow the instructions on the can for application and drying time).
7. Wet sand primer with 600 grit sandpaper. Be careful not to sand through the primer. If you do, you MUST clean those areas with plastic prep cleaner, apply adhesion promoter and prime. Once the primer has dried, wet sand the areas that were touched up. Your surface is now ready for paint.
* These items can be purchased at any auto body supply store.
