 FREE 1 to 3-Day Delivery on Orders $149+ Details
Competition Engineering Mustang Aluminum Transmission Crossmember Bushings ('79-'93) - Installation
Installation Time
1 days
Tools Required
- Heavy duty jack
- Jack stands
- 1/2 inch wrench
- 3/8 or 1/2 inch Socket wrench
- 1/2, 9/16 inch and 15mm sockets
- Rubber mallet or soft-blow hammer
- Anti-seize compound
- Pliers
- Disposable shop towel
- Air Wrench/Gun (Optional)
- Car Ramps (Optional)
Installation
1. Prep the Car. Park on a level spot, set the handbrake and take the keys out of the ignition. Using the jack, raise the car enough to access transmission from either side. Support the car on the jack stands and remove the jack (or lift the car using ramps). Block/ chock the rear tires.
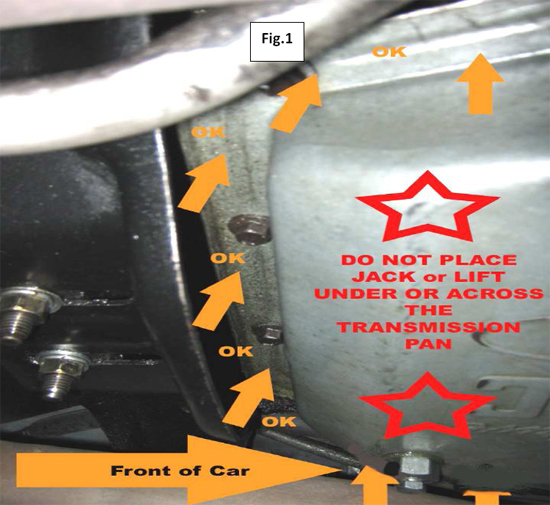
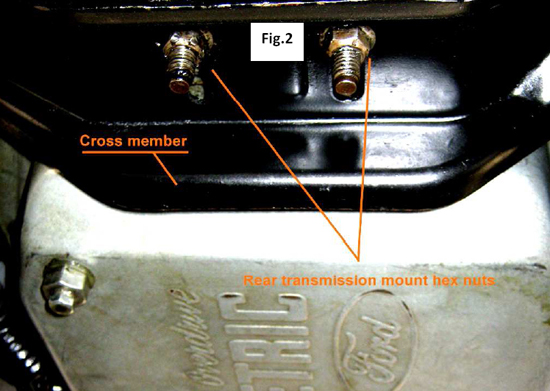
2. Place jack at the rear of transmission pan flange. Slowly, gently use a jack to lift the rear of the trans only enough to relieve pressure from the two rear mount nuts. (Fig.1) Using the 9/16” socket remove the rear trans mount nuts. (Fig.2)
3. Remove the transmission cross member support bolts. On either the passenger or driver’s side put the 1/2 inch wrench on the bolt head and the 15mm socket on the nut. After the nut is removed the bolt may need to be tapped out using a mallet at first, to break it free. Repeat this for the other side as well.
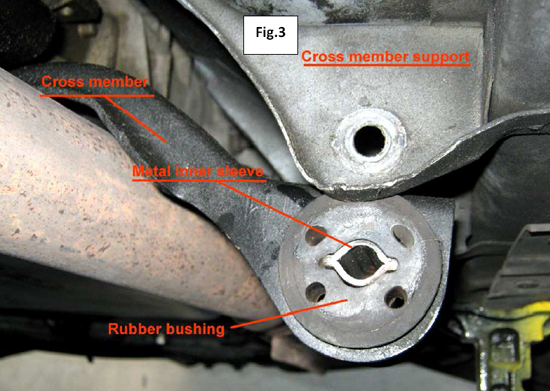
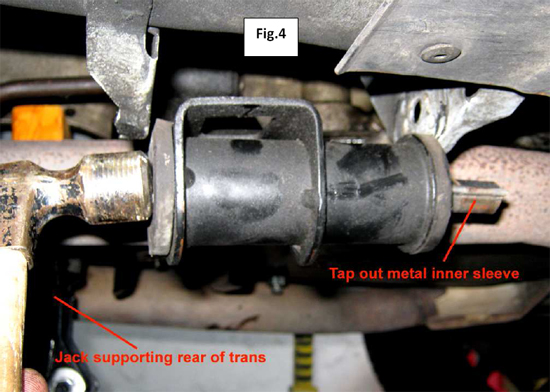
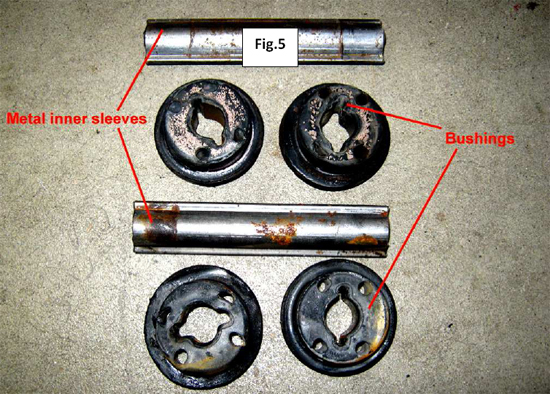
4. Remove the rubber bushings. The cross member should be detached from both the car and transmission at this point. Move to the passenger side of the car and pull down the cross member to access the bushings. You will need to tilt the cross member across the exhaust pipes somewhat, but in most cases, exhaust removal is not necessary. Tap out the metal inner sleeve then pull out the rubber bushings. (Figs. 3 and 4)
5. Push the passenger side of the cross member (minus bushings) up to the floor pan, this should help provide clearance for the driver’s side. Move to the driver’s side of the cross member, take out the inner sleeve and bushings. (Fig.5)
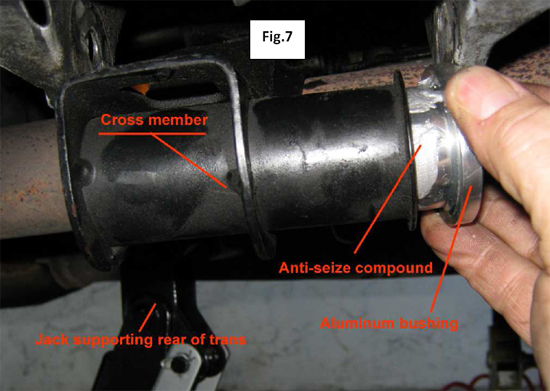
6. Install the Aluminum bushings. Wipe off the inner surface of the cross member where the bushings came out with a shop rag. (Fig.6) Apply some anti-seize compound to the outer surface of the smaller diameter area of the aluminum bushings.(Fig.7) Press or tap the aluminum bushing into the opening of the cross member until it is seated completely.(Fig.8) Once both bushings are installed in the cross member, push it up to align the bolt holes. Put the bolt through, spin the nut on a couple of turns to hold it all in place. (Fig.9) Move to the passenger side of the car; install the aluminum bushings, bolt and nut as was done on the driver’s side.
***NOTE: Be sure that the two rear transmission mount studs line up properly with the holes in the cross member.

7. Reattach the cross member to the rear transmission mount. With the cross member in place, install the two nuts that attach the rear trans mount. Using the 9/16 inch socket, torque these nuts to factory spec (5.0L engine = 35 LB-FT Max). Lower the jack allowing the full weight of the trans to rest on the cross member.
8. Tighten both cross member support bolts to factory spec (5.0L engine = 50 LB-FT Max). This will provide enough clamping force to hold tightly against the aluminum bushings.
9. Lower the car. With all bolts and nuts tightened, you can put the car back on the ground. *Remember to remove the tire blocks from the rear tires!
10. Congratulations, you’re finished! The installation of Competition Engineering’s Aluminum cross member bushings provided the car with added chassis stiffness resulting in better power transfer. This means more consistent E.T.’s for the drag strip and better handling on the street. Convertible models will see a dramatic improvement overall. My car feels tighter, more responsive and more predictable at turn- in. Simply put, I feel much more connected to the road.
Installation instructions provided by AmericanMuscle customer Curt Calfee 3.17.10
Related Guides
-
Installation
-
Installation
-
Installation
