 FREE 1 to 3-Day Delivery on Orders $149+ Details
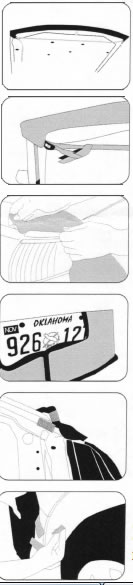
How to Install a CoverCraft Bra on your 2003-2004 Mustang Cobra
Installation

Note: Before installation, carefully read the enclosed instruction sheet (form 2327001). Note all warnings, recommendations and cleaning instructions.
1. Open hood, install hood piece.
2. Thread webbing strap through buckles/cover hooks as provided.
3. Remove front license plate flap if necessary.
4. Align mask around driver's side headlight.
5. Attach with pocket and/or adhesive backed hook strip.
6. Attach hook backed trim lock or adhesive backed hook strip to wheel well.
General Installation Instructions for "M" series and "MM" series mask, plus usage and care instructions and cautions.
We manufacture thousands of mask patterns for various years, makes and models of vehicles. This instruction sheet is designed to cover all aspects of the various attachment methods. Not all procedures will apply to your specific vehicle. Please read each segment carefully to determine what procedures apply to your specific application.
NOTE: PLEASE READ THESE INSTRUCTIONS CAREFULLY BEFORE ATTEMPTING TO INSTALL YOUR NEW MASK. COVERCRAFT WILL NOT BE RESPONSIBLE OR LIABLE FOR ANY DAMAGE RESULTING FROM THE FAILURE TO FOLLOW THE DIRECTIONS AND OR RECOMMENDATIONS GIVEN.
GENERAL INFORMATION
These instructions are written to describe the installation procedures while you are standing at the front, facing the vehicle. The driver's side is your RIGHT and the passenger's side will be your LEFT.
Your new mask is constructed from a "breathable" vinyl material. Vinyls are affected by weather conditions. Allow the mask to sit in the sun or other warm location, (ABOVE 80 DEGREES FAHRENHEIT), for a few minutes. This will allow the vinyl to soften and stretch, resulting in a properly tight fit as the mask cools after installation.
NOTE: In cooler climates it may be necessary to use a heater, hair dryer or other method to warm up the mask.
DO NOT PUT IN MICROWAVE OVENS. DO NOT PLACE THE MASK DIRECTLY ON A HEATER.
Make sure your vehicle is free from dirt before installing the mask. For best results, apply a heavy coat of wax to the surface of the vehicle in areas the mask will cover. A good polymer wax provides a clean, smooth surface for the mask. Pre-waxing and periodically renewing this coat of wax, will maximize the protection from your new mask.
WE DO NOT RECOMMEND USE OF THIS PRODUCT ON VEHICLES PAINTED WITHIN THE PAST 90-120 DAYS. WE RECOMMEND YOU CHECK WITH THE PAINT & BODY SHOP THAT PAINTED YOUR VEHICLE FOR ADDITIONAL PRECAUTIONS.
PRE-INSTALLATION CHECKLIST
Lay the mask on the front of the vehicle in the general position it would be in after installation. Review each section below and notethose that are applicable for your installation.
BUMPERS - Most passenger vehicle applications fit OVER the front bumper. The majority of the truck, van and utility vehicle applications are positioned BEHIND the bumper to allow use of accessories like push bars, brush guards, fog lights, etc.
LICENSE PLATES - Many states do not require front license plates. Covercraft masks are designed with a flap made of matching vinyl and/or screen which is sewn into the area used for mounting the license. If your vehicle has a front license plate, carefully remove the flap by cutting the vinyl/screen flap as close as possible to the binding on the underside of the mask.
SIDE CORNERING LIGHTS - Some vehicles have optional side cornering lights, CAREFULLY remove the corresponding flap portion of the mask by cutting the vinyl from the UNDERSIDE of the mask. If your vehicle does not have the cornering lights, leave the flaps in place.
HOOK AND LOOP (or Velcro®) - Hook and loop is a very strong fastening material widely used in place of snaps and zippers. Mating pieces can be attached and separated from each other many times. The tearing sound produced when separating hook and loop will not damage or weaken it. Once installed, it is not necessary to remove the hook when the mask is not being used. HOOK is either laminated on a "U" shaped trim lock or ADHESIVE BACKED. LOOP is sewn directly on the mask or sewn on the underside of the tabs that bend around the wheel well openings.
ADHESIVE BACKED HOOK - Thoroughly clean and dry the surface of the area where the adhesive backed hook is to be installed BEFORE removing paper backing. We recommend isopropyl (rubbing) alcohol as the cleaning agent.
HOOK BACKED "U" SHAPED TRIMLOK® - Introduction of flat, inner wheel well liners made the use of "U" shaped TrimLok hook necessary. The TrimLok must be installed on the inside edge of the front fenders, on the edge of the liner or inside edge of the bumpers.
If the liner is ON TOP of the inside edge of the front fenders, install the TrimLok on the edge of the LINER. If the liner is UNDER the inside edge of the fender, install the TrimLok on the inside edge of the FENDER. PLEASE NOTE: The hook surface MUST BE facing the tires.
