 FREE 1 to 3-Day Delivery on Orders $149+ Details
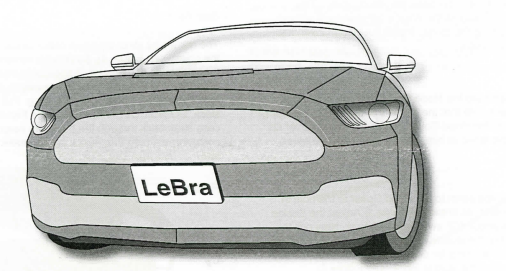
How to Install Covercraft LeBra Front End Cover on your Mustang

Shop Parts in this Guide
Before installation, wash and wax your vehicle. Use a paste wax-not a spray-on the hood and fenders in order to maintain the finish underneath the LeBra® Front End Cover.
Install the LeBra® Front End Cover in temperatures of ?O'F (21 'C) or higher. The warmth will make the fabric more pliable and will allow it to stretch slightly for a tighter and smoother fit.
Do not use vinyl cleaners or protectants on your LeBra® Front End Cover. These cleaners reduce the breathability of the vinyl and will void the Covercraft Warranty.
Do not install the LeBra® Front End Cover on any vehicle that does not still have its original factory paint. Covercraft will not be held liable for any warranty claims of paint damage to repainted vehicles.
Remember that the LeBra® Front End Cover also protects paint from fading due to sunlight while the rest of the car is exposed. Covercraft will not be held liable for any warranty claims on sun-faded paint.
Caution: There may be elastic straps described in some sections of this manual that can snap back if not properly hooked. To avoid injuries, exercise caution and use safety glasses when installing.
Where available, always use the loops sewn to the cover to remove the plastic clips. DO NOT PULL UP ON THE CLIPS OR THE FABRIC TO REMOVE THE COVER. When removing the cover, it will be easiest to reverse the installation steps.
One of the features that makes your LeBra® Front End Cover the very best available is the separate Hood Cover. This means that you can access the engine compartment without removing or adjusting the cover. Install the Hood Cover first, by following these steps:
Step One
Open the hood and slip the Hood Cover over the front edge of the hood. Make sure that the corners of the hood fit snugly into the corners of the Hood Cover. When the Hood Cover fits snugly, stretch the fabric at straps to remove major wrinkles.
Step Two
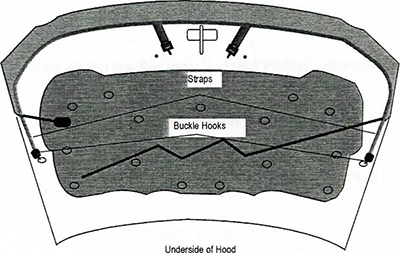
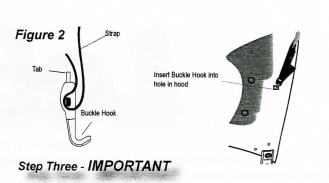
Pull one of the straps sewn to the Hood Cover to the hole in the hood's underside, as shown in Figure 1. Adjust the Buckle Hook so that it is about 1/2" away from the hole. Now pull the strap down and slip the Buckle Hook into the hole. To release the tension on the webbing for adjustment of the strap, simply pull out on the tab on the Buckle Hook (see Figure 2).
The Strap should be quite taut (as taut as possible without tearing). Relocate the Buckle Hook if necessary to tighten. Tie off excess strap to keep free of the engine compartment. Repeat this process for the other side.
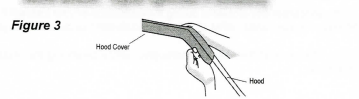
Step 3- IMPORTANT
With the Hood Cover in place, pull the fabric on the sides of the hood around to the underside of the hood on both sides. This will insure maximum tightness of the Hood Cover (see Figure 3). Note: Check all straps periodically to
insure tension. Adjust tightnes! if necessary.
Step 4
The remaining strap provides better tension and stability for the cover (see Figure 4). Stretch the remaining strap across the underside of the hood (if applicable strap must go behind prop rod) and thread it through the buckle on the opposite side (see Figure 4a). Do not twist the strap. Pull the strap to remove slack, DO NOT OVERTIGHTEN (see Figure 4b). Loop the excess strap back through the buckle to keep it out of the engine compartment (see Figure 4c). Again, make sure the strap is taut.
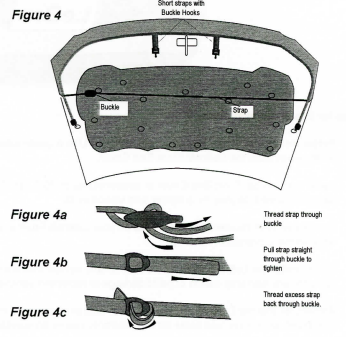
Step 5
Locate the shorter straps with buckle hooks sewn to the center of the cover (see Figure 4). Using the same operation as described for the the straps in Step Two, attach the buckle hooks into the holes as shown.
Note: If your vehicle is equipped with front parking assist sensors having the front end cover installed may interfere with the proper functioning of this feature.
Note: Instructions for license plate opening. Cut out the indented, rectangular area in the center of the cover, if you choose to use your front license plate. Be sure to cut inside and as close to the indentation as possible.
Installing the Front End Cover
This section explains how to install the front cover portion of your LeBra® Front End Cover.
Step One
Orient the cover on the vehicle. The bottom of the cover will have a small fabric identification tag sewn in. If necessary, slip the opening in the cover around the license plate bracket.
Note: Turn the wheels for easier access to the wheel wells.
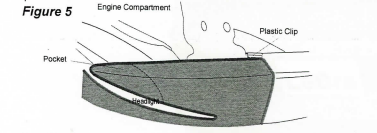
Step Two
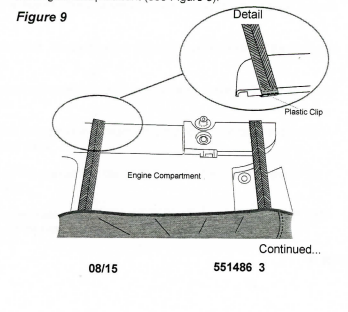
Pull the sides of the cover up over the fender and slip the pockets sewn into the cover over the front corners of the fenders,
above each headlight. Then locate the plastic clip sewn to the
cover on each side of the engine compartment (see Figure 5). Hook the clips to the ledge on each side of the engine com
partment.
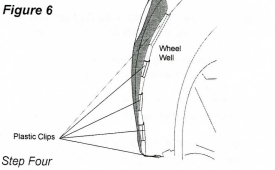
Step Three
Pull the cover back to one of the wheel wells and locate the five plastic clips sewn to the cover in the wheel well (see Figure 6). Hook them to the edge of the fender. Pull the cover around the front of the vehicle and attach it to the opposite wheel well.
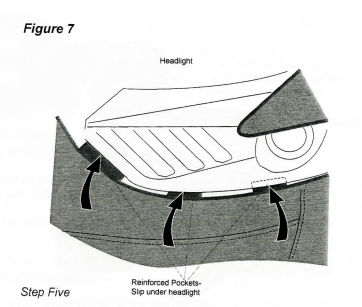
Step 4
Pull the cover up over the bumper and locate the three (3) reinforced pockets sewn to the cover under each headlight opening (see Figure 7). Slip the pockets as far as possible under the headlights.
Step 5
Pull the cover up over the grille. Slip the front edge of the header panel between the flap and the cover (see Figure 8). There are not any attachments associated with this flap. It is just placed around the header panel as a stabilizer for air getting into the grille screen. Keep the cover in position and proceed to the next step. WARNING-This step MUST be done as described. The vinyl side of the flap cannot lay on the painted surface of the header panel .
Step Seven
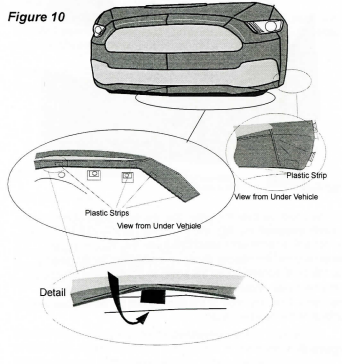
Locate the ten plastic strips sewn across the bottom front of the vehicle, eight across the front and one under each fender (see Figure 10). Slip the plastic strips into the break between the spoiler and the plastic guard under the vehicle.
Note: Where available, always use the loops sewn to the cover to remove the plastic clips. DO NOT PULL UP ON THE CLIPS OR THE FABRIC TO REMOVE THE COVER. When removing the cover, it will be easiest to reverse the installation steps.
"This completes the installation of your custom-designed front end cover."

