FREE 1 to 3-Day Delivery on Orders $149+ Details
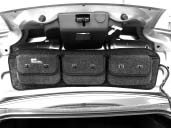
How to install a Covercraft Pocket Pod on your 2005-2009 Mustang
Installation
IMPORTANT
Pocket Pods™ are designed for easy storing of lightweight items
- As a general rule, do NOT exceed 3 pounds of weight per “pocket”
- Do NOT store liquids in pocket pods, when the trunk lid is closed they can spill
- Pocket Pods are molded of carpet-like material and are flexible - do NOT overload
- Excessive weight can affect the operation of raising and lowering the trunk lid
STEP 1
Locate hardware kit (included) Adhesion promoter ampule x 2 Alcohol prep pad x 2
STEP 2
The installation area surface under the trunk lid must be clean and free of any contaminants (e.g. oil, grease) to provide maximum adhesion for the pressure sensitive securing tape. If you have used oil, wax or silicone based protectants on the surfaces of your vehicle, the enclosed alcohol wipes will not remove all the protectants and cause adhesive failure. These protectants can be removed by using a mixture of 5 parts warm water, 1 part household ammonia, and 1 part liquid dish detergent. Wipe on with a clean towel, turning the towel frequently to ensure you do not reapply the protectant after it has been removed. Wipe surface dry with a clean towel.
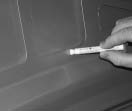
STEP 3
Clean the surface with the enclosed alcohol pads.
Wear latex gloves and eye protection when applying alcohol.
STEP 4
Wearing latex gloves and eye protection, crush the adhesive primer ampule by pressing on the dot. Apply the adhesive primer to the area on the underside of the trunk lid that will be covered by the Custom Pocket PodsTM pressure sensitive securing tape.
STEP 5
Vehicle and Custom Pocket PodsTM assembly must be between 60 degrees F (minimum) and 100 degrees F (maximum) during installation.
STEP 6
When affixing the Custom Pocket PodsTM to the underside of trunk lid, make certain positioning is correct as damage may occur if removal is attempted after installation.
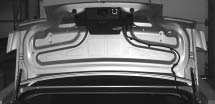
STEP 7
See Illustration. Position the Custom Pocket PodsTM into depressed area on the underside of the trunk lid. Do not remove protective paper backing from pressure sensitive tape at this time. Place reference marks on the underside of the trunk lid and the Custom Pocket PodsTM if necessary.
STEP 8
Remove the Custom Pocket PodsTM from the vehicle and lay flat with backside (tape side) facing up. Peel back appoximately two inches of the protective paper backing on the left or right side of the Custom Pocket PodsTM to partially expose adhesive.
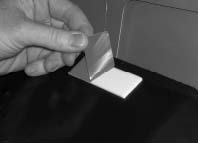
STEP 9
Place the Custom Pocket PodsTM in position. Next, press the exposed adhesive until it adheres to inner trunk lid surface.
STEP 10
Pull back the free side of the Custom Pocket PodsTM enough to remove the remaining paper backing from adhesive.
STEP 11
Push the free side slowly into place, carefully maintaing correct positioning. Press firmly on outer edges and surfaces inside each storage pouch to insure proper adhesion.