 FREE 1 to 3-Day Delivery on Orders $149+ Details
How to Install Davies Craig Electric Water Pump Header-Adapter Kit on your Mustang

Shop Parts in this Guide
Congratulations on your purchase of the Davies, Craig Ford Coyote EWP® Header-Adaptor Kit. It has been designed for use with an Electric Water Pumps (EWP®) and Davies, Craig Thermatic® Fans to replace your belt-driven mechanical fan and pump.
You will find details for identifying the most suitable EWP® and Thermatic® Fan on our website www.daviescraig.com.au.
Note: This header adaptor plate is designed to fit in place of the original belt driven Mechanical Water Pump. Upon removing the Mechanical Water Pump, you will need to ensure that you have the correct sized belt for reconfiguration.
Installation Guidelines:
1. Remove the radiator cap then disconnect the bottom radiator hose to drain the coolant from both the radiator and engine into a clean tray. If the coolant is clean and free of foreign matter it may be reused. Retain the bottom radiator hose; you may require a section of this hose to complete your EWP® Coyote conversion.
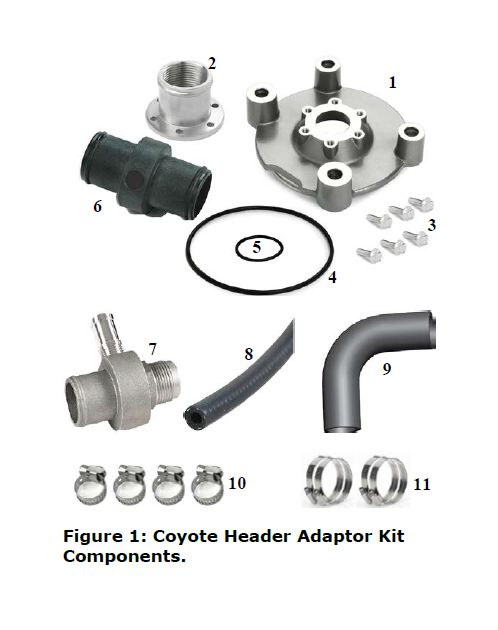
2. Loosen appropriate hardware and remove all belts i.e. water pump, alternator, air conditioning and power steering (if fitted). Disconnect heater return hose and remove the Mechancial Water Pump from the Engine Block. (refer Figure 1) Replacement belts will be required.
3. Retain the bolts from the detached mechanical water pump as these will be required to attach your Coyote EWP® Adaptor Plate. Clean the surface of the engine block to ensure it’s free of the old gasket and any grime or coolant.

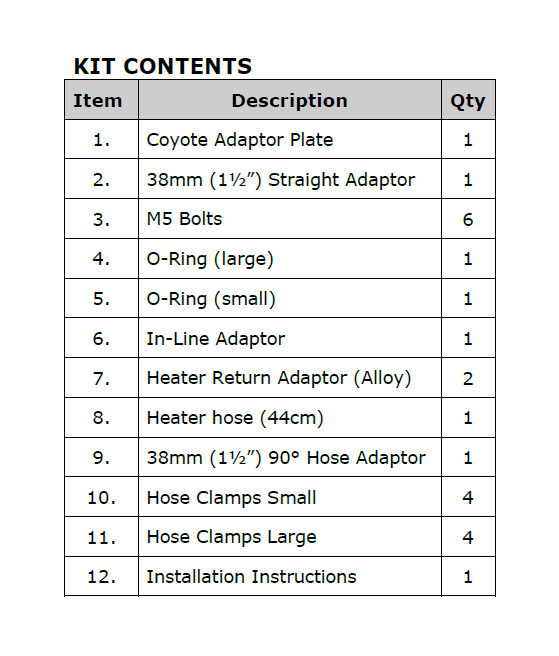
4. Pre-Assembly – take the Coyote EWP® Adaptor Plate and place the small O-Ring provided over the surface of the inlet. Secure the 38mm (1½”) Straight Adaptor onto the Coyote Adaptor Plate with the 6 x M5 Screws provided. When mounting the Straight Adaptor to the plate ensure the O-Ring is properly positioned. Take the large O-Ring and place in the groove provided in the rear of the Adaptor Plate.
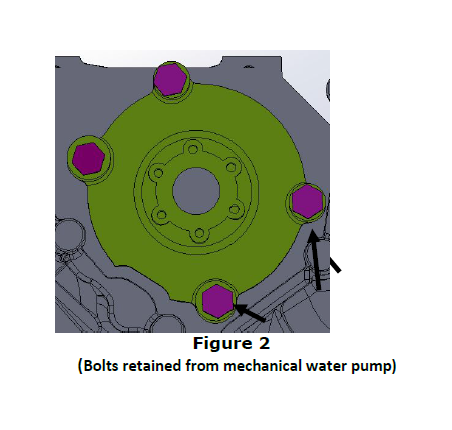
5. Slide the Coyote EWP® Adaptor Plate Assembly into the open profile of the existing
mechanical water pump, ensuring the large O-Ring sits comfortably in its groove and the mounting holes align with those on the engine block. Secure in place with the bolts from the mechanical water pump (refer Figure 2).
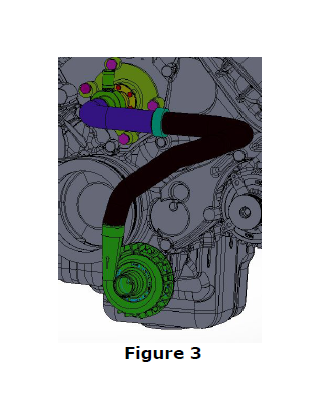
6. Secure the 90° hose supplied to the 38mm (1½”) Straight Adaptor with a hose clamp supplied. Slide another hose clamp over the bottom of the 90° hose and do not fully tighten.
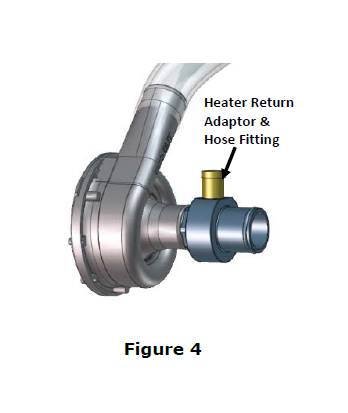
7. Place the Nylon In-Line Adaptor provided into the bottom of the 90° hose. Place a hose clamp provided in place, do not fully tighten. Connect a section of the bottom radiator hose (if serviceable) to the other end of the In-Line Adaptor with a hose clamp provided, (refer Figure 3), do not tighten. Screw the Heater Return Adaptor & Hose Fitting (refer Figure 3, if applicable) into the EWP® inlet then position and align the EWP® with the bottom radiator outlet. You may wish to use “Loctite” or Teflon tape for added security on the threads to ensure no coolant leaks develop. Secure the Heater Return Hose to hose fitting. Ensure your EWP® is located as low as possible relative to the Radiator outlet to avoid trapped air. Check you have enough length of bottom connector hose, (the remainder of your current bottom radiator hose may be suitable for this purpose,) connect the radiator hose with a hose clamp provided to the EWP® inlet. Then fit the other end to the bottom radiator outlet with a hose clamp.
8. Once you are satisfied with the initial assembly and alignment of your EWP® and header-adaptor kit conversion proceed with final assembly ensuring all hose clamps, screws and bolts are sufficiently tightened to prevent leaks. Careful not to over-tighten.
9. Follow the LCD EWP®/Fan Digital Controller installation instructions to complete this part of the EWP® conversion.
10. Refill the radiator and with the cap off, start the engine. Your EWP® and EWP®/Fan Digital Controller combination will commence its pre- programmed ‘test’ mode and operate the EWP at full speed for 5-10 seconds approx. Turn on heater to the maximum setting (if applicable). Run engine for around 10 minutes while carefully monitoring engine temperature. Top up coolant level as required. Switch off engine. If you are satisfied your cooling system is completely free of air, replace the radiator cap. Restart engine, run up to operating temperature checking all fittings are secure and observe for any leaks. Switch off engine and re-torque any fittings and hose clamps if required.
11. ‘Road test’ the vehicle. Again, turn the heater on to assist purging air from the cooling system. Allow engine to cool down, check coolant level again, topping up if required. Please repeat the above process until you are satisfied your engine’s cooling system is totally free of air, all hose clamps and hex cap screws are torqued up satisfactorily and there are no leaks. You should check your system again after another 20 hours operation.
These installation instructions will suit most applications but there are circumstances surrounding some engine designs, environments, and the nature of system involved, which may require other installation arrangements not outlined here. Frequently Asked Questions are listed on our website www.daviescraig.com.au Davies Craig Pty Ltd appreciates customer feedback. Emails can be directed to [email protected] or Telephone 61 (0) 3 9369 1234.
WARRANTY
Davies, Craig Pty Ltd hereby warrants these products for a period of two (2) years, 40,000km or 2000 hours continuous running (whichever is the lesser) from the date of purchase. Davies, Craig Pty Ltd shall carry out any repairs/replacement to the Electric Water Pump, EWP®/Fan Digital Controller and/or EWP® Header-Adaptor Kit free of cost provided that such fault is directly attributable to a defect in the workmanship or materials used in the manufacture of the Davies, Craig products supplied. Labour and consequential costs excluded.
