 FREE 1 to 3-Day Delivery on Orders $149+ Details
How to Install a Dual Gauge Pillar in your 1994-2004 Mustang

Shop Parts in this Guide
Installation
Congratulations! In your hands is an A-pillar gauge pod that represents the highest degrees of engineering, build-quality, and style. You have chosen a product that was born from the belief auto accessories should adhere to a higher standard. Assembled by hand in the USA, this pillar will give you the satisfaction of owning acustompart instead of the same old thing.
The installation of this part should be an enjoyable task, and may be accomplished with minimal mechanical knowledge and basic hand tools. The instructions will differ slightly from coupe to convertible, as the parts attach to the car in a different manner. These differences are clearly noted for your convenience.
Let’s get started on the install!
•Step One Removal of OEM A-Pillar
Hardtop Mustang:
Your factory pillar is attached to the car with a pair of metal clips that lock the pillar onto the metal frame of the windshield. To remove this part, work your fingers under the plastic of the pillar at the top of the windshield (where the pillar meets the headliner). Applying even pressure, pull the pillar away from its mounting point. A firm, slightly quick motion will release the upper clip with ease. Once the upper clip is free, continue to pull the pillar towards you to release the lower clip.
If you would like a little more help, refer to the video clip on our website!
Convertible Mustang:
All drop-top Mustangs have A-pillars attached to the car with the same metal clips found in the coupes. Most 1994-1998 Mustang convertibles will have two metal clips, just as with the coupes. 1999 and newer Mustangs have a third metal clip, located near the top of the pillar.
The biggest difference from the coupe is found at the top of the pillar, near where the convertible top meets the windshield. You will find a small, round plastic pushpin (matching in color to the pillar). A panel tool (preferably) or dull flathead screwdriver is required to work under the pin to remove it. Be careful and work slowly here, as the plastic is soft and the pin is reused when installing the new pillar.
Once the pushpin is removed, follow the coupe instructions for removal of the pillar.
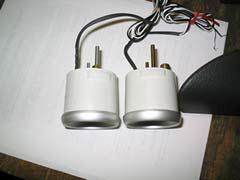
•Step Two Installation of 2 1/16” Gauges
Due to the wide variation of types and functions of gauges, we recommend you follow the manufacturer’s instructions for installation. There are some tips we’ll share once you are ready to mount the gauges in the pods.
Speed of Sound recommends placing any mechanical boost or boost/vacuum gauges in the lower bullet. This is recommended for a lesser strain on the
vacuum tubing from being bent excessively, possibly affecting the performance of the gauge. For best results, use an electronic gauge in the upper bullet.
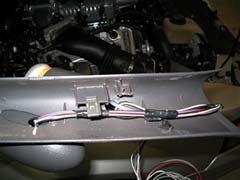
Route the wiring and tubing neatly and carefully inside the pillar. Be mindful of the mounting points (clip locations) to ensure no wiring is pinched or tubing is kinked. Refer to the photo for an example of proper wiring routing. (Example: Boost/Vacuum gauge and electric fuel psi gauge)
The pillar’s “bullets” are designed to house 2 1/16” gauges. Autometer is the brand of choice at Speed of Sound, and exhibit a perfect fit. Should your gauge require a more snug fit, simply attach a small piece of Velcro (only one side, hook or loop, about the size of half a postage stamp) or a single wrap of electric tape at the rear of the gauge. This will ensure a firm fit.
We recommend you wait until the installation is complete before you completely seat the gauges in the bullets. Align the gauges in your preferred angle first, and then press them into the bullets. Use one hand to press the gauges in, while using your other hand to support the bullet from the back. Keeping the bullet steady will reduce any unwanted pressure at the joints where the bullets meet the pillar.
•Step Three Installation of Gauge Pillar
Before completely re-installing the pillar, check to ensure the gauges are working properly. Once all gauge functions are confirmed OK, proceed to the completion of the installation.
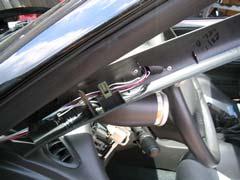
Once the gauges are wired and ready for final installation you can attach your new pillar. Your new pillar uses the same mounting clips and attachment points as the original factory part. Installation is essentially the opposite of the removal process. Refer to the photo, or video on our website, as needed.
For best results, align the new pillar starting from the end closest to the dashboard. Check and correct as needed any slack wiring/tubing as you fit the pillar into place. Insert the lower guide pin and clip into place, pressing lightly to lock it into its attachment point. Now,
move the upper clip into position. Once both clips are aligned press firmly to seat the clips to their original fit.
For convertibles, replace the pushpin at the top of the pillar as your final step.
Sit back in the driver’s seat and admire your work! Better yet, check all gauge connections and sending units and go for a drive!
